🐭 How To Draw A Mouse Step By Step

& Painting
No rigid rules or pretension. Just practical guides, medium comparisons, and encouraging tips to help you enjoy the drawing & painting process.
Learning to draw can feel daunting, especially when trying to capture the charm of a small creature.
I remember my first attempts at drawing mice, often ending up with something more akin to a blob with ears.
This guide comes from countless hours of practice and observation, designed to make your journey smoother and more rewarding.
Quick Overview
You’re about to embark on a fun artistic adventure, transforming simple shapes into an adorable mouse.
By the end of this guide, you’ll have a complete drawing and the confidence to sketch many more.
- Time needed: 30-60 minutes (depending on detail)
- Difficulty: Beginner
- What you’ll need: Pencil (HB, 2B), eraser, paper
Step-by-Step Instructions
Step 1: Sketch the Basic Shapes for the Body
Begin by lightly sketching two overlapping ovals on your paper. These will form the foundation of your mouse’s body.
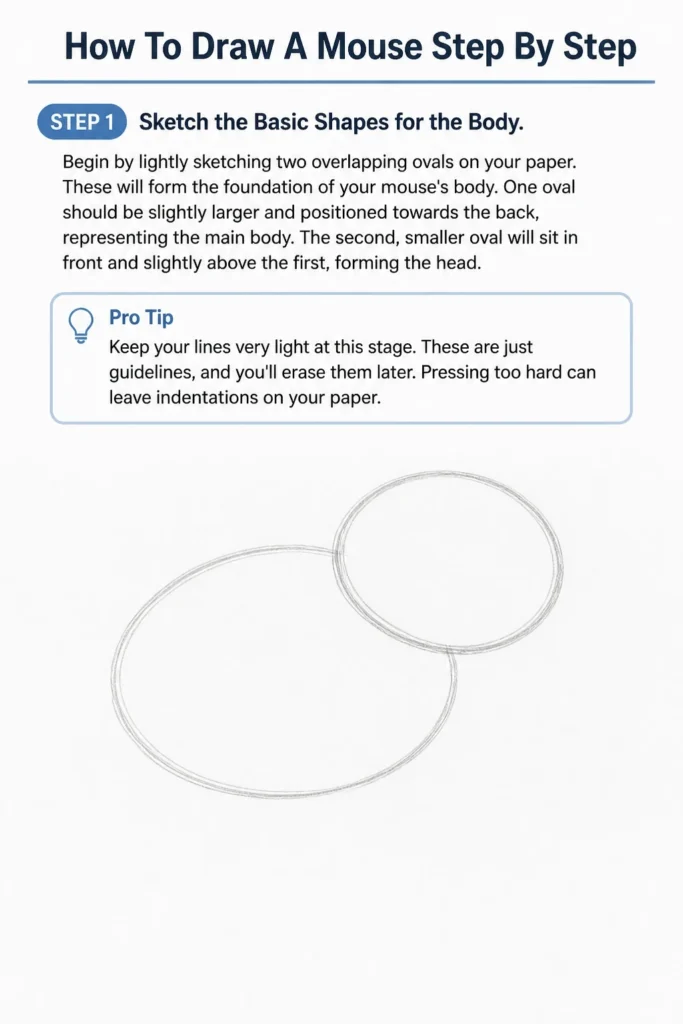
One oval should be slightly larger and positioned towards the back, representing the main body.
The second, smaller oval will sit in front and slightly above the first, forming the head.
Pro Tip: Keep your lines very light at this stage. These are just guidelines, and you’ll erase them later. Pressing too hard can leave indentations on your paper.
Step 2: Connect the Head and Body
Now, gently connect the two ovals with smooth, curved lines to establish the mouse’s neck and back.
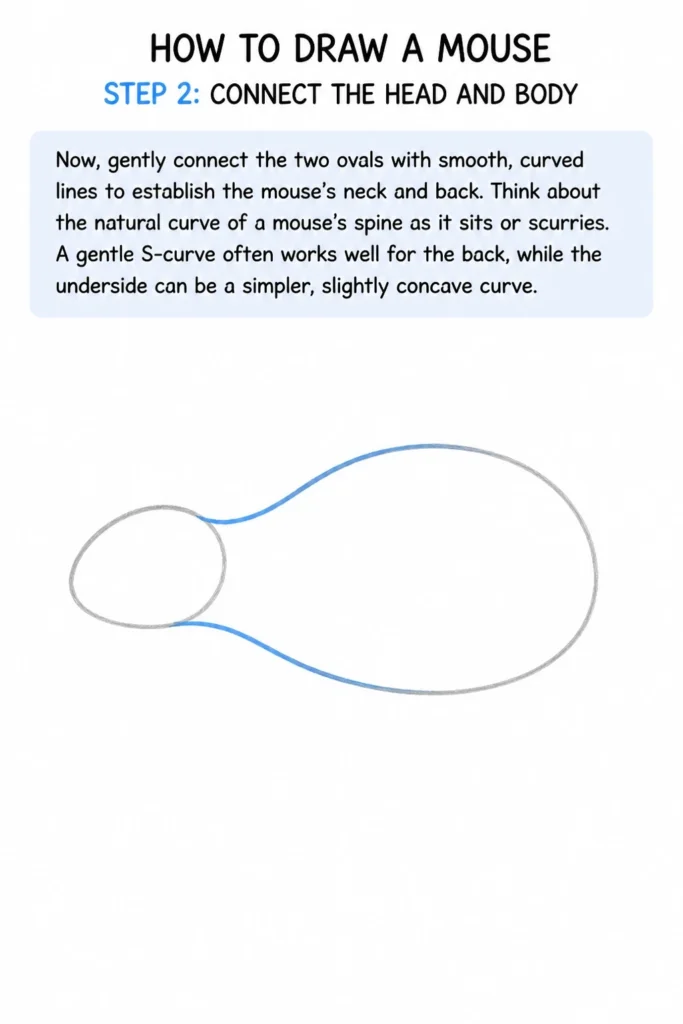
Think about the natural curve of a mouse’s spine as it sits or scurries.
A gentle S-curve often works well for the back, while the underside can be a simpler, slightly concave curve.
Step 3: Add the Ears and Snout
Draw two prominent, rounded circles on top of the head oval for the ears.
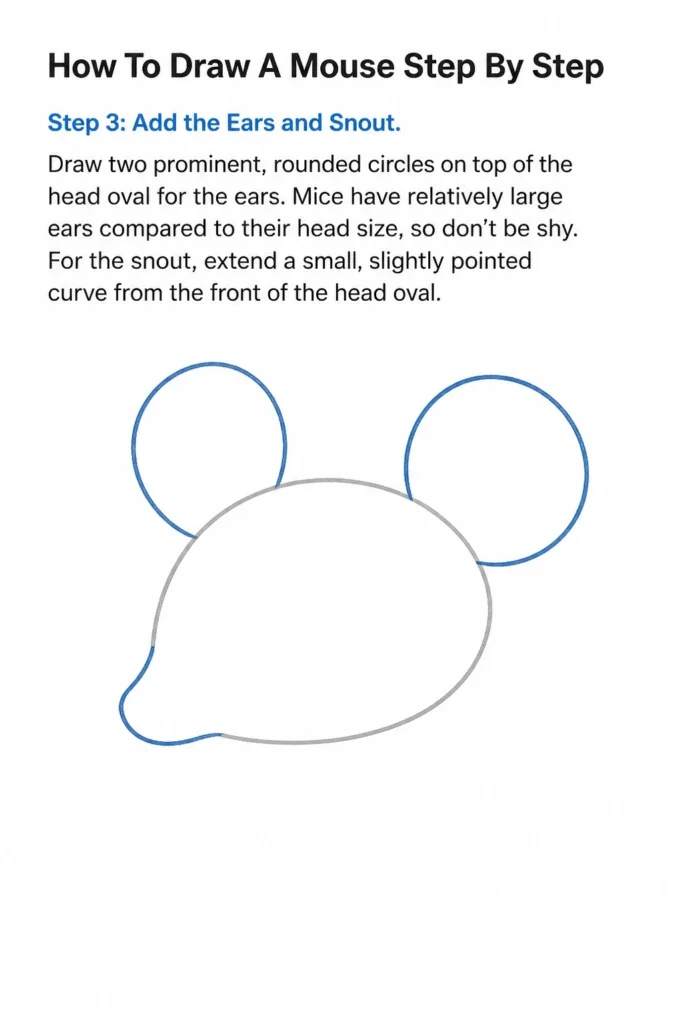
Mice have relatively large ears compared to their head size, so don’t be shy.
For the snout, extend a small, slightly pointed curve from the front of the head oval.
Step 4: Place the Legs and Paws
Sketch four small, simple shapes for the legs and paws.
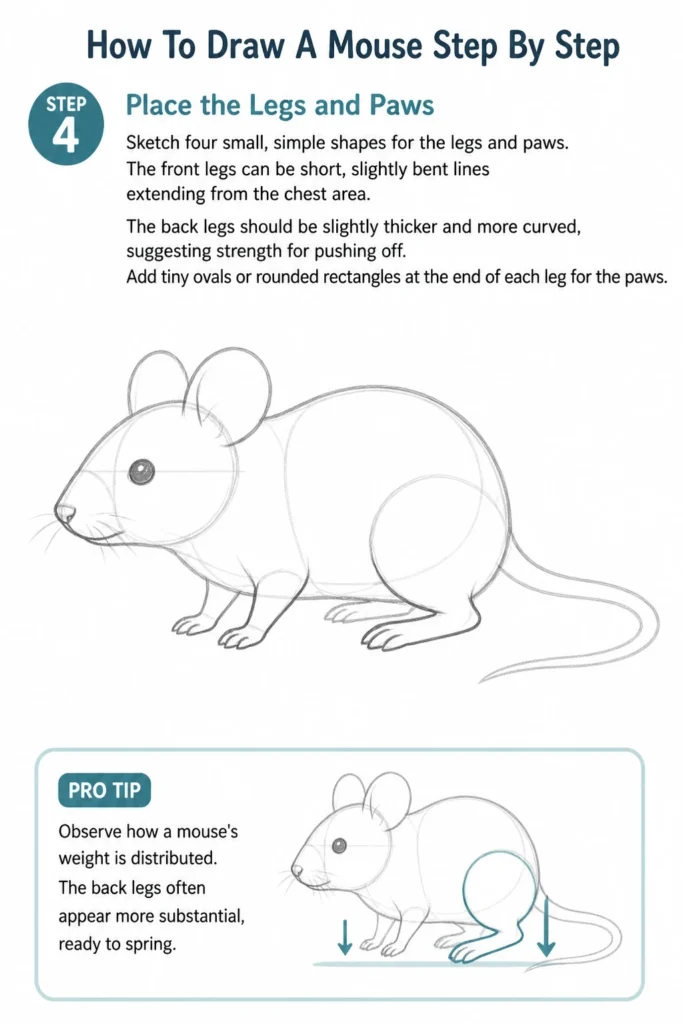
The front legs can be short, slightly bent lines extending from the chest area.
The back legs should be slightly thicker and more curved, suggesting strength for pushing off.
Add tiny ovals or rounded rectangles at the end of each leg for the paws.
Pro Tip: Observe how a mouse’s weight is distributed. The back legs often appear more substantial, ready to spring.
Step 5: Draw the Long, Thin Tail
A mouse’s tail is a defining feature. Draw a long, thin, tapering line extending from the back of the body.
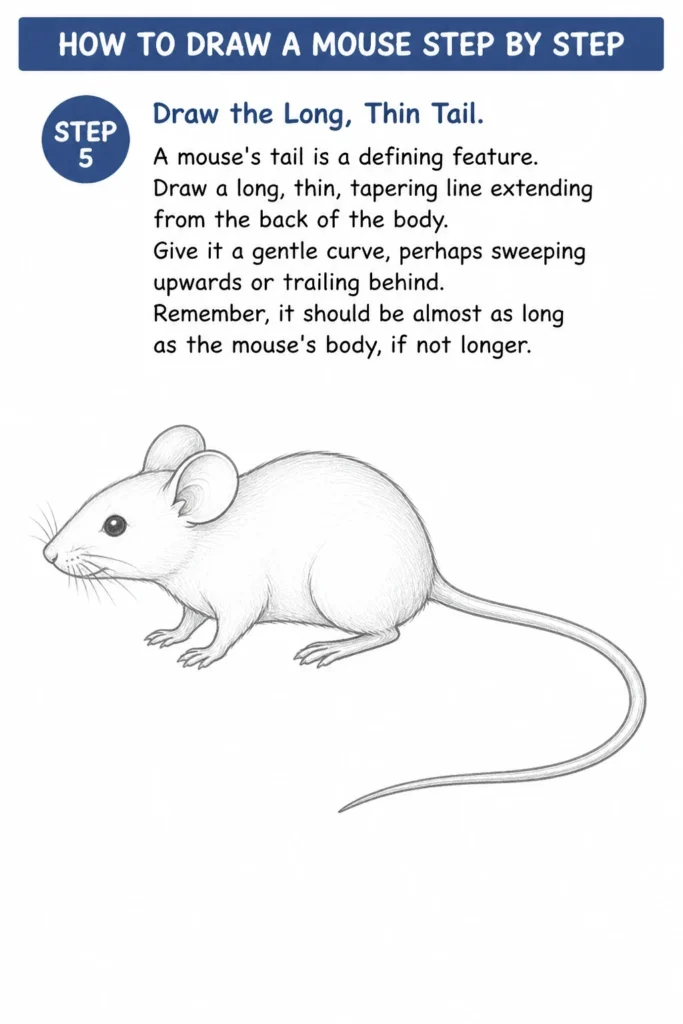
Give it a gentle curve, perhaps sweeping upwards or trailing behind.
Remember, it should be almost as long as the mouse’s body, if not longer.
Step 6: Refine the Outline and Add Facial Features
Go over your light sketch, refining the overall outline of the mouse.
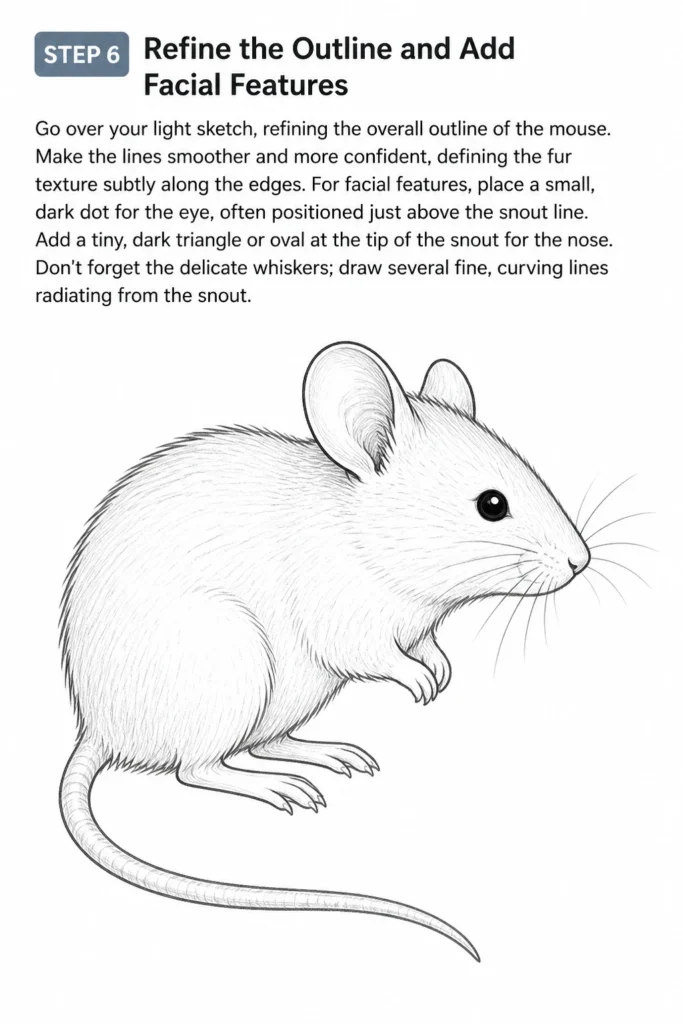
Make the lines smoother and more confident, defining the fur texture subtly along the edges.
For facial features, place a small, dark dot for the eye, often positioned just above the snout line.
Add a tiny, dark triangle or oval at the tip of the snout for the nose.
Don’t forget the delicate whiskers; draw several fine, curving lines radiating from the snout.
Step 7: Erase Guidelines and Add Details
Carefully erase all the initial construction lines and overlapping shapes.
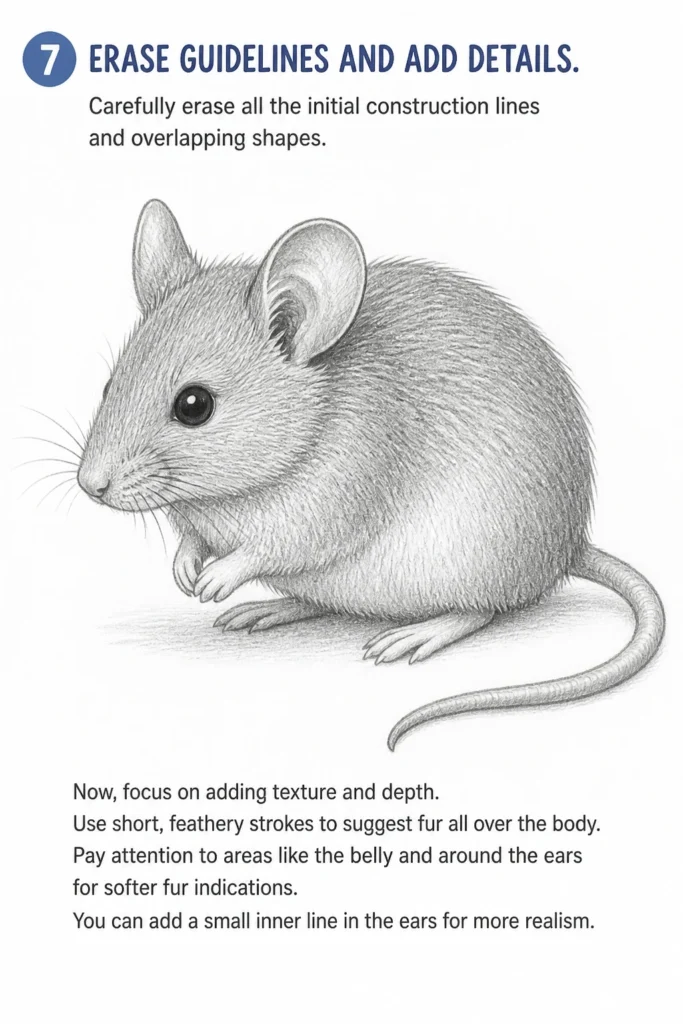
Now, focus on adding texture and depth. Use short, feathery strokes to suggest fur all over the body.
Pay attention to areas like the belly and around the ears for softer fur indications.
You can add a small inner line in the ears for more realism.
Step 8: Shade for Depth and Realism
Using a softer pencil (like a 2B), begin to add shading to give your mouse dimension.
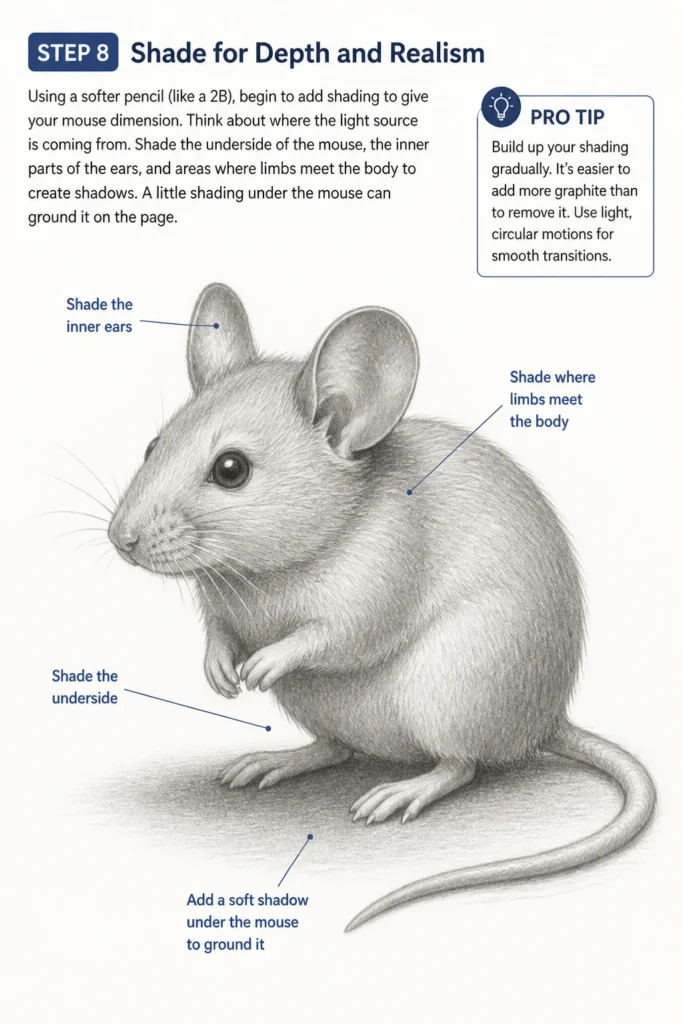
Think about where the light source is coming from.
Shade the underside of the mouse, the inner parts of the ears, and areas where limbs meet the body to create shadows.
A little shading under the mouse can ground it on the page.
Pro Tip: Build up your shading gradually. It’s easier to add more graphite than to remove it. Use light, circular motions for smooth transitions.
Common Mistakes to Avoid
Disproportionate Features
One common pitfall is making the head too large or too small compared to the body, or giving the mouse tiny ears.
Mice have relatively large heads and ears in proportion to their compact bodies.
Always double-check your initial ovals to ensure they have a realistic size relationship before adding details.
Stiff or Lifeless Poses
Drawing a mouse as a static, rigid shape can make it look unnatural. Mice are dynamic creatures.
Avoid straight lines where curves should be, especially for the back and tail.
Introduce subtle bends and angles in the limbs to suggest movement or a relaxed posture.
Over-Detailed Fur
While fur texture is important, overdoing individual hairs can make your mouse look hairy rather than furry.
Instead of drawing every single strand, use short, directional strokes that follow the contours of the body.
Focus on implying texture through shading and slight variations in line rather than drawing explicit hairs.
Flat Appearance Due to Lack of Shading
A drawing without proper shading can look two-dimensional, lacking volume and depth.
Neglecting to add shadows and highlights means the mouse won’t appear to exist in space.
Always consider a light source and apply shading to create roundness and dimension, especially on the belly, under the chin, and where limbs attach.
Troubleshooting
My Mouse Looks Too Cartoonish
If your mouse is looking more like a cartoon character than a realistic animal, consider refining your proportions and adding more subtle details.
Cartoons often exaggerate features, so try to tone down the size of the eyes or ears slightly if they seem too big.
Focus on softer, more natural curves for the body and less defined, more feathery lines for the fur texture.
I’m Struggling with Symmetry for the Ears/Eyes
Symmetry can be tricky, especially with organic shapes.
Instead of trying to draw both ears or eyes perfectly at once, draw one, then lightly sketch a guideline (like a horizontal line across the head) to help you place the second feature at a similar height and distance.
Remember that perfect symmetry isn’t always natural; slight variations can add character.
My Shading Makes the Mouse Look Dirty or Muddy
If your shading appears smudged or unclear, you might be pressing too hard or not blending smoothly.
Start with a very light touch, building up layers of graphite gradually.
Use consistent strokes in one direction or small, circular motions for a smoother blend.
Avoid using your finger to smudge, as this can introduce oils and create uneven patches; instead, use a blending stump or a clean cotton swab.
Key Takeaways
- Always start with light, basic shapes to establish proportion and pose.
- Mice have distinct features: large ears, prominent whiskers, and long tails.
- Refine your outline and erase guidelines carefully for a clean drawing.
- Use short, directional strokes to suggest fur rather than drawing individual hairs.
- Shading is crucial for adding depth, volume, and realism to your mouse.
- Practice observation; look at reference images of real mice to understand their anatomy.
Frequently Asked Questions
How can I make my mouse drawing look more unique?
To add uniqueness, experiment with different poses—a mouse nibbling cheese, standing on its hind legs, or peeking from a hole. You can also vary the ear shape slightly, add small tufts of fur, or give it a distinct expression with a slightly open mouth or tilted head.
What’s the best type of pencil for drawing animals?
A good range of graphite pencils is ideal. An HB pencil is excellent for initial sketches and general work, while a 2B or 4B allows for darker shading and richer tones. A harder pencil like a 2H can be used for very light details or initial guidelines.
Should I draw the mouse’s environment too?
Adding a simple environment, like a small piece of cheese, a blade of grass, or a faint shadow of a wall, can greatly enhance your drawing.
It helps to tell a story and grounds your mouse in a setting, making the overall composition more engaging.
How do I make the whiskers look delicate?
For delicate whiskers, use a very sharp pencil and apply minimal pressure. Draw them as fine, slightly curved lines radiating from the snout. Avoid making them too thick or perfectly straight, as real whiskers have a subtle organic quality.
Our Top Recommended Finds
- Sketchbook: A good quality sketchbook with smooth, durable paper prevents bleed-through and holds graphite well.
- Graphite Pencil Set: A set including HB, 2B, and 4B pencils provides versatility for sketching, detailing, and shading.
- Kneaded Eraser: This type of eraser is fantastic for lifting graphite without smudging and can be molded into fine points for precise erasing.
Your Next Creative Adventure Awaits
You’ve successfully drawn a charming mouse, a testament to your patience and developing skill.
Don’t stop here; the world of animal drawing is vast and full of delightful subjects.
Consider trying a squirrel or a rabbit next, applying the same foundational principles you’ve learned today.
Grab your pencil, find a quiet corner, and let your creativity flow onto the page once more!
& Painting
No rigid rules or pretension. Just practical guides, medium comparisons, and encouraging tips to help you enjoy the drawing & painting process.