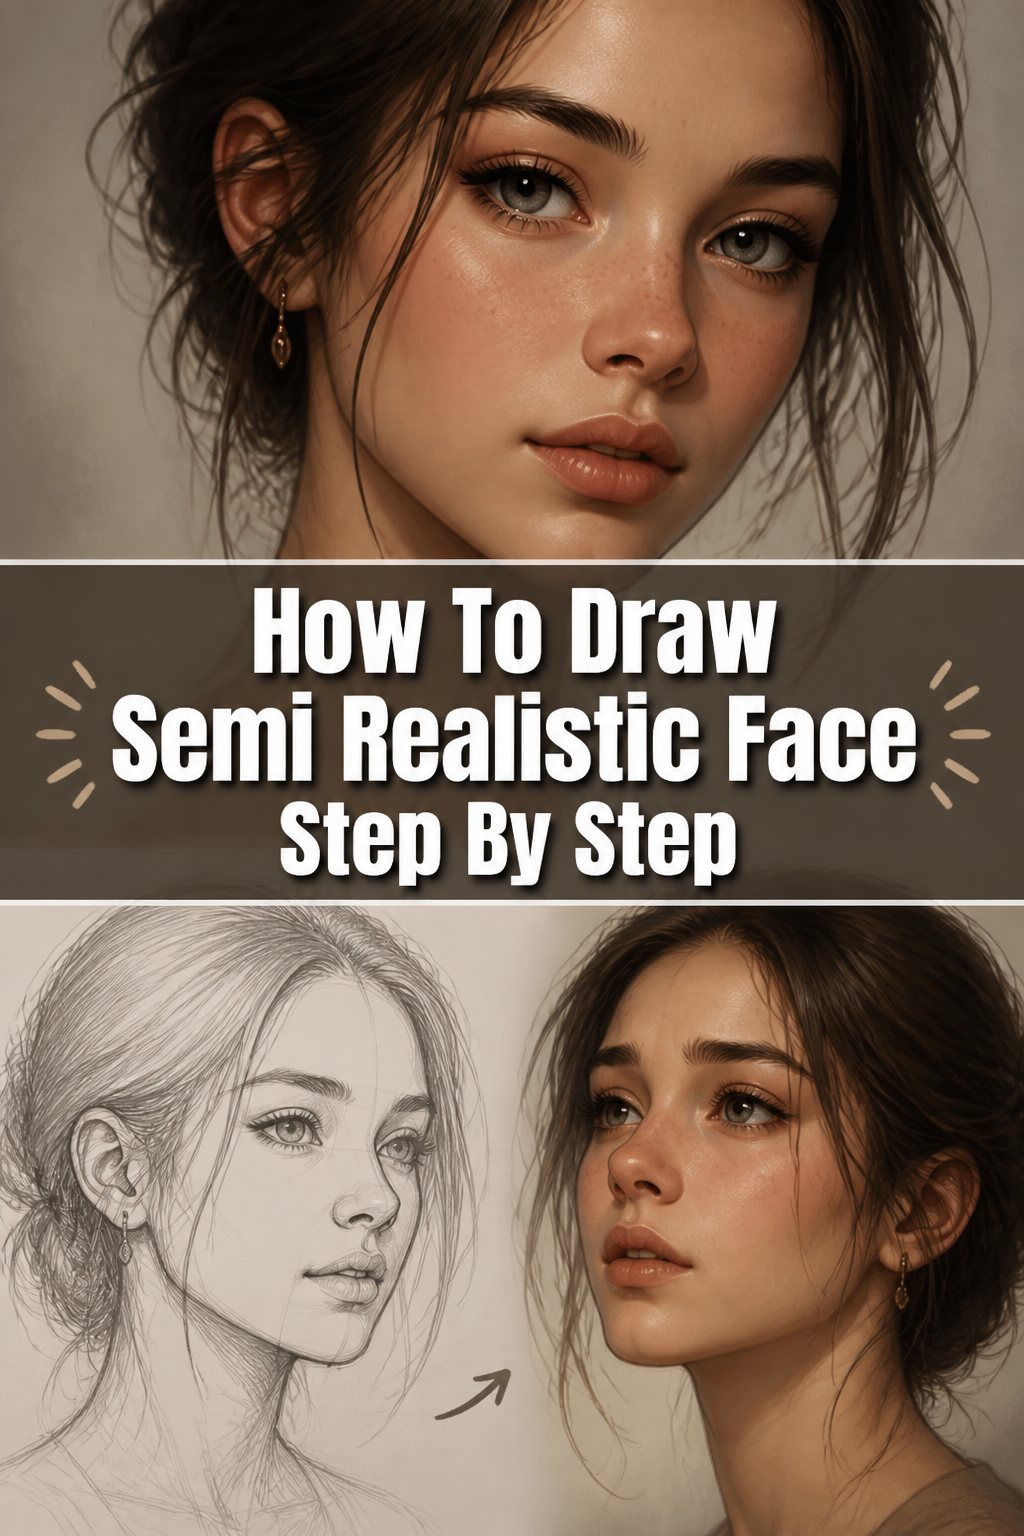
🎨 How To Draw Semi Realistic Face Step By Step

& Painting
No rigid rules or pretension. Just practical guides, medium comparisons, and encouraging tips to help you enjoy the drawing & painting process.
Learning to draw a semi-realistic face can feel like a daunting challenge at first.
I’ve spent countless hours refining this process, understanding the nuances that transform a flat sketch into something truly lifelike.
This guide breaks it all down, making the journey enjoyable and achievable for you.
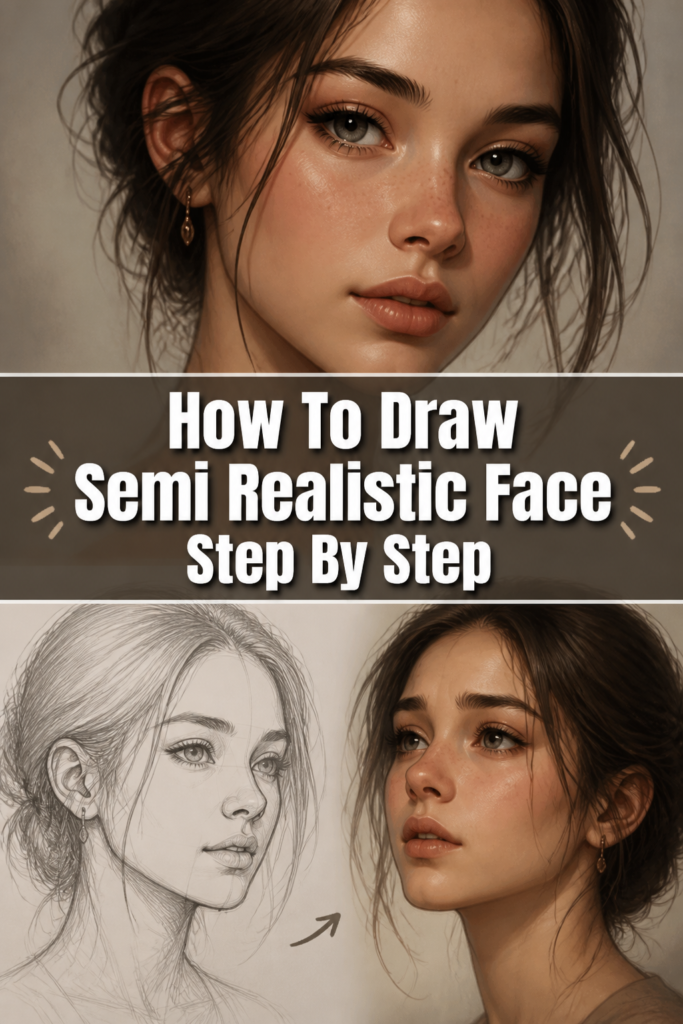
Quick Overview
This guide will walk you through the essential stages of constructing a semi-realistic face, from basic shapes to subtle shading.
You’ll learn to understand proportions, sculpt features, and add the depth that brings your portraits to life.
- Time needed: 1-3 hours (depending on detail and experience)
- Difficulty: Intermediate
- What you’ll need: Graphite pencils (HB, 2B, 4B, 6B), sketch paper, kneaded eraser, blending stump or cotton swab, reference photo (optional but recommended)
Step-by-Step Instructions
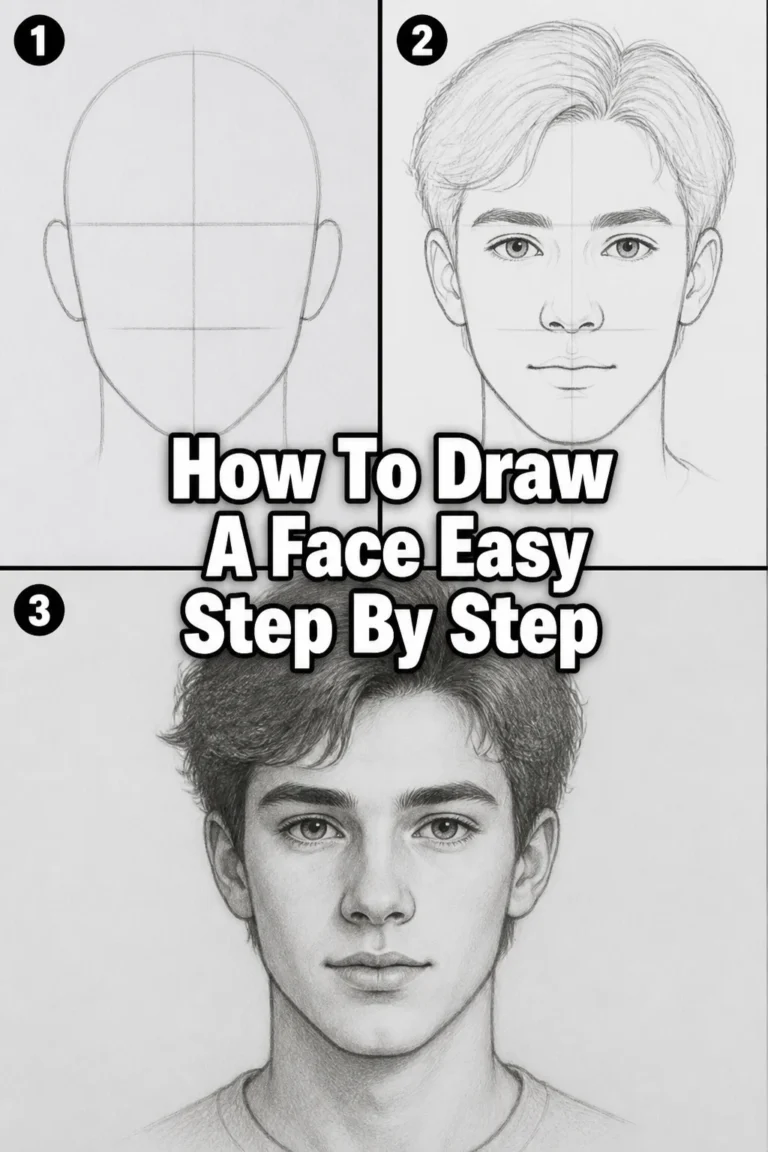
Step 1: Map the Basic Head Shape and Guidelines
Every great drawing begins with a solid foundation. We’ll start by defining the overall form and placement of the head.
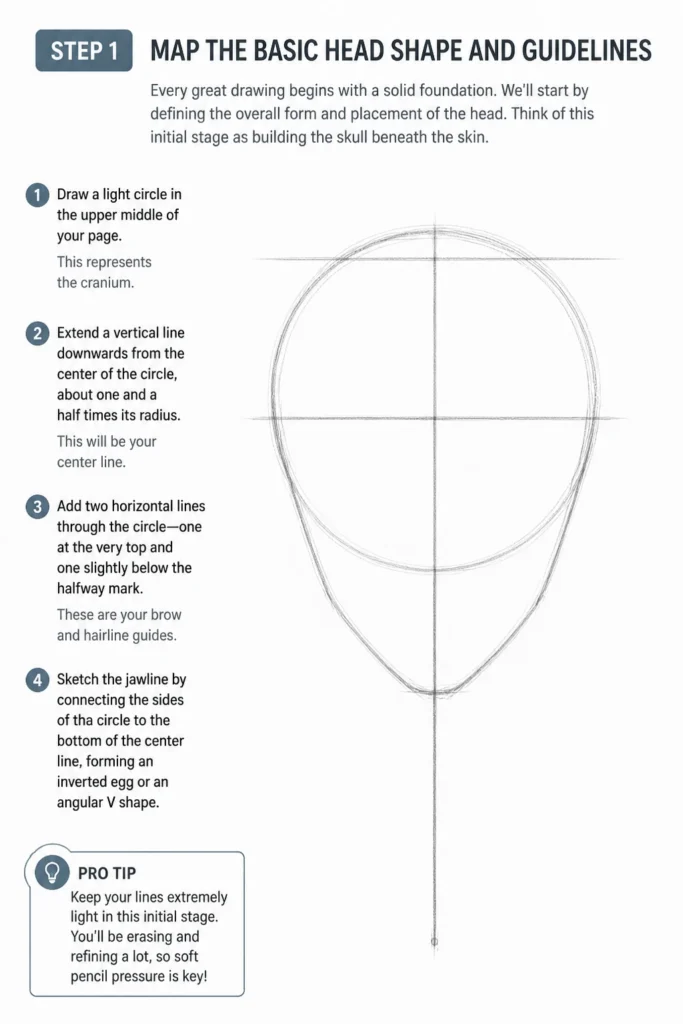
Think of this initial stage as building the skull beneath the skin.
- Draw a light circle in the upper middle of your page. This represents the cranium.
- Extend a vertical line downwards from the center of the circle, about one and a half times its radius. This will be your center line.
- Add two horizontal lines through the circle: one at the very top and one slightly below the halfway mark. These are your brow and hairline guides.
- Sketch the jawline by connecting the sides of the circle to the bottom of the center line, forming an inverted egg or an angular “V” shape.
Pro Tip: Keep your lines extremely light in this initial stage. You’ll be erasing and refining a lot, so a soft touch is key. Use an HB pencil.
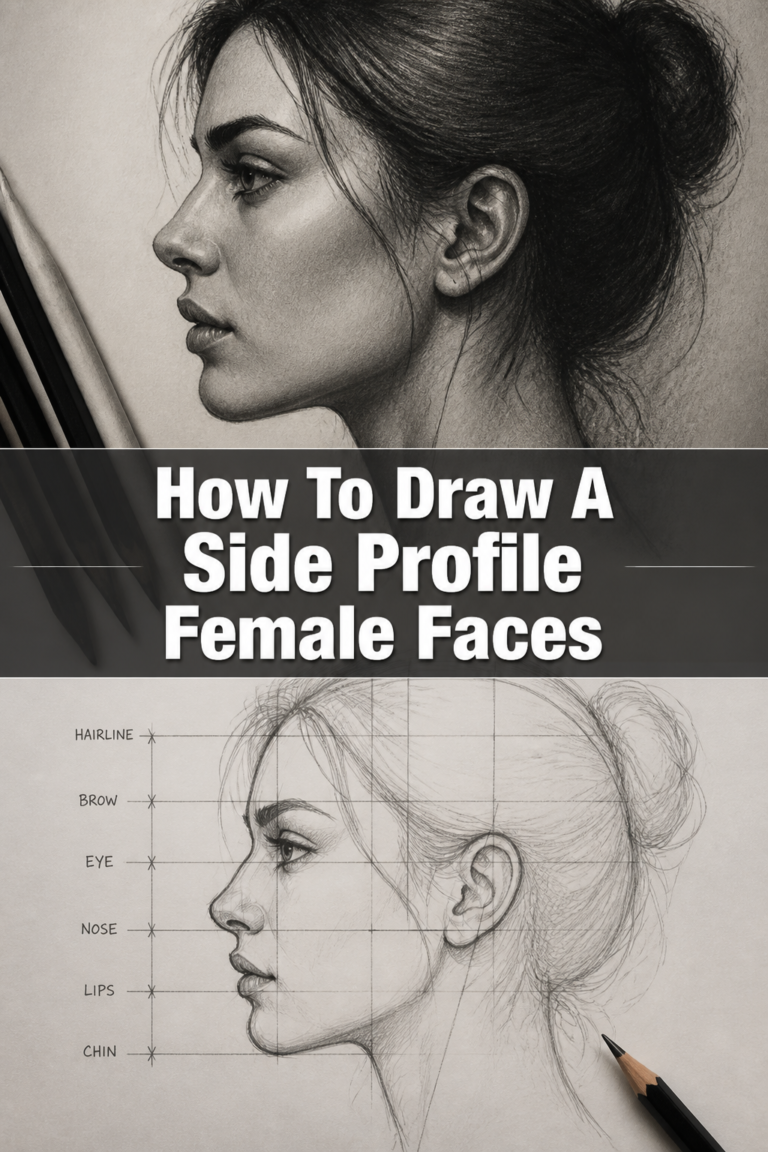
Step 2: Establish Major Proportions and Feature Placement
Accurate proportions are crucial for a realistic look. This step focuses on dividing the face into balanced sections.
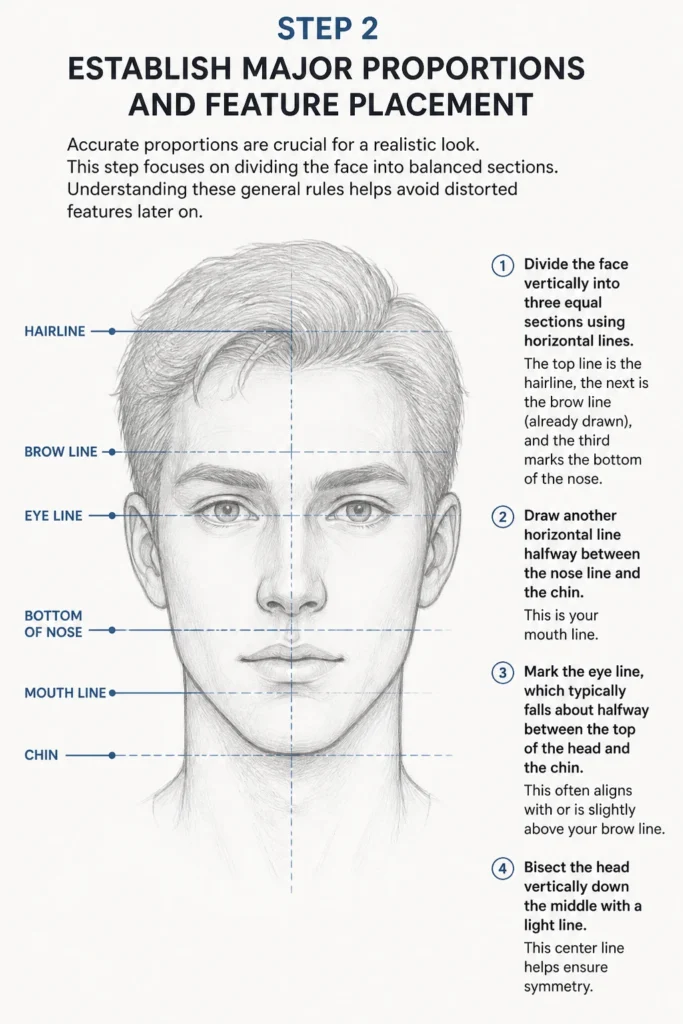
Understanding these general rules helps avoid distorted features later on.
- Divide the face vertically into three equal sections using horizontal lines. The top line is the hairline, the next is the brow line (already drawn), and the third marks the bottom of the nose.
- Draw another horizontal line halfway between the nose line and the chin. This is your mouth line.
- Mark the eye line, which typically falls about halfway between the top of the head and the chin. This often aligns with or is slightly above your brow line.
- Bisect the head vertically down the middle with a light line. This center line helps ensure symmetry.
Step 3: Sketch the Eye Sockets and Eyes
The eyes are often considered the windows to the soul, and their correct placement and shape are vital for expression.
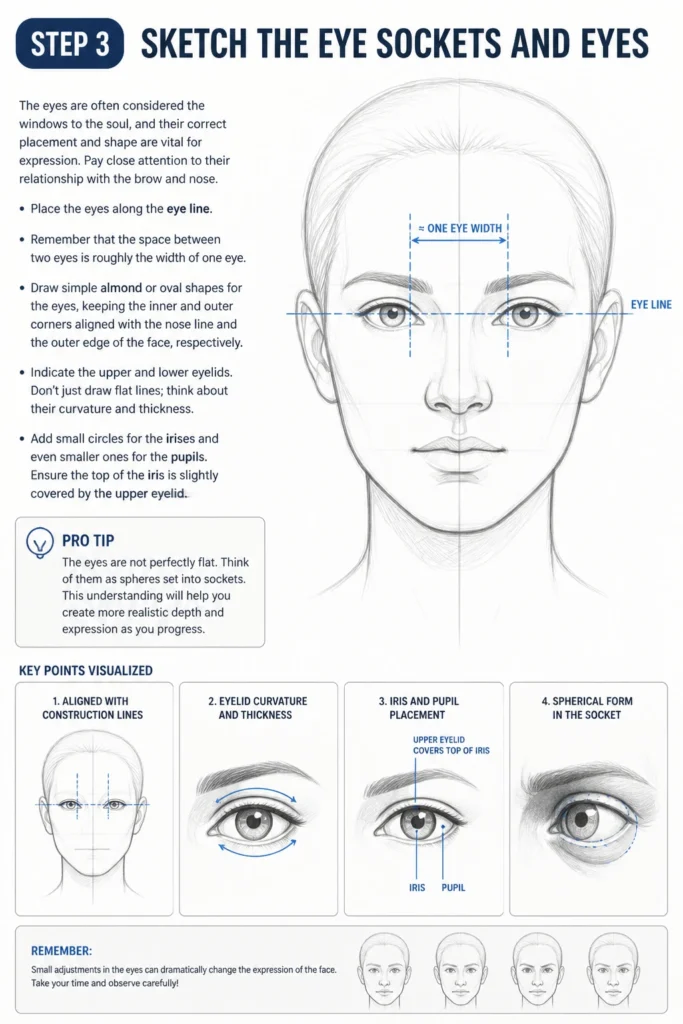
Pay close attention to their relationship with the brow and nose.
- Place the eyes along the eye line. Remember that the space between two eyes is roughly the width of one eye.
- Draw simple almond or oval shapes for the eyes, keeping the inner and outer corners aligned with the nose line and the outer edge of the face, respectively.
- Indicate the upper and lower eyelids. Don’t just draw flat lines; think about their curvature and thickness.
- Add small circles for the irises and even smaller ones for the pupils. Ensure the top of the iris is slightly covered by the upper eyelid.
Pro Tip: The eyes are not perfectly flat. Think of them as spheres set into sockets. This understanding will help you with shading later.
Step 4: Define the Nose Structure
The nose can be one of the most challenging features due to its complex planes and subtle curves.
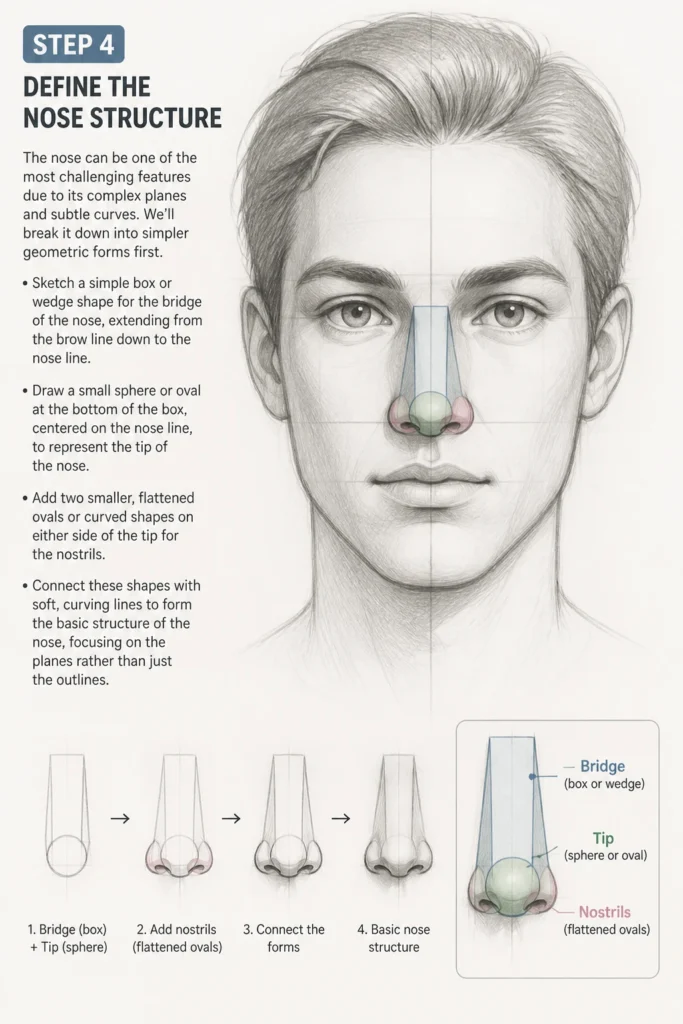
We’ll break it down into simpler geometric forms first.
- Sketch a simple box or wedge shape for the bridge of the nose, extending from the brow line down to the nose line.
- Draw a small sphere or oval at the bottom of the box, centered on the nose line, to represent the tip of the nose.
- Add two smaller, flattened ovals or curved shapes on either side of the tip for the nostrils.
- Connect these shapes with soft, curving lines to form the basic structure of the nose, focusing on the planes rather than just the outlines.
Step 5: Form the Mouth and Lips
The mouth is highly expressive and requires careful attention to its subtle curves and volume.
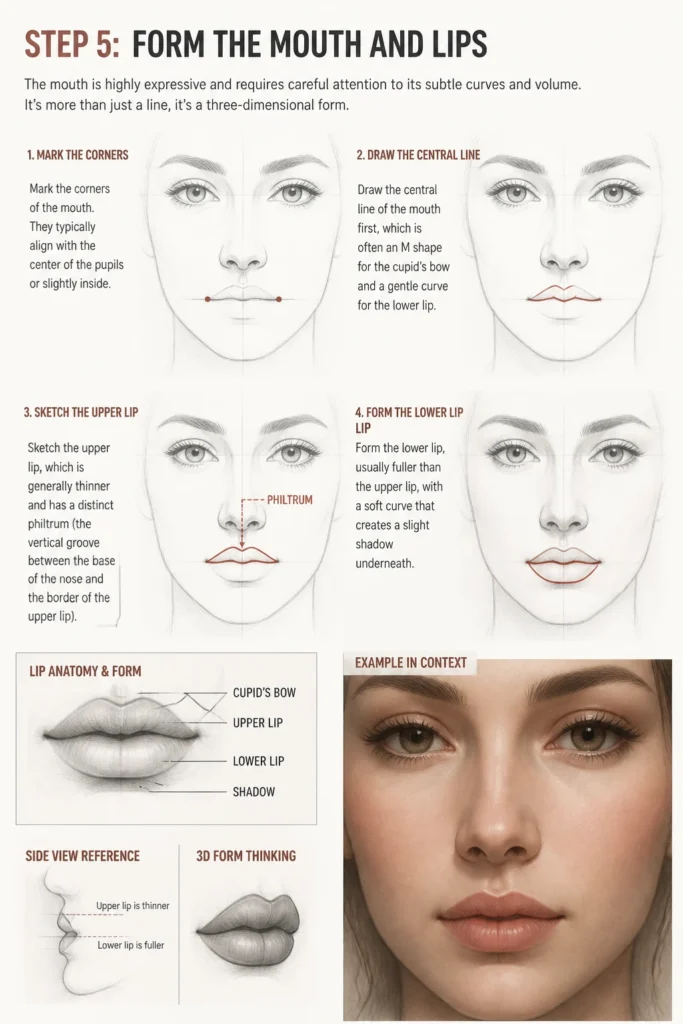
It’s more than just a line; it’s a three-dimensional form.
- Mark the corners of the mouth. They typically align with the center of the pupils or slightly inside.
- Draw the central line of the mouth first, which is often an “M” shape for the cupid’s bow and a gentle curve for the lower lip.
- Sketch the upper lip, which is generally thinner and has a distinct philtrum (the vertical groove between the base of the nose and the border of the upper lip).
- Form the lower lip, usually fuller than the upper lip, with a soft curve that creates a slight shadow underneath.
Step 6: Place the Ears and Hairline
Ears are often overlooked but contribute significantly to the overall realism and character of a face.
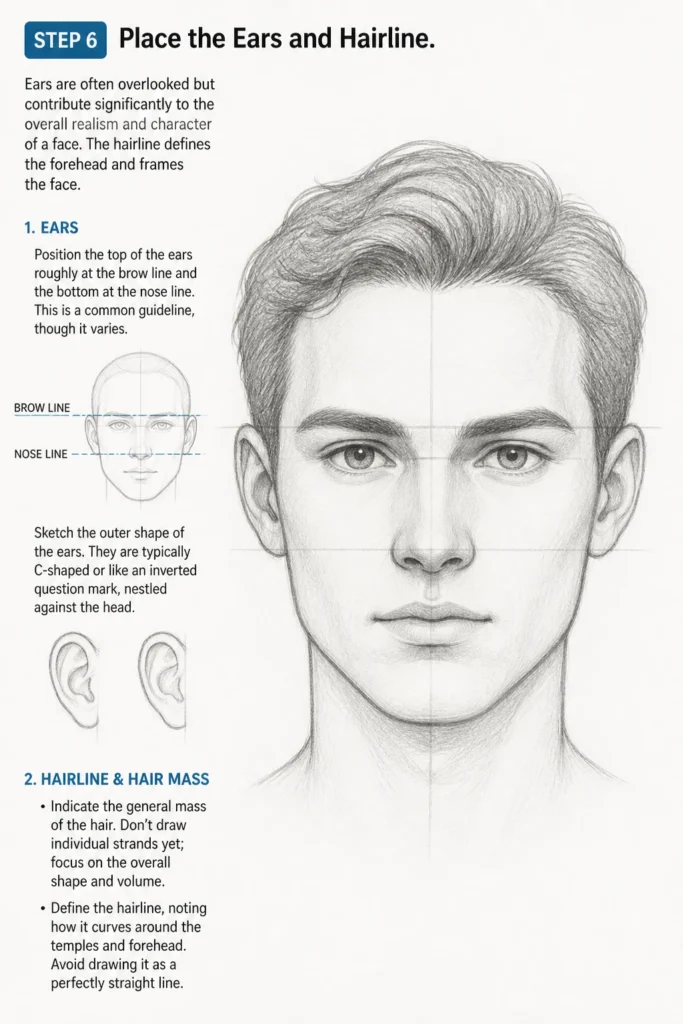
The hairline defines the forehead and frames the face.
- Position the top of the ears roughly at the brow line and the bottom at the nose line. This is a common guideline, though it varies.
- Sketch the outer shape of the ears. They are typically C-shaped or like an inverted question mark, nestled against the head.
- Indicate the general mass of the hair. Don’t draw individual strands yet; focus on the overall shape and volume.
- Define the hairline, noting how it curves around the temples and forehead. Avoid drawing it as a perfectly straight line.
Step 7: Refine Features and Add Subtle Sculpting
Now that all the major features are in place, it’s time to refine the forms and begin to sculpt the face.
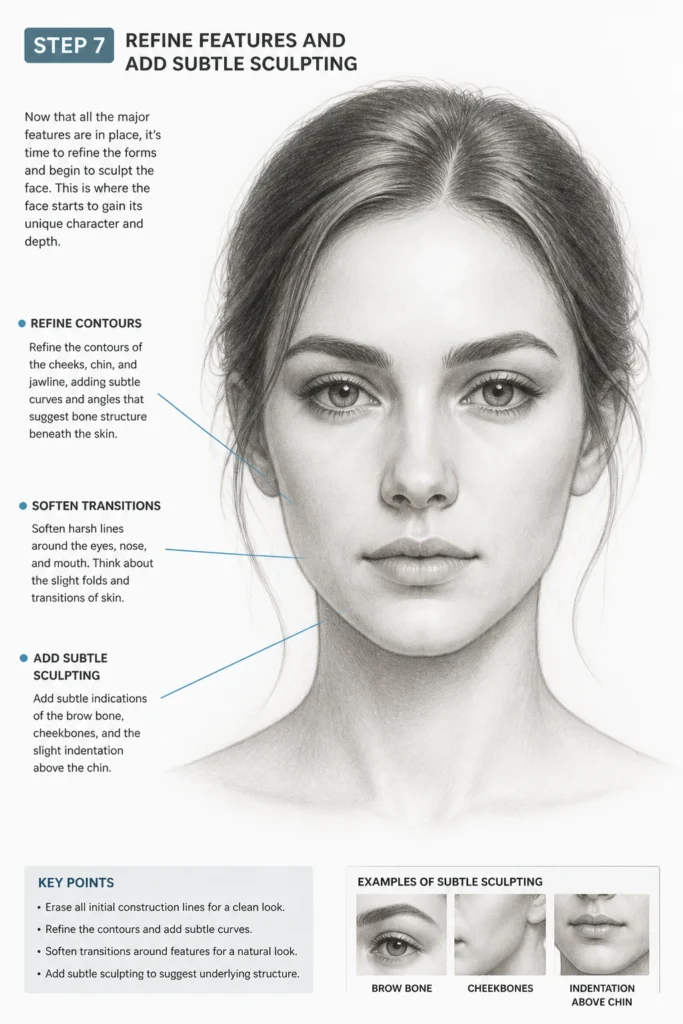
This is where the face starts to gain its unique character and depth.
- Erase all your initial light construction lines. You should now have a clean outline of the face and its features.
- Refine the contours of the cheeks, chin, and jawline, adding subtle curves and angles that suggest bone structure beneath the skin.
- Soften harsh lines around the eyes, nose, and mouth. Think about the slight folds and transitions of skin.
- Add subtle indications of the brow bone, cheekbones, and the slight indentation above the chin.
Step 8: Begin Shading and Texturing
Shading transforms a flat drawing into a three-dimensional form, giving it volume and realism.
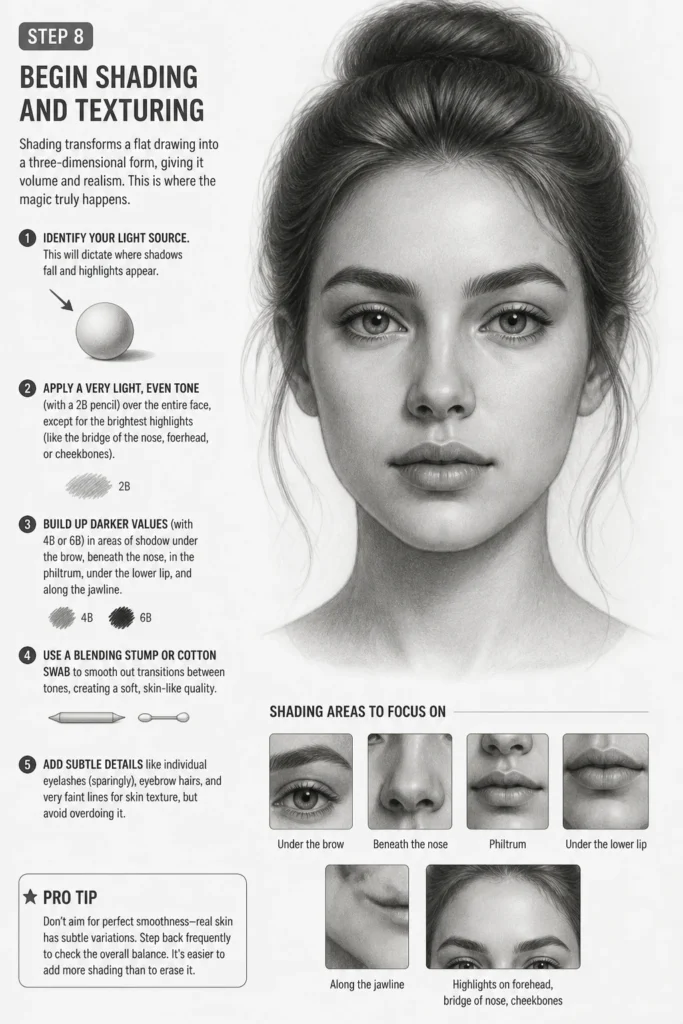
This is where the magic truly happens.
- Identify your light source. This will dictate where shadows fall and highlights appear.
- Apply a very light, even tone (with a 2B pencil) over the entire face, except for the brightest highlights (like the bridge of the nose, forehead, or cheekbones).
- Build up darker values (with 4B or 6B) in areas of shadow: under the brow, beneath the nose, in the philtrum, under the lower lip, and along the jawline.
- Use a blending stump or cotton swab to smooth out transitions between tones, creating a soft, skin-like quality.
- Add subtle details like individual eyelashes (sparingly), eyebrow hairs, and very faint lines for skin texture, but avoid overdoing it.
Pro Tip: Don’t think of shading as coloring in. Think of it as sculpting with light and shadow, defining the planes and forms of the face.
Common Mistakes to Avoid
Incorrect Proportions
One of the most common pitfalls is getting the scale of features wrong relative to each other. Eyes might be too big, or the nose too long.
Always double-check your initial guidelines and use a reference to ensure features are correctly spaced and sized before you commit to details.
Drawing Features in Isolation
Often, beginners focus on perfecting one eye before moving to the next, causing the overall face to look disjointed. Each feature influences the others.
Work on all features simultaneously, building them up together in stages. This ensures harmony and correct alignment across the entire face.
Ignoring Light and Shadow
A drawing without proper values will appear flat and two-dimensional, no matter how accurate the lines. Light and shadow create depth and form.
Always establish a clear light source and consciously apply different tonal values to sculpt the face. Think about how light hits the planes of the face.
Over-rendering Details Too Early
It’s tempting to jump straight to drawing individual eyelashes or perfect lips. However, focusing on small details before the overall structure is solid can lead to a messy, inconsistent drawing.
Prioritize the big shapes and overall forms first. Refine details only in the final stages, once the underlying structure and shading are well established.
Troubleshooting
Face Looks Flat
If your drawing lacks depth and appears flat, it’s usually a sign that your shading isn’t varied enough. You might be using too few values or not understanding how light wraps around forms.
Re-evaluate your light source. Push your darks darker and ensure a full range of tones, from the brightest highlights to the deepest shadows. Think of the face as a series of interconnected forms, not a flat surface.
Features Seem Unbalanced
When eyes are misaligned, or one side of the face looks different from the other, it points to issues with your initial guidelines and symmetry.
Go back to your initial construction lines. Use a ruler or a straight edge to double-check horizontal and vertical alignments. Practice drawing symmetrical basic shapes before adding features.
Drawing Lacks “Life”
Sometimes a technically accurate drawing still feels stiff or lifeless. This can be due to overly rigid lines, a lack of subtle expression, or not enough variation in texture.
Introduce subtle imperfections and asymmetry; real faces are rarely perfectly symmetrical. Vary your line weight, adding softer lines in some areas and slightly firmer ones to define edges. Observe real faces for their unique nuances.
Key Takeaways
- Always start with basic shapes and light construction lines to establish correct proportions.
- Work on the face as a whole, developing all features together rather than in isolation.
- Understand and apply a full range of values to create depth and dimension through shading.
- Pay close attention to your reference photo for accurate details, expressions, and light direction.
- Practice regularly; consistency is key to improving your observational and rendering skills.
- Don’t be afraid to erase and refine; drawing is an iterative process of building and adjusting.
Frequently Asked Questions
How do I make my faces look less symmetrical?
Real faces are rarely perfectly symmetrical. To avoid a robotic look, consciously introduce subtle variations. Make one eye slightly narrower, one eyebrow slightly higher, or add a slight tilt to the nose. Observe your own face in a mirror for natural asymmetries.
What’s the best way to practice?
Consistent practice is vital. Sketch faces from reference photos, live models, or even quick sketches of people around you. Focus on one aspect at a time, such as just eyes for a session, or just different nose types. Quantity often leads to quality.
Should I use reference photos?
Absolutely. Reference photos are invaluable for learning anatomy, understanding light and shadow, and observing the countless variations in human faces. They provide a concrete guide to accuracy and realism. Over time, you’ll develop the visual library to draw more from imagination.
How do I draw different ethnicities?
Drawing different ethnicities involves understanding subtle variations in features, not entirely different structures. Pay attention to eye shape, nose width, lip fullness, skin tone, and hair texture. Study diverse reference photos and avoid stereotypes, focusing on individual characteristics.
Our Top Recommended Finds
- Graphite Pencil Set (HB, 2B, 4B, 6B, 8B): A good range of hardness allows you to achieve both light construction lines and deep, rich shadows.
- Artist’s Blending Stumps/Tortillons: These compressed paper tools are excellent for smoothing out graphite, creating soft transitions, and achieving realistic skin textures.
- High-Quality Sketchbook (Smooth Bristol or Vellum Paper): A smooth surface is ideal for detailed work and blending, ensuring your graphite lays down evenly without too much tooth.
Your Artistic Journey Begins Now
You now have a clear roadmap to drawing semi-realistic faces, armed with practical steps and valuable insights.
The next step is to pick up your pencil and start creating. Don’t worry about perfection; focus on the process and enjoy each stroke.
Consider exploring guides on rendering hair or understanding facial expressions to further enhance your portrait skills.
& Painting
No rigid rules or pretension. Just practical guides, medium comparisons, and encouraging tips to help you enjoy the drawing & painting process.