👋 How To Draw A Hand Step By Step

& Painting
No rigid rules or pretension. Just practical guides, medium comparisons, and encouraging tips to help you enjoy the drawing & painting process.
Drawing hands often feels like a formidable challenge for many artists. They are incredibly expressive and complex, with intricate bone structures and flexible movements. I remember my own frustrations trying to capture their dynamic forms, often ending up with stiff, unnatural results. This guide will help you break down that complexity, offering a clear path to drawing hands you’ll be proud of.
Quick Overview
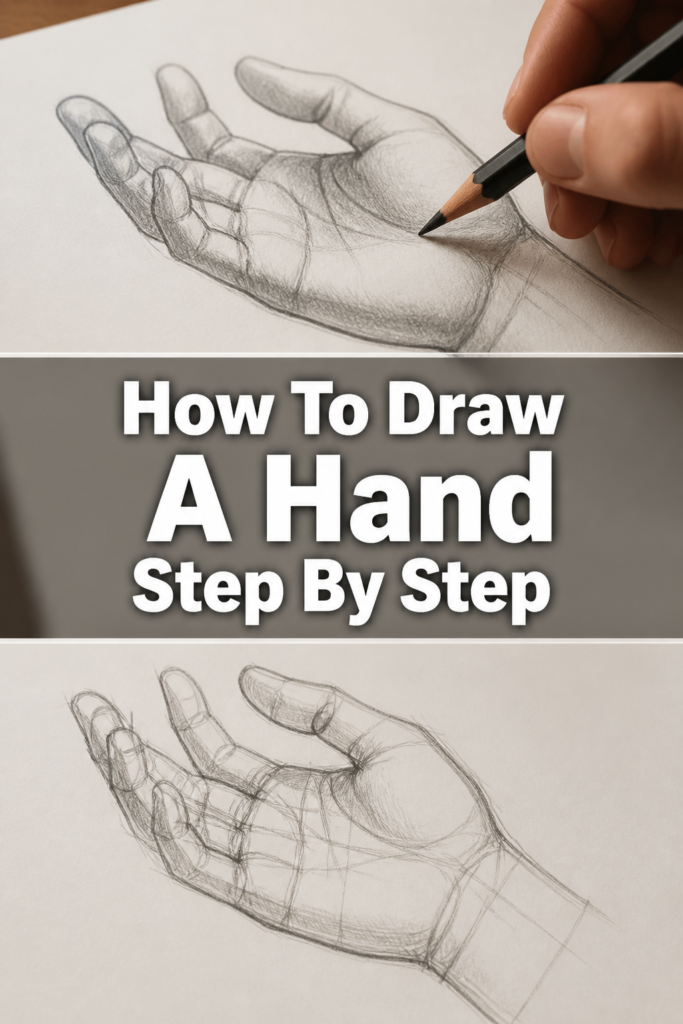
This guide provides a structured approach to drawing hands, focusing on fundamental shapes and anatomical understanding. You will learn to build a hand from simple forms, gradually adding detail and dimension.
- Time needed: 45-75 minutes (for a focused drawing session)
- Difficulty: Beginner
- What you’ll need: Pencil (HB, 2B recommended), sketch paper, eraser, a mirror or your own hand as a reference.
Step-by-Step Instructions
Step 1: Understand the Basic Gesture and Palm Shape
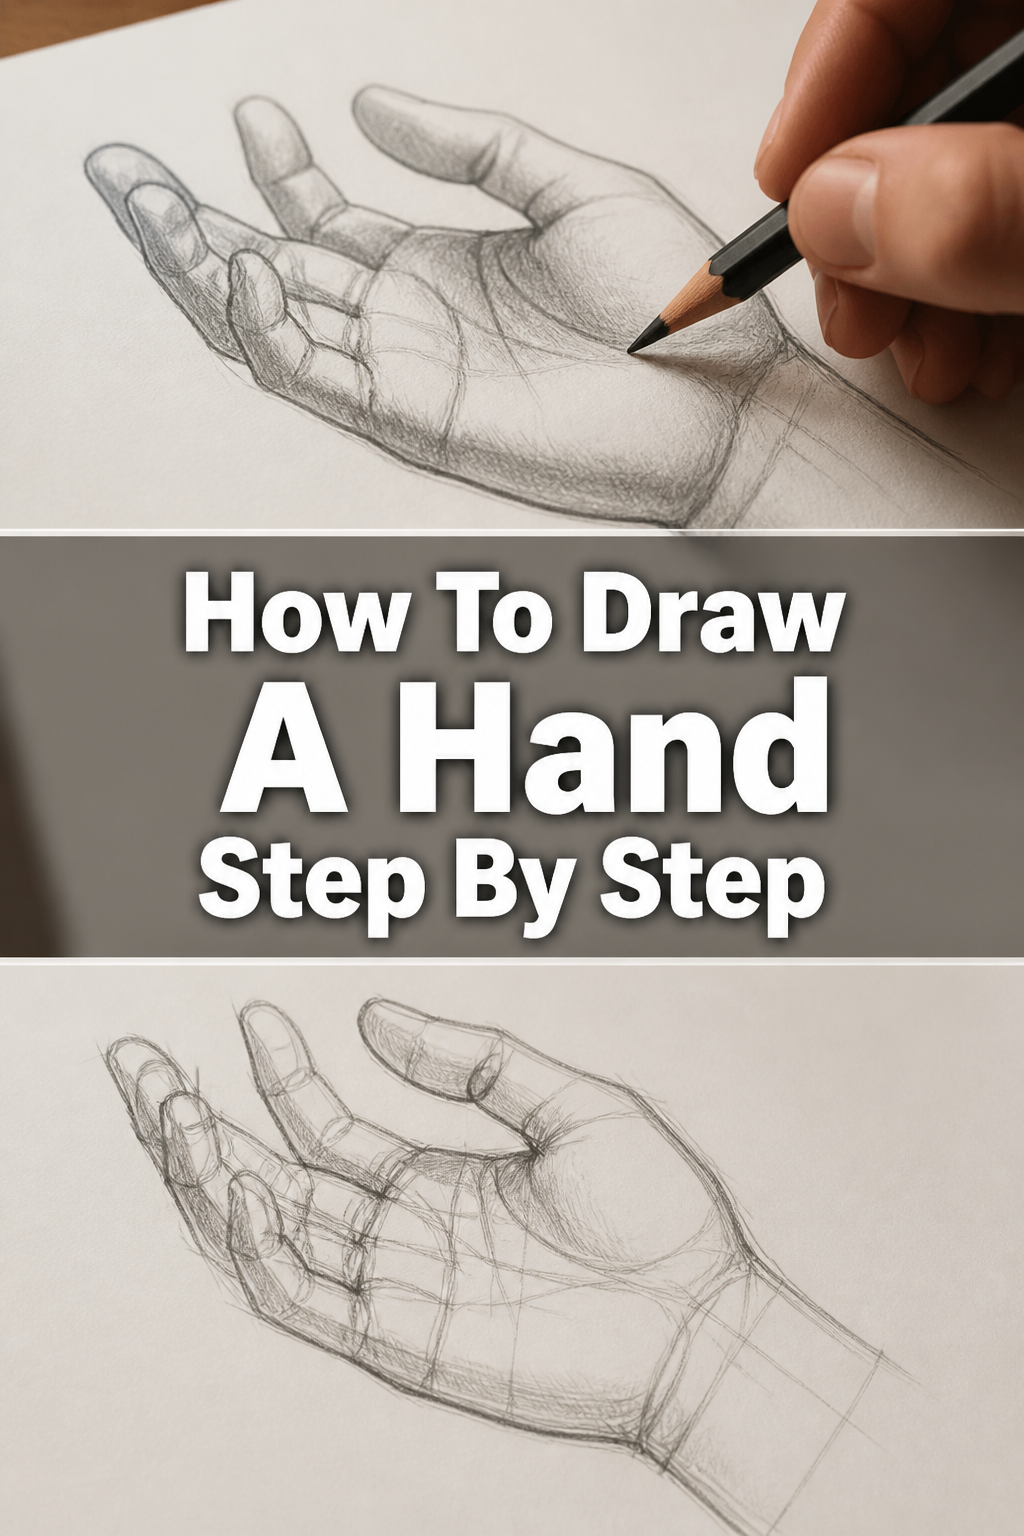
Every great drawing starts with a strong foundation. Begin by observing the overall pose and flow of the hand you wish to draw. This initial stage is about capturing the energy and direction.
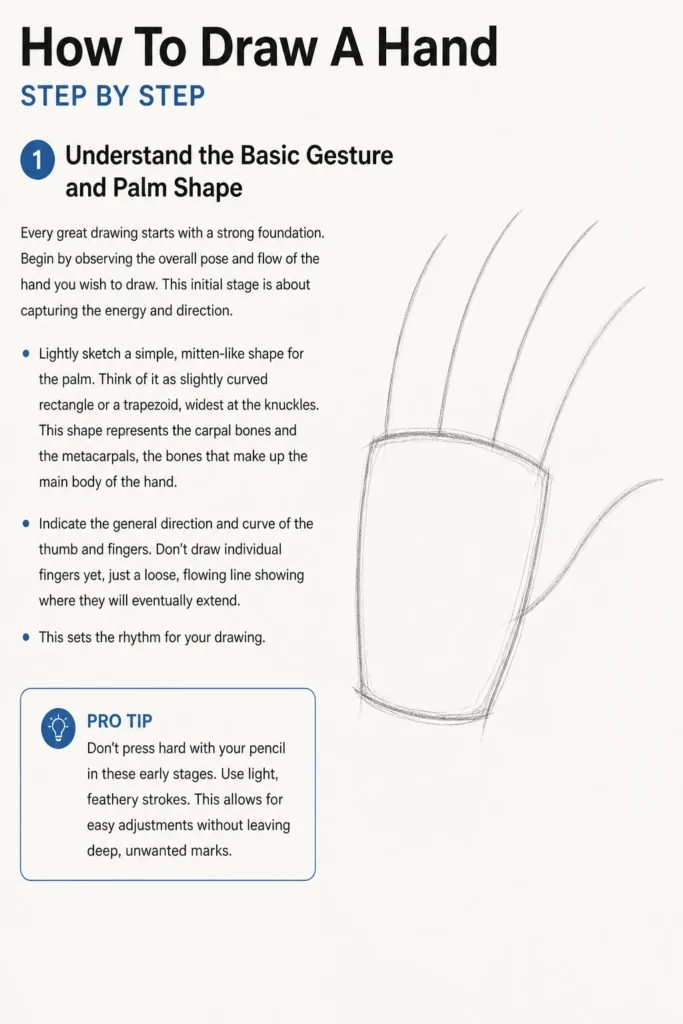
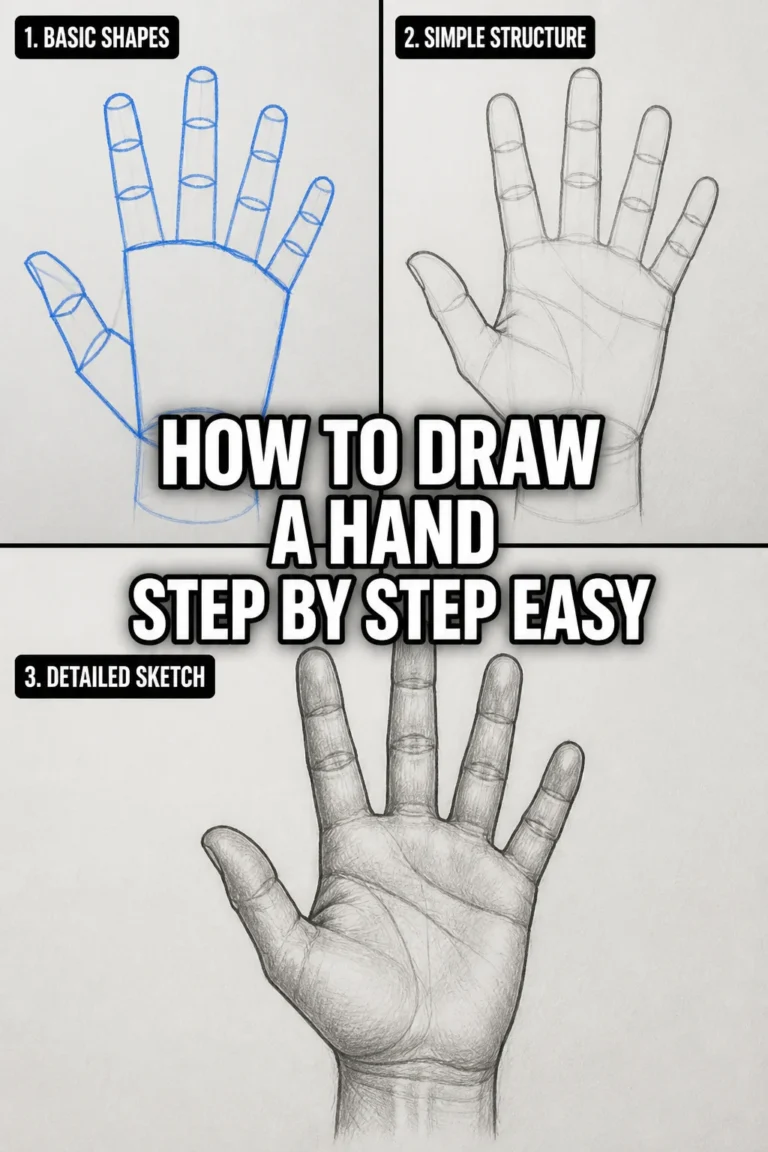
Lightly sketch a simple, mitten-like shape for the palm. Think of it as a slightly curved rectangle or a trapezoid, widest at the knuckles. This shape represents the carpal bones and the metacarpals, the bones that make up the main body of the hand.
Indicate the general direction and curve of the thumb and fingers. Don’t draw individual fingers yet; just a loose, flowing line showing where they will eventually extend. This sets the rhythm for your drawing.
Pro Tip: Don’t press hard with your pencil in these early stages. Use light, feathery strokes. This allows for easy adjustments without leaving deep indentations on your paper.
Step 2: Block Out the Thumb and Finger Groups
Now, define the main masses for the thumb and the collective fingers. The thumb is a unique structure, often thought of as a separate entity from the main group of fingers.
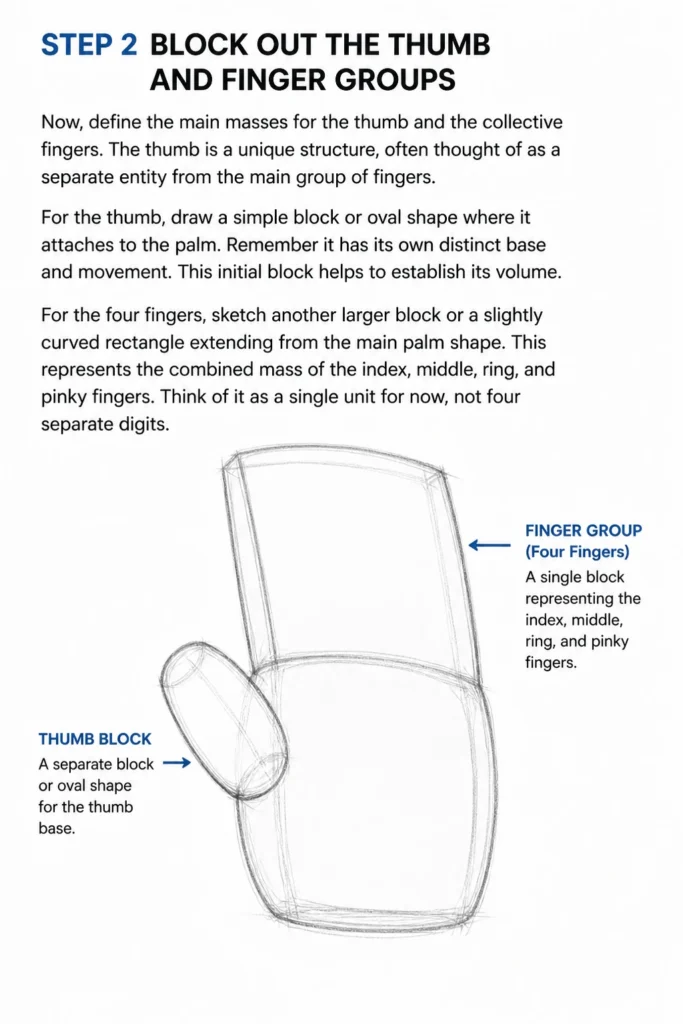
For the thumb, draw a simple block or oval shape where it attaches to the palm. Remember it has its own distinct base and movement. This initial block helps to establish its volume.
For the four fingers, sketch another larger block or a slightly curved rectangle extending from the main palm shape. This represents the combined mass of the index, middle, ring, and pinky fingers. Think of it as a single unit for now, not four separate digits.
Step 3: Establish Knuckle Lines and Finger Segments
With the main blocks in place, it’s time to introduce the knuckle lines. These horizontal lines are crucial for understanding the hand’s structure and proportions.
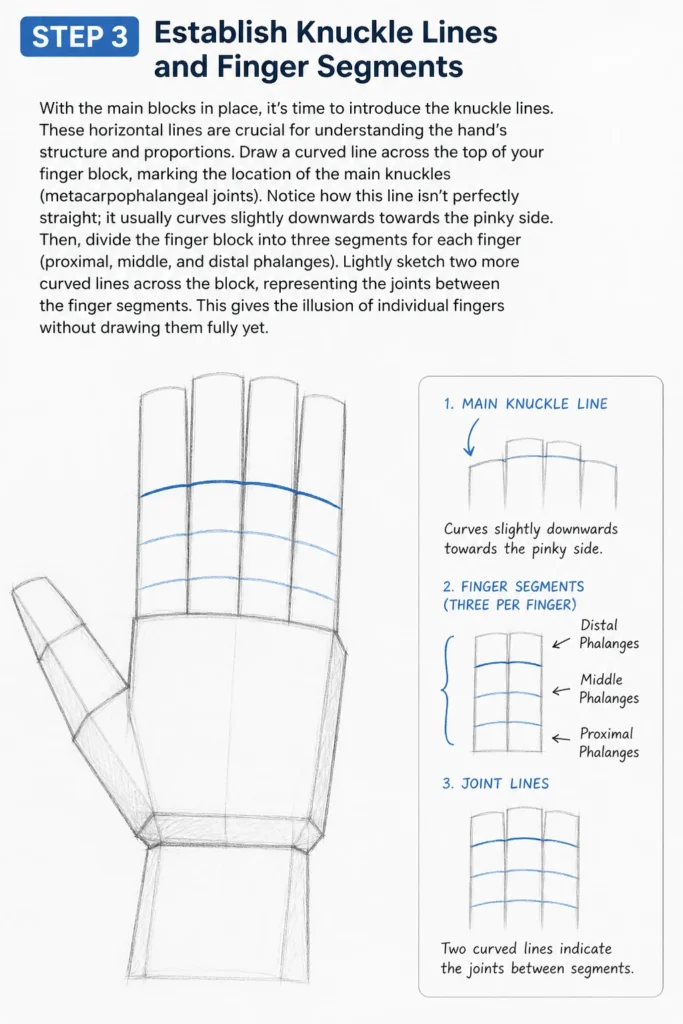
Draw a curved line across the top of your finger block, marking the location of the main knuckles (metacarpophalangeal joints). Notice how this line isn’t perfectly straight; it usually curves slightly downwards towards the pinky side.
Then, divide the finger block into three segments for each finger (proximal, middle, and distal phalanges). Lightly sketch two more curved lines across the block, representing the joints between the finger segments. This gives the illusion of individual fingers without drawing them fully yet.
Step 4: Refine Individual Finger Shapes
Now you can start to carve out the individual fingers from your finger block. Each finger has three segments, but remember they are not all the same length.
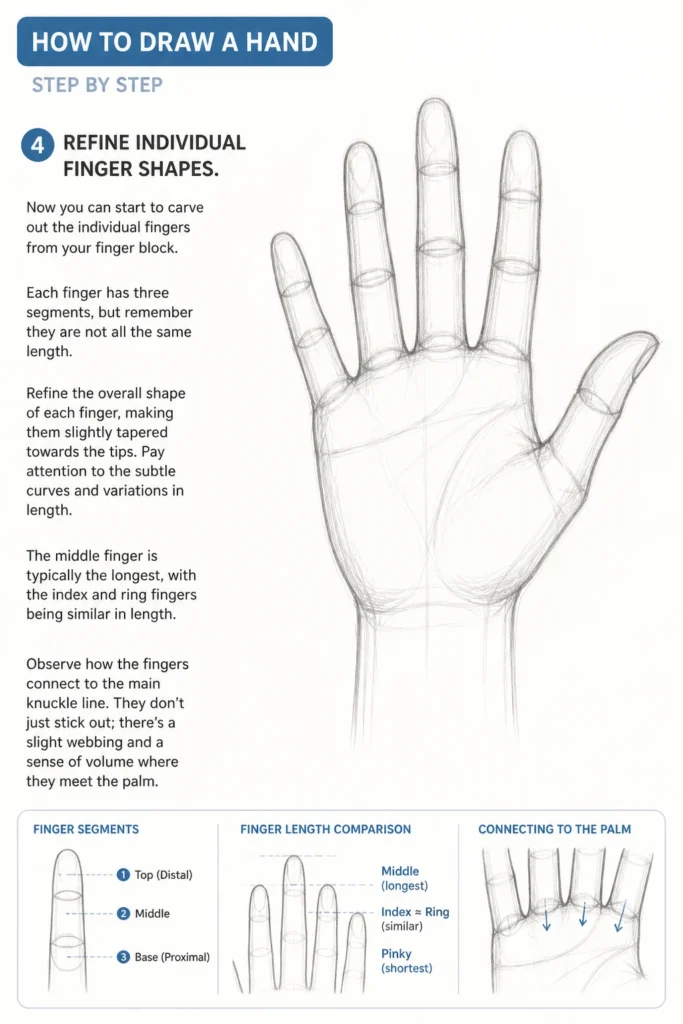
Refine the overall shape of each finger, making them slightly tapered towards the tips. Pay attention to the subtle curves and variations in length. The middle finger is typically the longest, with the index and ring fingers being similar in length.
Observe how the fingers connect to the main knuckle line. They don’t just “stick out”; there’s a slight webbing and a sense of volume where they meet the palm.
Step 5: Detail the Thumb Structure
The thumb is essential for the hand’s functionality and expressiveness. It requires careful attention to its unique form.
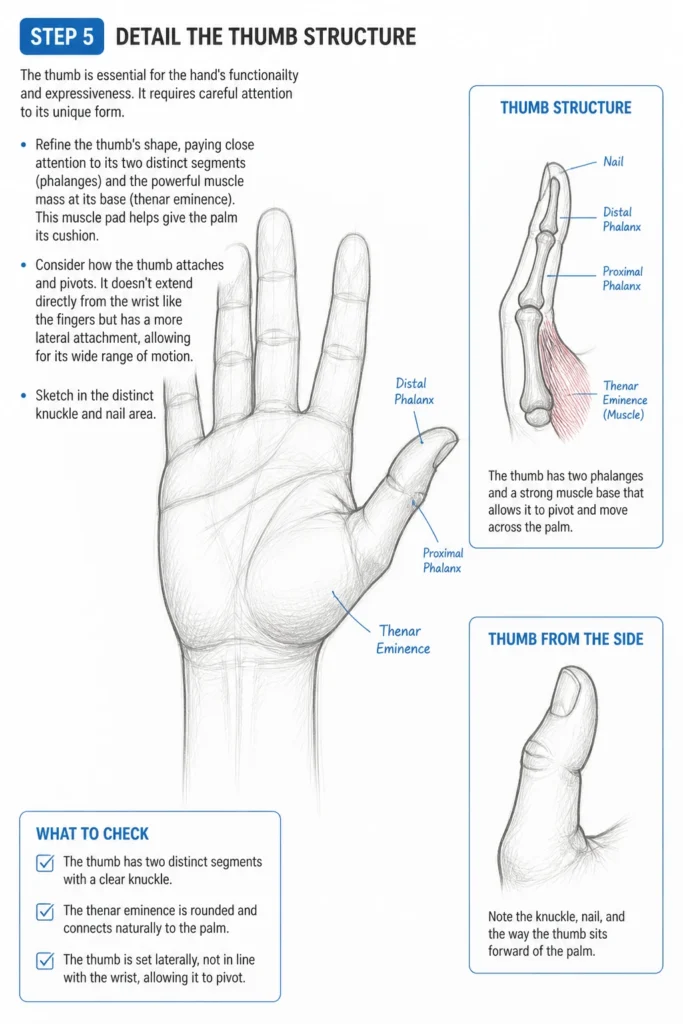
Refine the thumb’s shape, paying close attention to its two distinct segments (phalanges) and the powerful muscle mass at its base (thenar eminence). This muscle pad helps give the palm its cushion.
Consider how the thumb attaches and pivots. It doesn’t extend directly from the wrist like the fingers but has a more lateral attachment, allowing for its wide range of motion. Sketch in the distinct knuckle and nail area.
Step 6: Add Contours and Define Details
With the underlying structure complete, it’s time to add the precise contour lines and anatomical details. This step brings the hand to life.
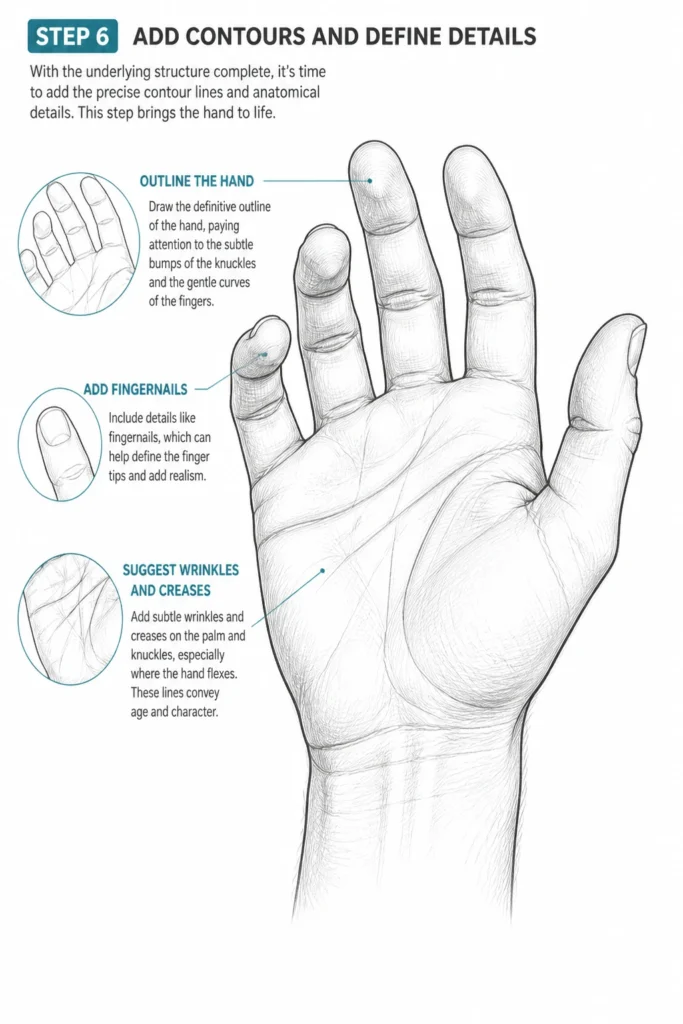
Draw the definitive outline of the hand, paying attention to the subtle bumps of the knuckles and the gentle curves of the fingers. Observe how the skin stretches and folds around the joints.
Include details like fingernails, which can help define the finger tips and add realism. Suggest the subtle wrinkles and creases on the palm and knuckles, especially where the hand flexes. These lines convey age and character.
Step 7: Introduce Shading and Form
Shading is what transforms your line drawing into a three-dimensional form. It helps to define the hand’s volume and texture.
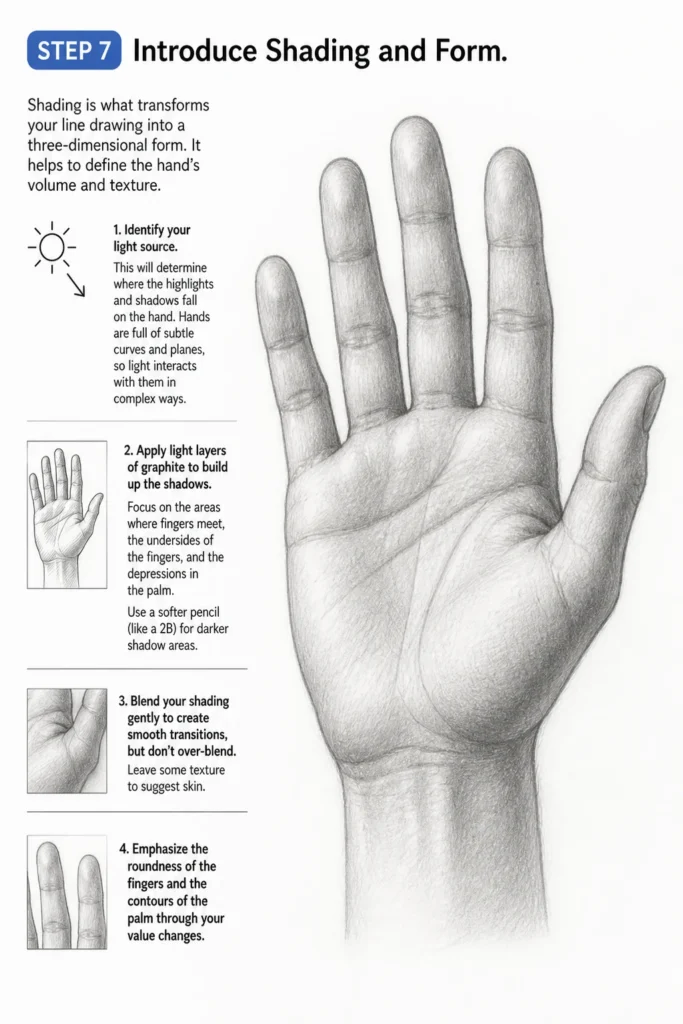
Identify your light source. This will determine where the highlights and shadows fall on the hand. Hands are full of subtle curves and planes, so light interacts with them in complex ways.
Apply light layers of graphite to build up the shadows. Focus on the areas where fingers meet, the undersides of the fingers, and the depressions in the palm. Use a softer pencil (like a 2B) for darker shadow areas.
Blend your shading gently to create smooth transitions, but don’t over-blend. Leave some texture to suggest skin. Emphasize the roundness of the fingers and the contours of the palm through your value changes.
Common Mistakes to Avoid
Drawing Fingers as Sausages
A common pitfall is rendering fingers as simple, uniform cylinders or “sausages.” This makes the hand look stiff and unnatural, lacking the underlying bone structure. Fingers are not just tubes; they have distinct knuckles, varying thicknesses, and subtle tapering towards the tips. Always think about the three segments of each finger and the way they connect.
Ignoring the Thumb’s Uniqueness
Many artists treat the thumb as just another finger, extending it in the same plane as the others. However, the thumb is a highly mobile digit with its own powerful muscle pad at the base (the thenar eminence). It often sits slightly apart and can rotate to oppose the other fingers. Pay close attention to its attachment point and its ability to move across the palm.
Stiff or Lifeless Poses
Hands are incredibly expressive, yet beginners often draw them in rigid, uninspired poses. A stiff hand lacks energy and movement. Always start with a gesture drawing that captures the hand’s overall flow and action, even if it’s just resting. Look for the natural curves and relaxed positions, or exaggerate a dynamic pose to convey emotion.
Inconsistent Proportions
Getting the proportions right is crucial for a believable hand. Common mistakes include fingers that are too long or too short for the palm, or a palm that is disproportionately small. A good rule of thumb is that the middle finger is roughly the same length as the palm itself. Always measure against your reference and check your initial block-in shapes for accuracy.
Troubleshooting
My Hand Looks Flat and Two-Dimensional
If your hand drawing lacks depth, you might be focusing too much on just the outlines. To fix this, start thinking in terms of three-dimensional forms like cylinders, boxes, and spheres when you begin your sketch. Instead of drawing the outline of a finger, imagine it as a series of connected cylinders.
Additionally, effective shading is key to creating depth. Identify a clear light source and apply shadows where surfaces turn away from the light. This contrast between light and dark will make your hand pop off the page.
My Fingers Look Stiff or Unnatural
Stiffness often comes from drawing each finger in isolation or neglecting the natural curves of the hand. To loosen up your fingers, begin by drawing them as a single, flowing mass before separating them. This helps maintain a natural rhythm.
Also, observe how fingers naturally curve and bend, even when relaxed. They are rarely perfectly straight. Use your own hand as a reference, flexing and relaxing it to see the subtle changes in form and tension.
I Can’t Get the Perspective Right
Perspective can be tricky, especially with complex forms like hands. If your hand looks distorted or out of proportion in a specific view, try simplifying it even further. Break the hand down into very basic boxes and planes first.
Use a grid system on your reference photo if available, or mentally divide the hand into sections. This helps you accurately place each part in relation to the others. Practice drawing the hand from extreme angles to better understand how foreshortening affects its appearance.
Key Takeaways
- Start with simple shapes: Build the hand from basic geometric forms before adding intricate details.
- Embrace the gesture: Always begin by capturing the overall flow and energy of the hand’s pose.
- Understand the thumb’s role: Recognize the thumb’s unique structure and movement, as it’s distinct from the fingers.
- Focus on proportions: Pay careful attention to the relative lengths of the palm and fingers for a believable result.
- Use reference wisely: Observe your own hand or photos from various angles to understand anatomy and natural poses.
- Practice shading for depth: Utilize light and shadow to transform your line drawing into a three-dimensional form.
Frequently Asked Questions
How can I make my hand drawings more expressive?
To add expressiveness, focus on the gesture and the subtle curves of the fingers and palm. Hands communicate a lot through their posture. Observe how different emotions manifest in hand positions, and try to exaggerate those natural tendencies in your initial sketches.
Should I draw the bones first?
While understanding bone structure is crucial, you don’t necessarily need to draw every bone initially. Instead, think about the masses and segments that the bones create. Start with the large blocks of the palm and finger groups, then refine based on where the joints and bones would be.
How do I draw different hand poses?
The key to drawing different poses is to always return to the basic building blocks. Every hand pose, no matter how complex, can be broken down into the main palm shape, the thumb’s distinct placement, and the collective mass of the fingers. Practice observing how these elements shift and foreshorten in various positions.
What’s the best way to practice drawing hands?
Consistent practice is vital. Try quick gesture drawings of hands from life or photos, focusing on capturing the overall movement in just a minute or two. Also, dedicate longer sessions to detailed studies, breaking down complex poses into the steps outlined in this guide. Don’t be afraid to draw your own hand in a mirror repeatedly.
Our Top Recommended Finds
- Sketching Pencils Set: A good set with a range of hardness (e.g., HB, 2B, 4B, 6B) allows for versatile line work and shading.
- Smooth Drawing Paper: Opt for a paper with a slightly smoother tooth, which is excellent for detailed work and blending graphite.
- Articulated Wooden Hand Model: While not essential, a poseable hand model can be an invaluable tool for studying complex hand angles and lighting without needing a live reference.
Embrace the Journey of Drawing Hands
Drawing hands effectively is a skill that develops with understanding and consistent practice. You now have a clear, practical framework to approach this often-dreaded subject. Remember that every artist, even the masters, once struggled with hands.
Don’t let initial imperfections discourage you. Pick up your pencil right now, look at your own hand, and start applying these steps. The more you observe and draw, the more confident and skilled you’ll become. Your artistic journey is just beginning, and mastering hands is a powerful step forward.
& Painting
No rigid rules or pretension. Just practical guides, medium comparisons, and encouraging tips to help you enjoy the drawing & painting process.