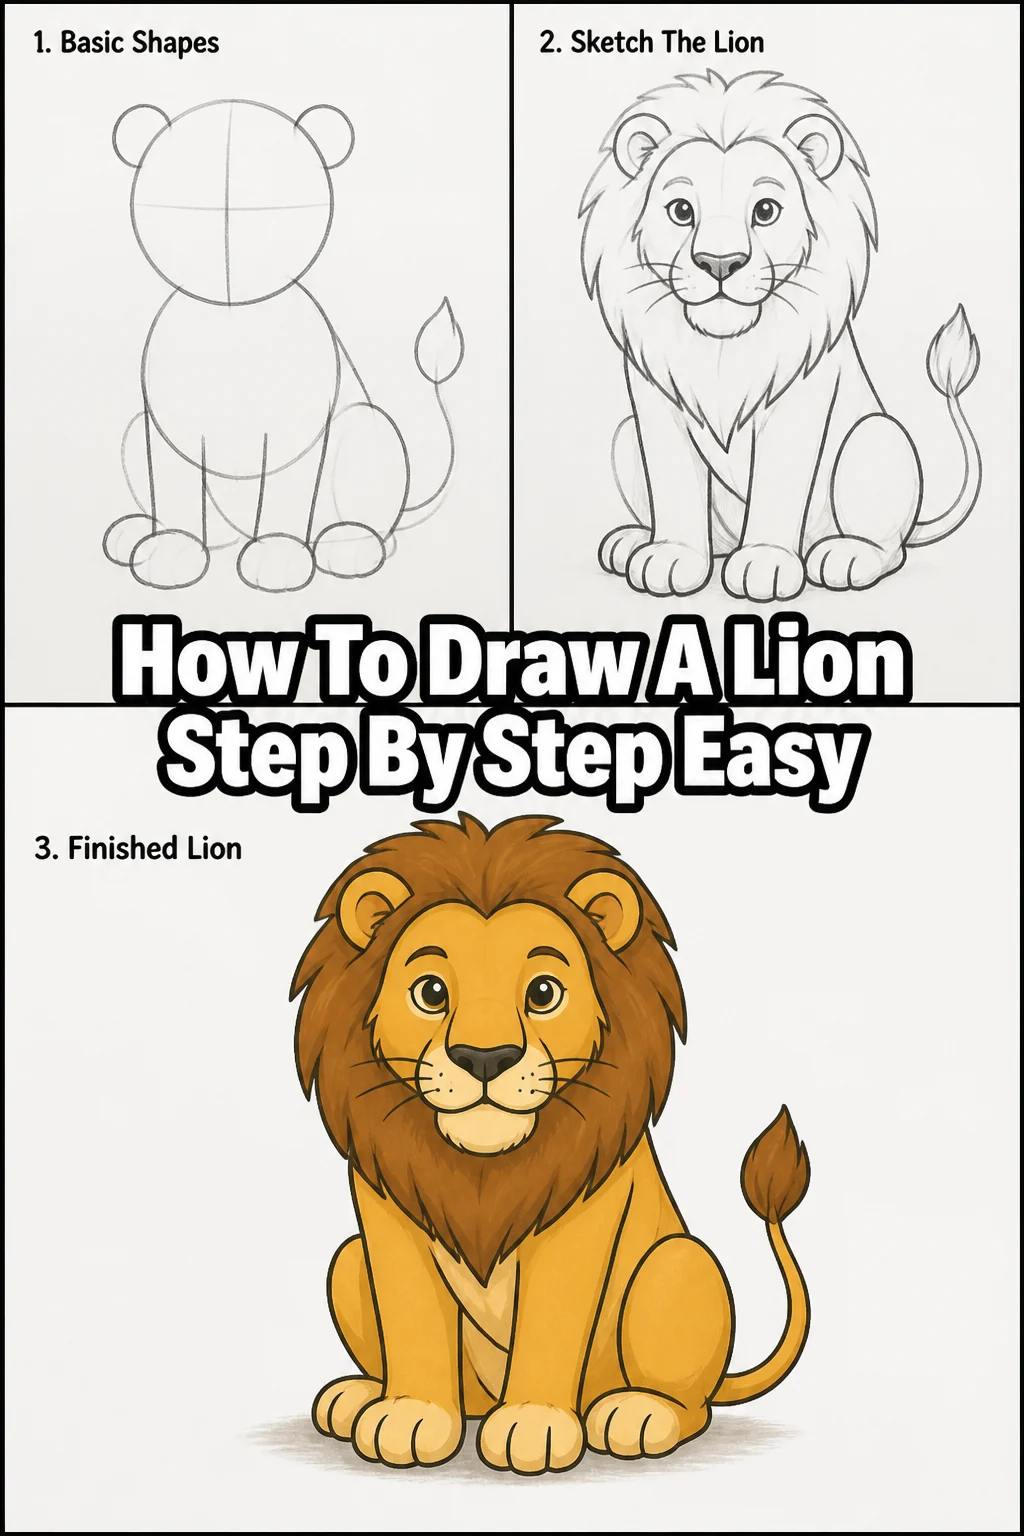
How To Draw A Lion Step By Step Easy
Learning to draw a majestic lion might seem like a huge challenge at first glance.
But with the right guidance, breaking it down into simple shapes makes it incredibly approachable.
I’ve spent countless hours sketching animals, and I’m excited to share a method that truly simplifies this process for anyone, no matter your starting point.
Quick Overview
This guide will walk you through creating a stunning lion drawing, focusing on ease and understanding. You’ll finish with a complete sketch, ready for further detailing or coloring.
- Time needed: 30-60 minutes
- Difficulty: Beginner
- What you’ll need: Pencil (HB or 2B), eraser, drawing paper, a reference photo (optional but helpful)
Step-by-Step Instructions
Step 1: Sketch the Basic Head Shape
Begin by lightly drawing a large circle for the main part of the lion’s head.
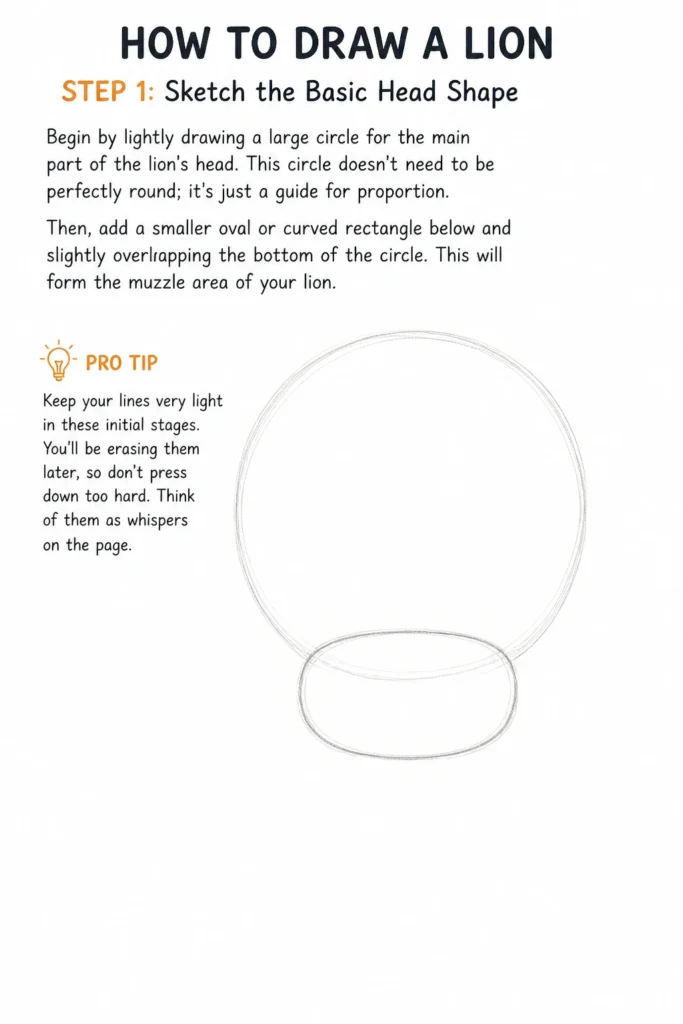
This circle doesn’t need to be perfectly round; it’s just a guide for proportion.
Then, add a smaller oval or curved rectangle below and slightly overlapping the bottom of the circle.
This will form the muzzle area of your lion.
Pro Tip: Keep your lines very light in these initial stages. You’ll be erasing them later, so don’t press down too hard. Think of them as whispers on the page.
Step 2: Place the Facial Guidelines
Inside the large circle, draw a vertical line down the center.
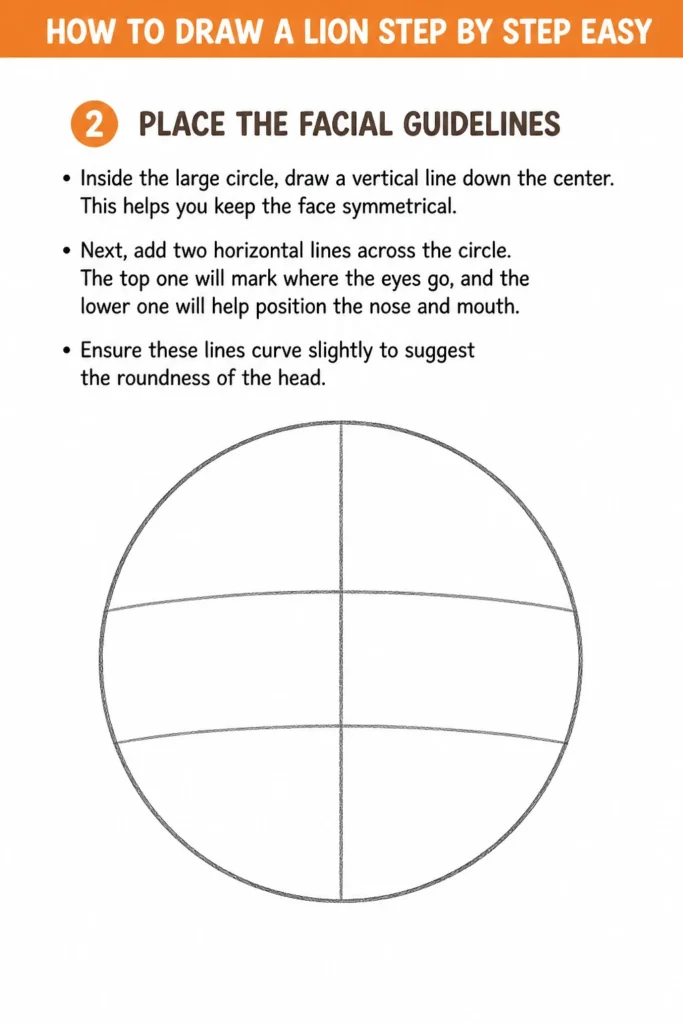
This helps you keep the face symmetrical.
Next, add two horizontal lines across the circle.
The top one will mark where the eyes go, and the lower one will help position the nose and mouth.
Ensure these lines curve slightly to suggest the roundness of the head.
Step 3: Define the Eyes and Nose
On the upper horizontal guideline, draw two small ovals for the eyes.
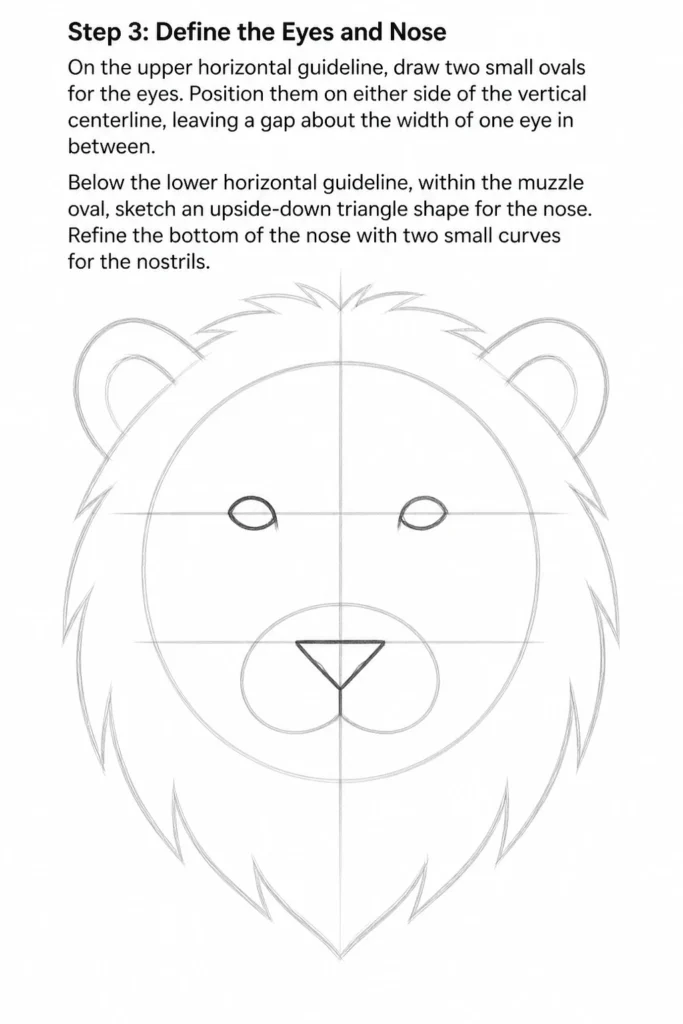
Position them on either side of the vertical centerline, leaving a gap about the width of one eye in between.
Below the lower horizontal guideline, within the muzzle oval, sketch an upside-down triangle shape for the nose.
Refine the bottom of the nose with two small curves for the nostrils.
Step 4: Shape the Muzzle and Mouth
Connect the bottom of the nose to a small, curved line that dips down, creating the upper lip.
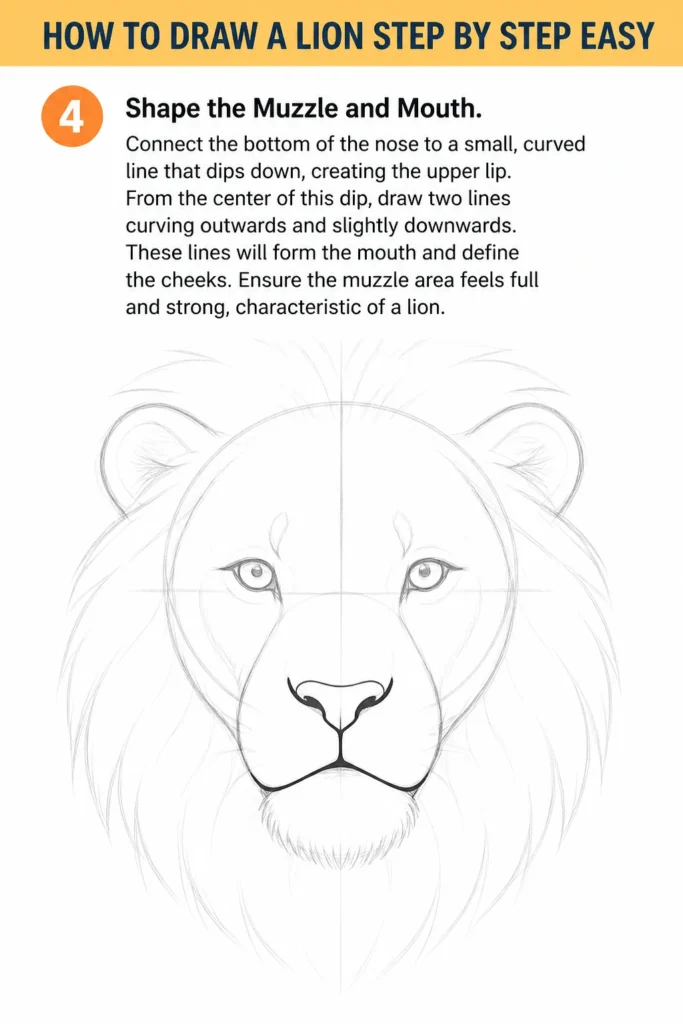
From the center of this dip, draw two lines curving outwards and slightly downwards.
These lines will form the mouth and define the cheeks.
Ensure the muzzle area feels full and strong, characteristic of a lion.
Step 5: Add the Ears
On the top part of the main head circle, draw two small, rounded ear shapes.
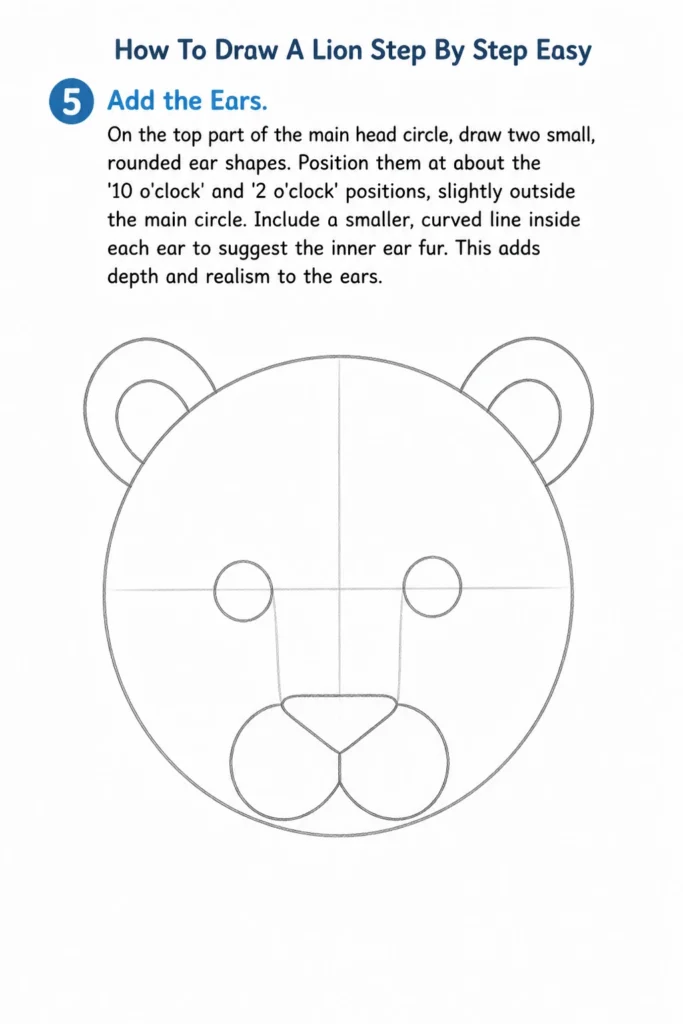
Position them at about the ’10 o’clock’ and ‘2 o’clock’ positions, slightly outside the main circle.
Include a smaller, curved line inside each ear to suggest the inner ear fur.
This adds depth and realism to the ears.
Step 6: Outline the Mane
This is where your lion truly comes to life.
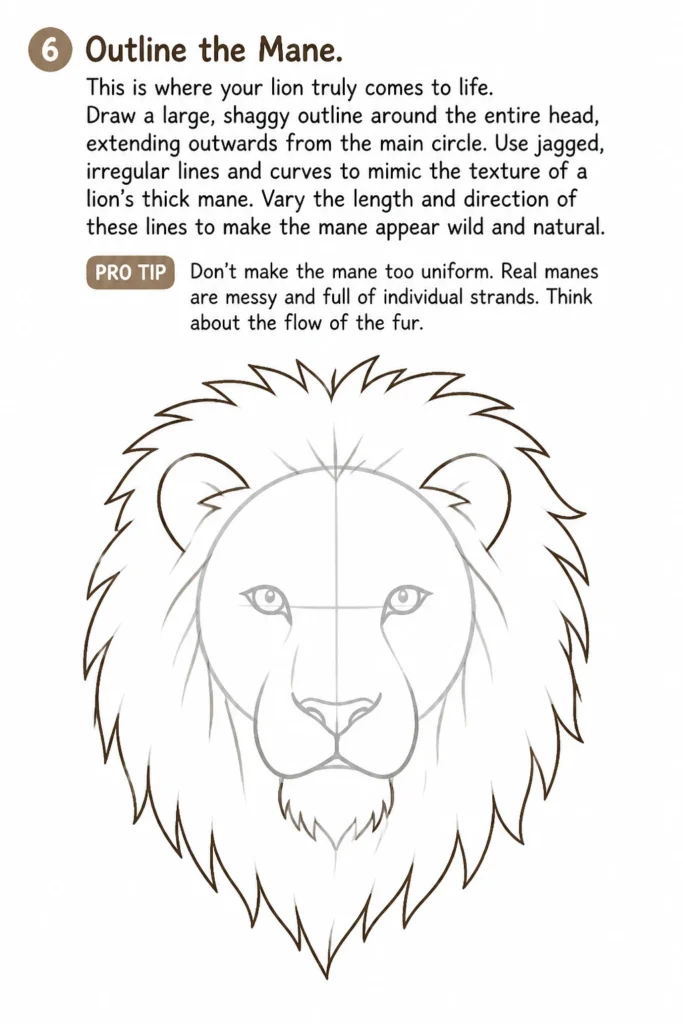
Draw a large, shaggy outline around the entire head, extending outwards from the main circle.
Use jagged, irregular lines and curves to mimic the texture of a lion’s thick mane.
Vary the length and direction of these lines to make the mane appear wild and natural.
Pro Tip: Don’t make the mane too uniform. Real manes are messy and full of individual strands. Think about the flow of the fur.
Step 7: Refine Facial Features and Details
Now, go back to the eyes and add pupils.
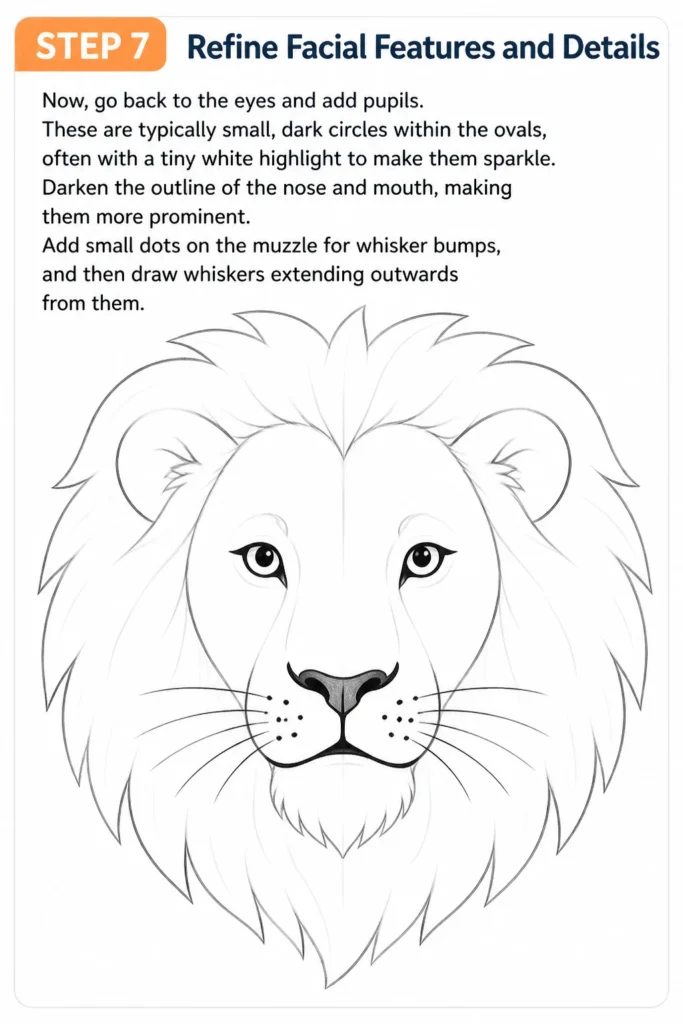
These are typically small, dark circles within the ovals, often with a tiny white highlight to make them sparkle.
Darken the outline of the nose and mouth, making them more prominent.
Add small dots on the muzzle for whisker bumps, and then draw whiskers extending outwards from them.
Step 8: Develop the Neck and Shoulders
Extend two curved lines downwards from the bottom of the mane to form the neck.
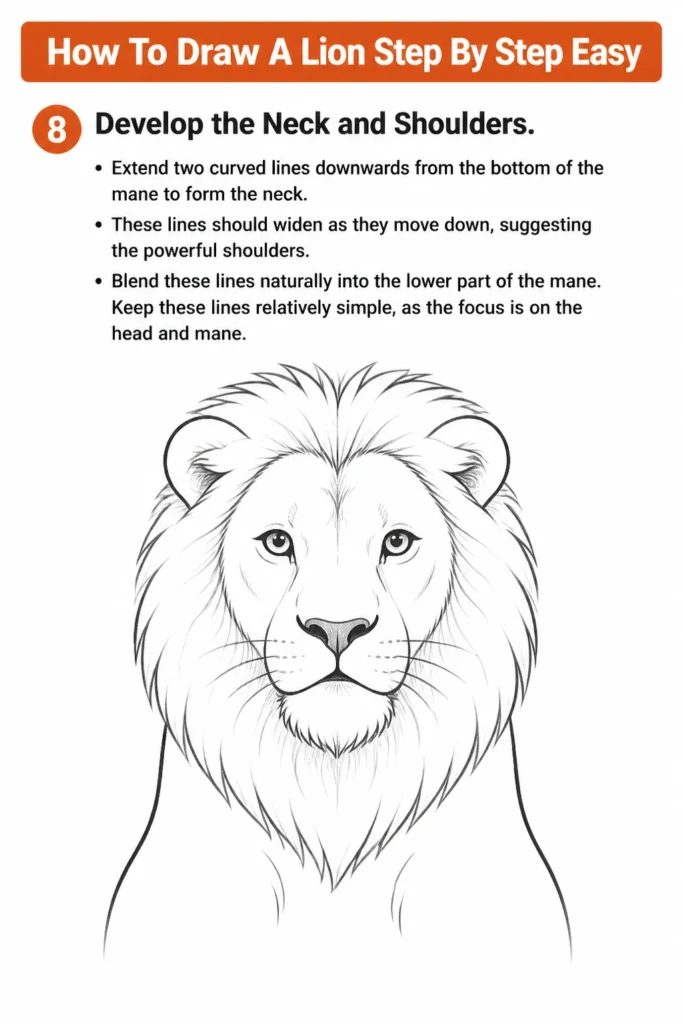
These lines should widen as they move down, suggesting the powerful shoulders.
Blend these lines naturally into the lower part of the mane.
Keep these lines relatively simple, as the focus is on the head and mane.
Step 9: Erase Guide Lines and Clean Up
Carefully erase all the initial light construction lines you drew in the first few steps.
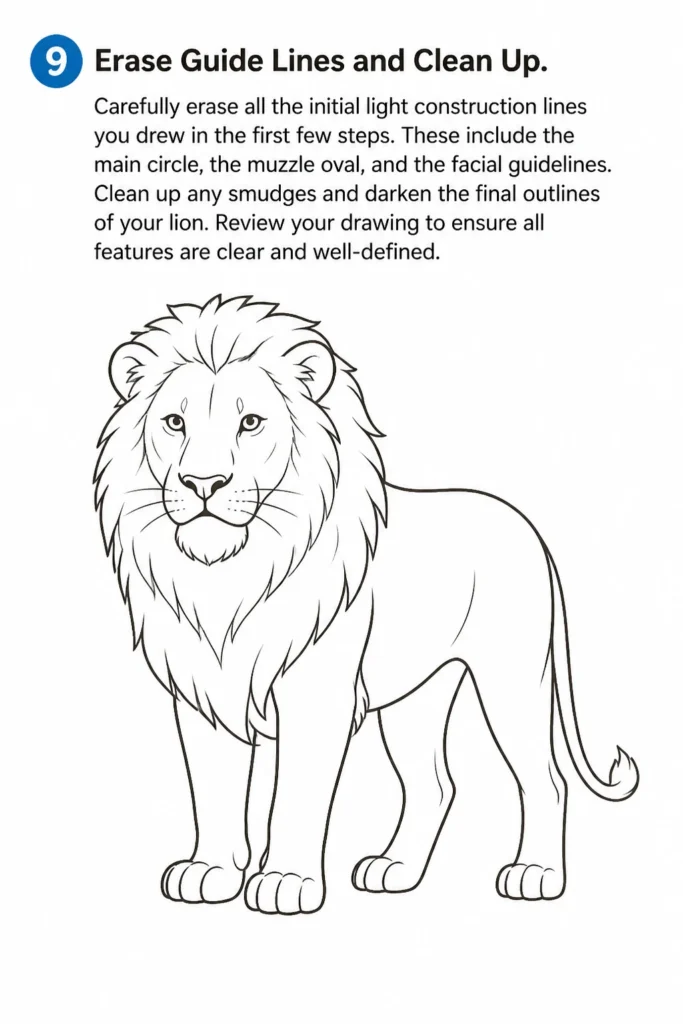
These include the main circle, the muzzle oval, and the facial guidelines.
Clean up any smudges and darken the final outlines of your lion.
Review your drawing to ensure all features are clear and well-defined.
Step 10: Add Basic Shading and Texture
To give your lion more dimension, add some light shading.
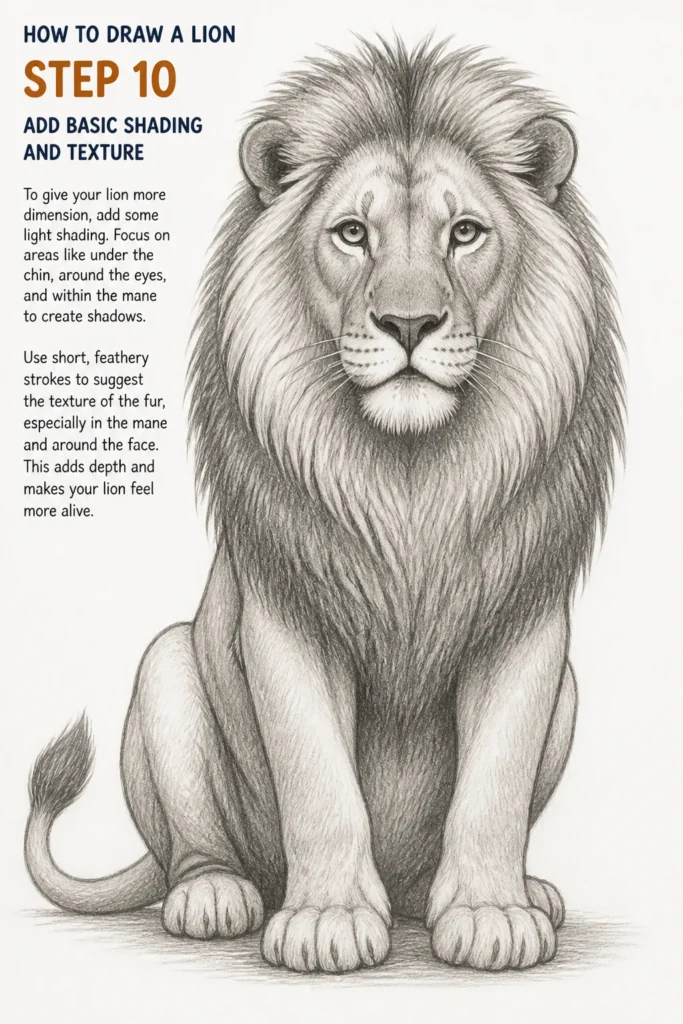
Focus on areas like under the chin, around the eyes, and within the mane to create shadows.
Use short, feathery strokes to suggest the texture of the fur, especially in the mane and around the face.
This adds depth and makes your lion feel more alive.
Common Mistakes to Avoid
Drawing Symmetrical Features
A common pitfall is trying to make every feature perfectly symmetrical.
Faces, even animal faces, are rarely mirror images, and striving for perfection can make your drawing look stiff or unnatural.
Instead, embrace slight variations; it adds character and realism to your lion.
Making the Mane Too Flat or Uniform
The mane is a lion’s most striking feature, but beginners often draw it as a neat, flat outline.
This robs the lion of its wild, powerful appearance.
Remember to use varied, jagged strokes to convey the texture, volume, and movement of the fur.
Pressing Too Hard Initially
Starting with heavy lines makes it difficult to erase mistakes or adjust proportions later.
It can also leave indentations on your paper, which show through even after erasing.
Always begin with very light, exploratory strokes, saving the darker lines for your final outline.
Ignoring Proportions
Getting the size relationships between the head, muzzle, and eyes wrong can make your lion look cartoonish or disproportionate.
For example, a too-small muzzle on a large head will throw everything off.
Take your time with the initial guide shapes; they are crucial for a well-balanced drawing.
Troubleshooting
My Lion Looks Too Flat
If your lion lacks depth, it often comes down to a lack of shading and varied line weight.
Go back and introduce gentle shading under the chin, around the eyes, and within the folds of the mane.
Also, make some lines darker than others – for instance, the bottom edge of the nose or the inner eye outlines.
The Mane Doesn’t Look Furry
A mane that looks stiff or like a solid mass needs more texture.
Instead of drawing one continuous outline, use many short, overlapping, and slightly irregular strokes.
Think of drawing individual clumps of fur rather than a single shape.
Vary the direction of these strokes to suggest different flows of hair.
The Eyes Seem Lifeless
Lifeless eyes usually lack highlights and proper pupil placement.
Ensure you add a small, bright white dot within the pupil area to simulate light reflecting off the eye.
Also, make sure the pupils are centered and dark, giving the eyes focus.
Key Takeaways
- Always start with light, basic shapes and guidelines to establish proportions.
- Embrace asymmetry; perfect symmetry can make drawings look unnatural.
- Use varied line weights and shading to add depth and dimension to your lion.
- The mane should be depicted with irregular, shaggy strokes to convey its texture and wildness.
- Don’t be afraid to erase and refine; drawing is an iterative process.
- Practice is key; each attempt will improve your understanding and skill.
Frequently Asked Questions
What kind of pencil is best for beginners?
An HB pencil is a great all-rounder for sketching and outlining, offering a good balance between hardness and darkness. For darker lines and shading, a 2B or 4B pencil can be very helpful.
How can I make the lion look more realistic?
Realism comes from observing details. Pay attention to how light hits the fur, creating highlights and shadows. Add subtle textures like whisker bumps, individual strands of fur, and the slight asymmetry found in real animals.
Should I use a reference photo?
Absolutely, especially when starting out. A good reference photo helps you understand the anatomy, proportions, and unique characteristics of a lion. It’s a tool for learning, not cheating.
What if my first attempt doesn’t look good?
That’s completely normal and part of the learning process! Every artist started somewhere. The goal of a first attempt is to learn and identify areas for improvement. Don’t get discouraged; simply try again, focusing on what you learned from the last drawing.
Our Top Recommended Finds
- Sketchbook with Quality Paper: A good sketchbook prevents bleed-through and holds up to erasing, making your drawing experience much more pleasant.
- Pencil Set with Varying Hardness: Having a range of pencils (from H for light lines to B for dark shading) gives you more control over your drawing’s depth and contrast.
- Kneaded Eraser: Unlike standard erasers, a kneaded eraser lifts graphite without damaging the paper, perfect for subtle corrections and highlights.
Unleash Your Inner Artist Today
You’ve just taken the first exciting steps toward drawing a magnificent lion.
This guide offers a solid foundation, but the real magic happens with your dedication.
Why not try drawing a lioness next, focusing on the lack of a mane and the slightly different facial structure?
Grab your pencil, find a quiet spot, and let your creativity roar!