✍️ How To Draw Faces Step By Step For Beginners
Learning to draw faces can feel overwhelming when you first start. I remember staring at a blank page, unsure where to even begin with proportions and features. This guide simplifies the process, breaking it down into manageable steps so you can create realistic faces with confidence.
You’ll discover the fundamental shapes and techniques that professional artists use every day. By the end, you’ll have a solid foundation for drawing expressive and well-proportioned faces.
Quick Overview
Drawing faces might seem complex, but we’ll tackle it together, building your skills one step at a time. You’ll learn the basic structure and placement of features, leading to satisfying results.
- Time needed: 60-90 minutes for focused practice
- Difficulty: Beginner
- What you’ll need: Pencil (HB or 2B), eraser, paper, ruler (optional)
Step-by-Step Instructions
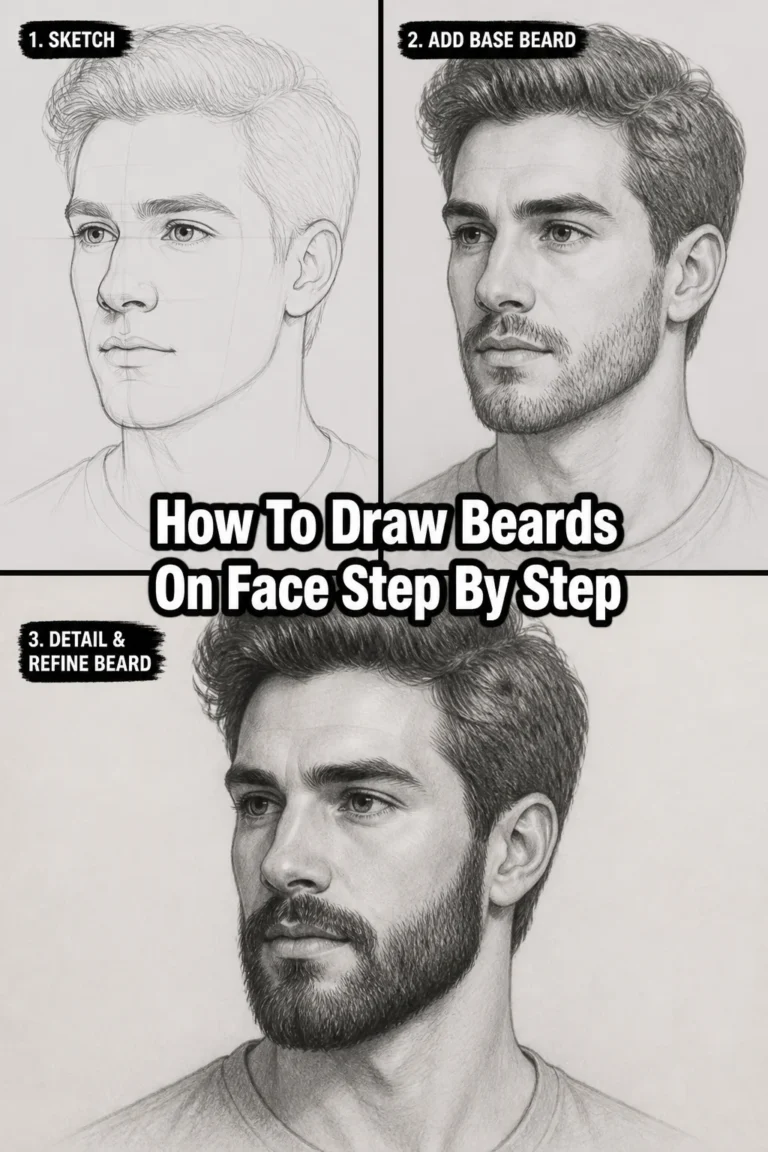
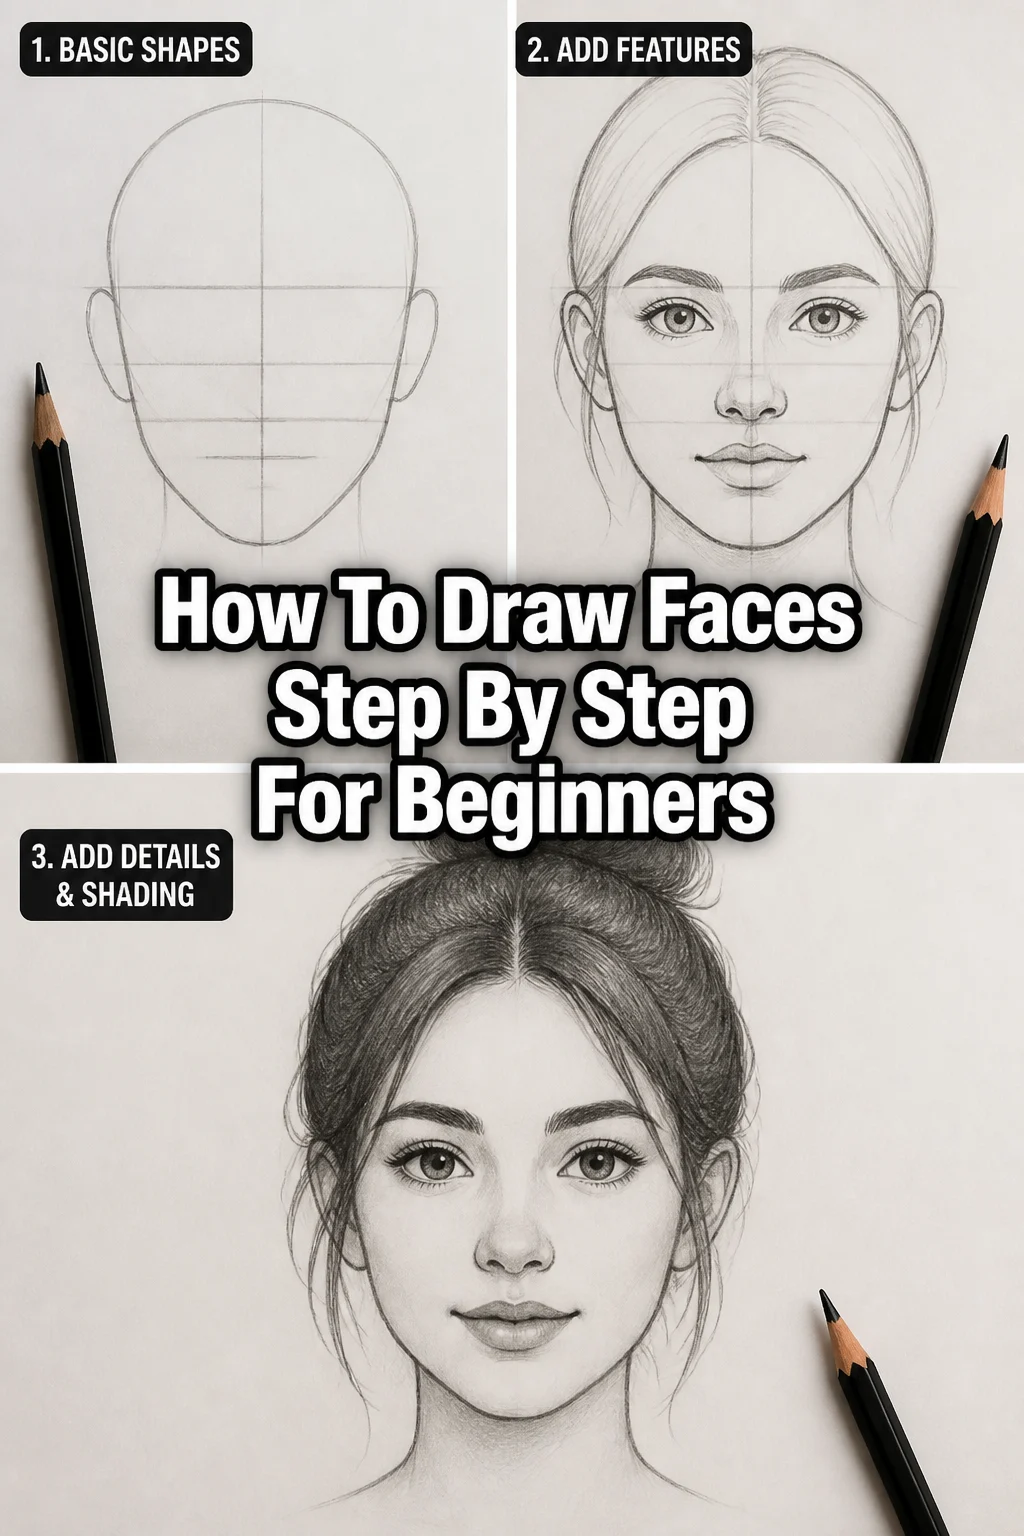
Step 1: Sketch the Basic Head Shape
Start by drawing a large circle in the middle of your paper. This circle represents the top part of the skull. Don’t press too hard; keep your lines light.
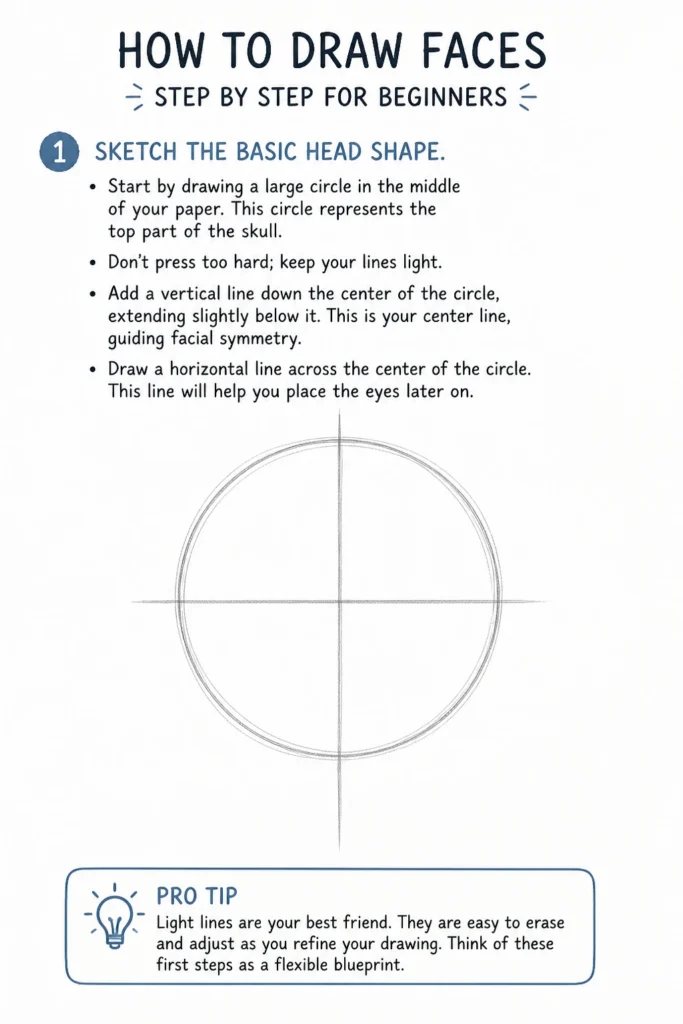
Add a vertical line down the center of the circle, extending slightly below it. This is your center line, guiding facial symmetry.
Draw a horizontal line across the center of the circle. This line will help you place the eyes later on.
Pro Tip: Light lines are your best friend. They are easy to erase and adjust as you refine your drawing. Think of these first steps as a flexible blueprint.
Step 2: Define the Jawline and Chin
Measure from the bottom of your initial circle to the top. Then, extend your vertical center line downwards by roughly the same distance. This marks where the chin will be.
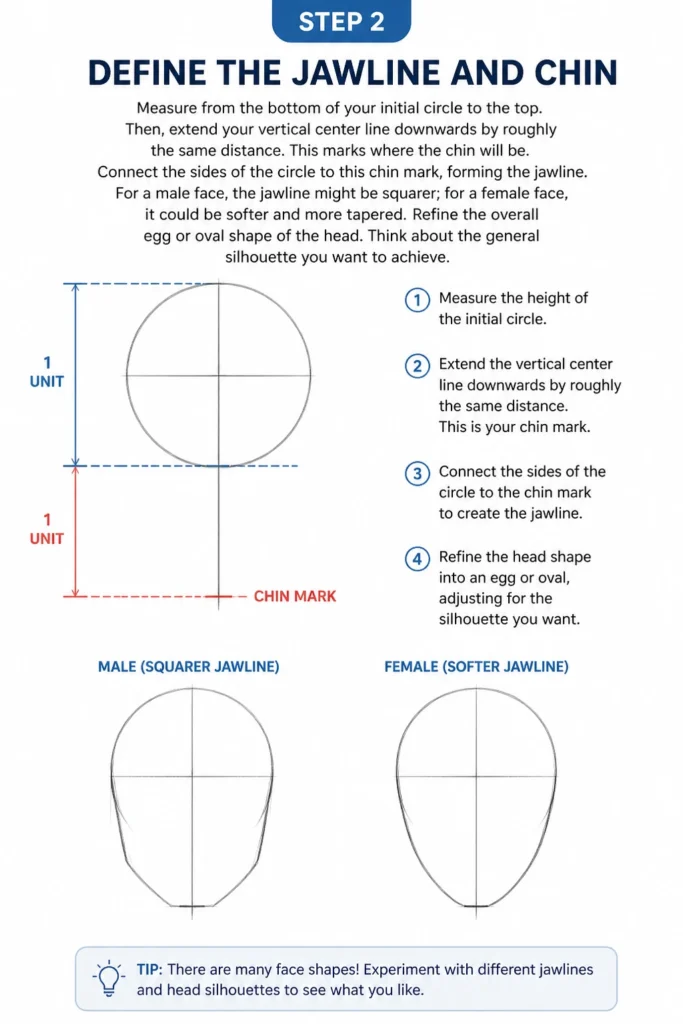
Connect the sides of the circle to this chin mark, forming the jawline. For a male face, the jawline might be squarer; for a female face, it could be softer and more tapered.
Refine the overall egg or oval shape of the head. Think about the general silhouette you want to achieve.
Step 3: Establish Key Proportional Guidelines
Divide the face vertically into halves with your initial horizontal line (the eye line). Now, divide the bottom half (from the eye line to the chin) into two equal sections.
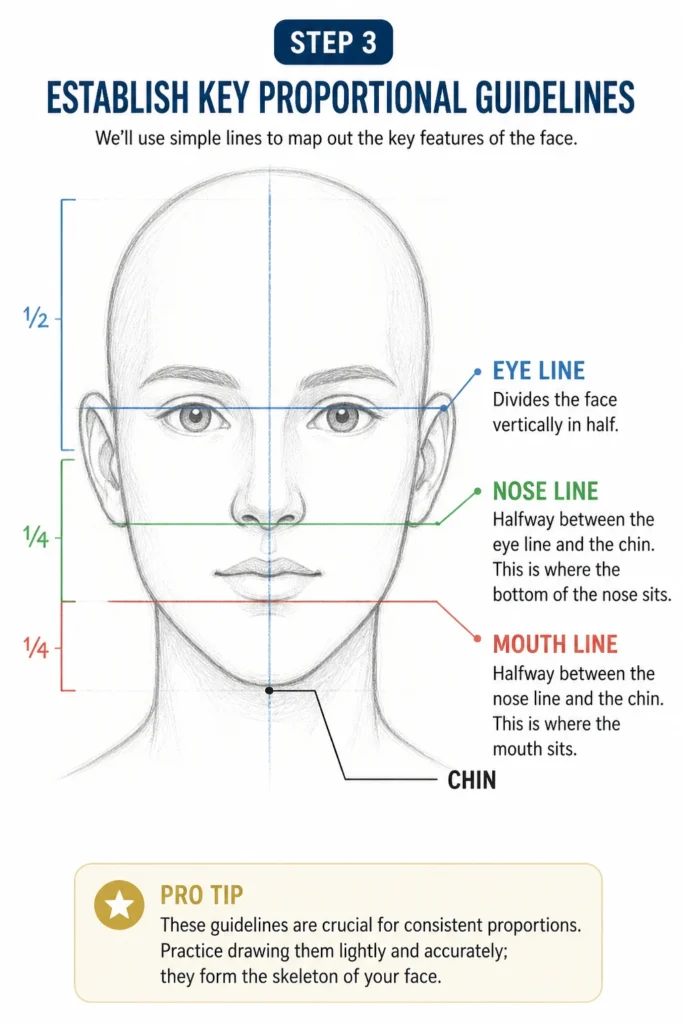
Mark the halfway point between the eye line and the chin. This new line will be where the bottom of the nose sits.
Divide the space between the nose line and the chin in half again. This final line indicates the placement of the mouth.
Pro Tip: These guidelines are crucial for consistent proportions. Practice drawing them lightly and accurately; they form the skeleton of your face.
Step 4: Place the Eyes
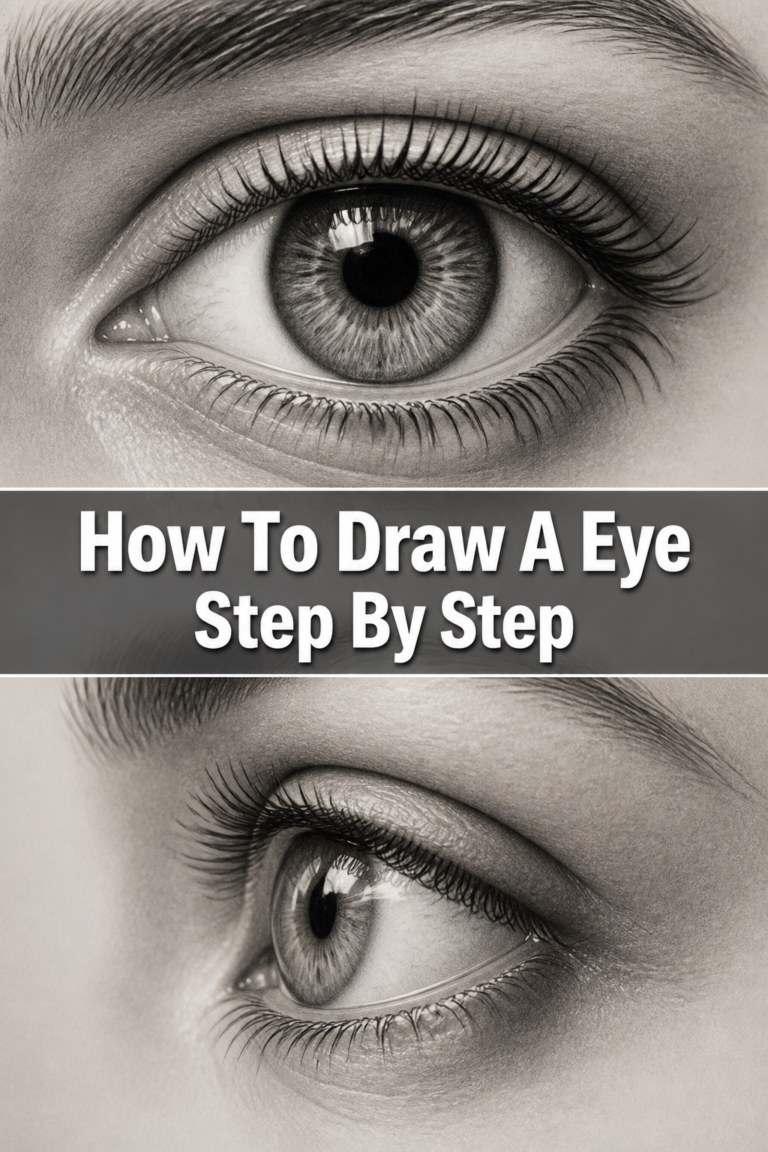
Draw two almond or oval shapes on the eye line. The space between the eyes should be roughly the width of one eye.
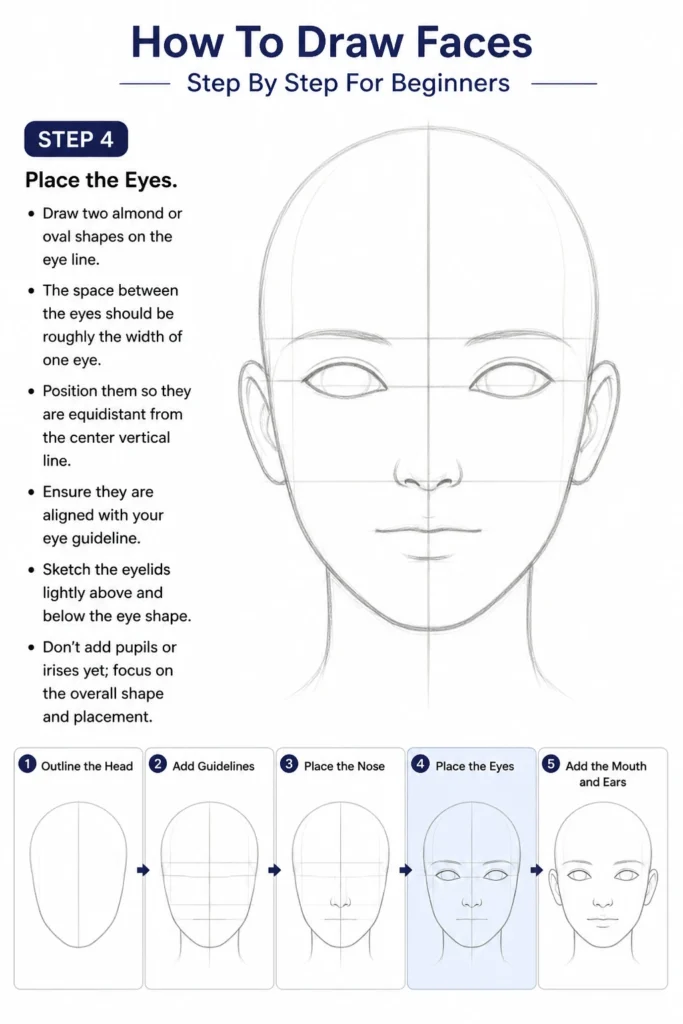
Position them so they are equidistant from the center vertical line. Ensure they are aligned with your eye guideline.
Sketch the eyelids lightly above and below the eye shape. Don’t add pupils or irises yet; focus on the overall shape and placement.
Step 5: Draw the Nose
Locate your nose line. The bottom of the nose will rest on this line.
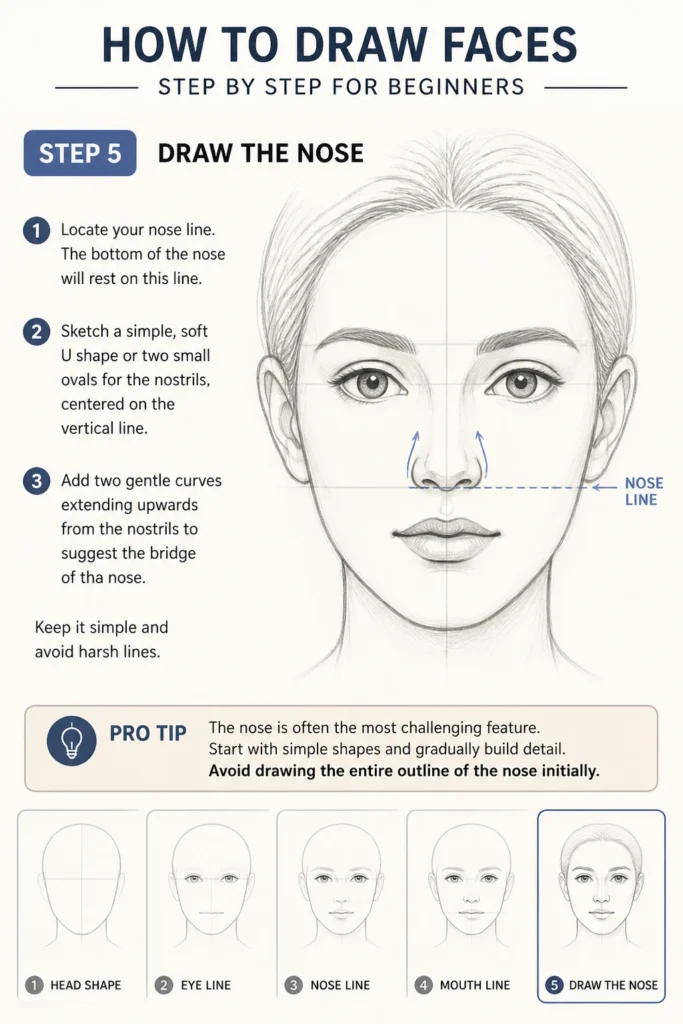
Sketch a simple, soft “U” shape or two small ovals for the nostrils, centered on the vertical line.
Add two gentle curves extending upwards from the nostrils to suggest the bridge of the nose. Keep it simple and avoid harsh lines.
Pro Tip: The nose is often the most challenging feature. Start with simple shapes and gradually build detail. Avoid drawing the entire outline of the nose initially.
Step 6: Form the Mouth
Find your mouth line. The line where the lips meet will sit on or just above this guideline.
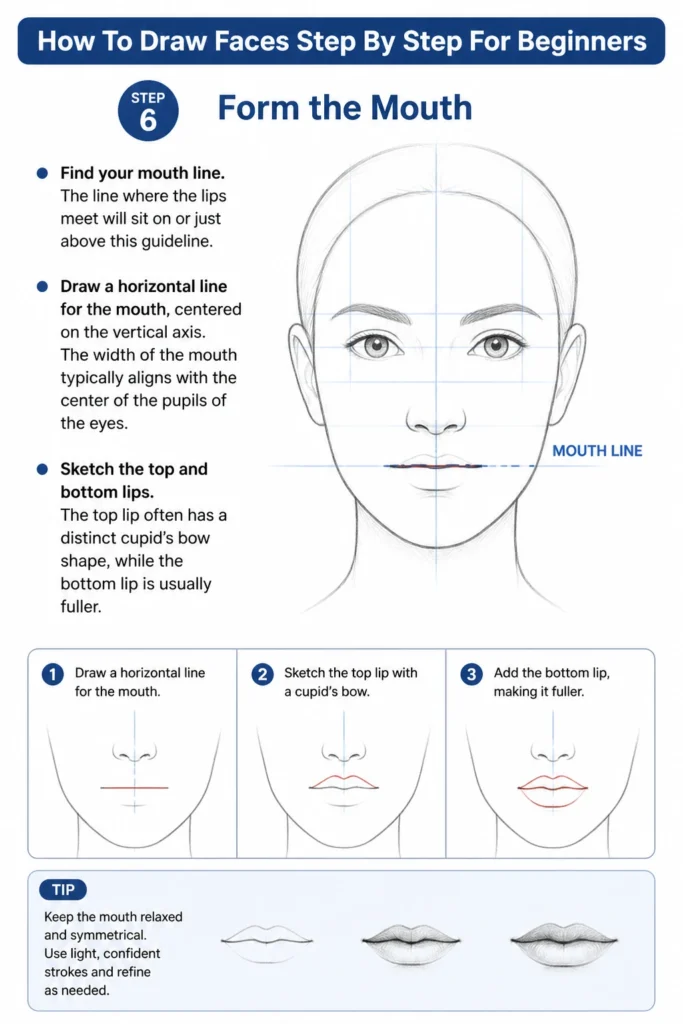
Draw a horizontal line for the mouth, centered on the vertical axis. The width of the mouth typically aligns with the center of the pupils of the eyes.
Sketch the top and bottom lips. The top lip often has a distinct “cupid’s bow” shape, while the bottom lip is usually fuller.
Step 7: Add the Ears and Hairline
Place the ears between the eye line and the nose line on either side of the head. Their exact position can vary slightly depending on the individual.
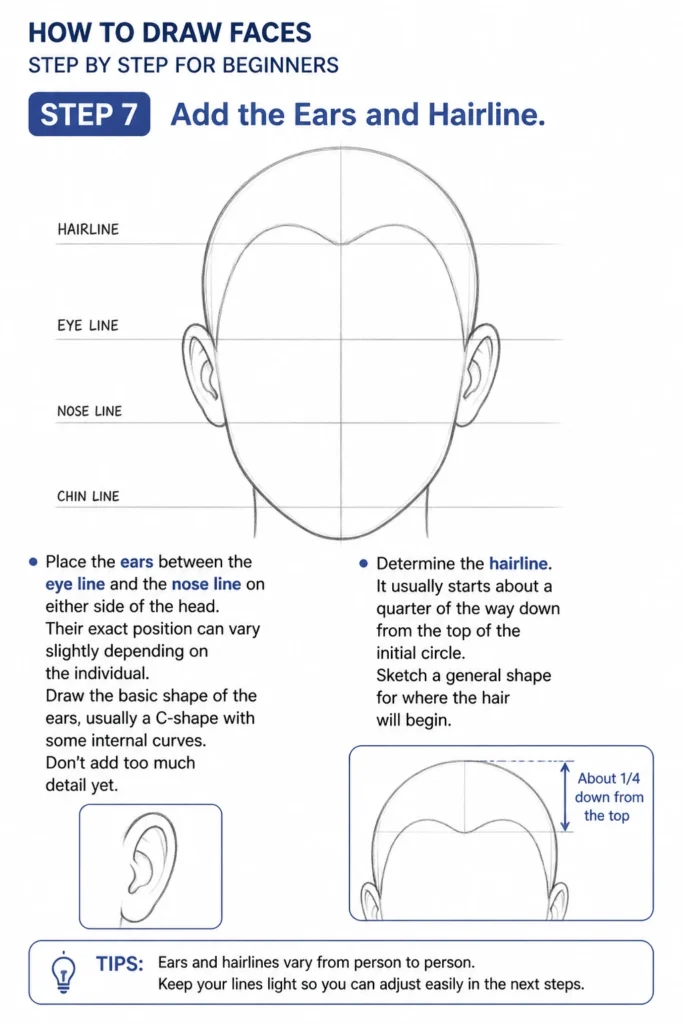
Draw the basic shape of the ears, usually a C-shape with some internal curves. Don’t add too much detail yet.
Determine the hairline. It usually starts about a quarter of the way down from the top of the initial circle. Sketch a general shape for where the hair will begin.
Step 8: Refine Features and Add Detail
Go back to the eyes. Add the irises and pupils, ensuring they are looking in the same direction. Sketch in eyebrows just above the eye line.
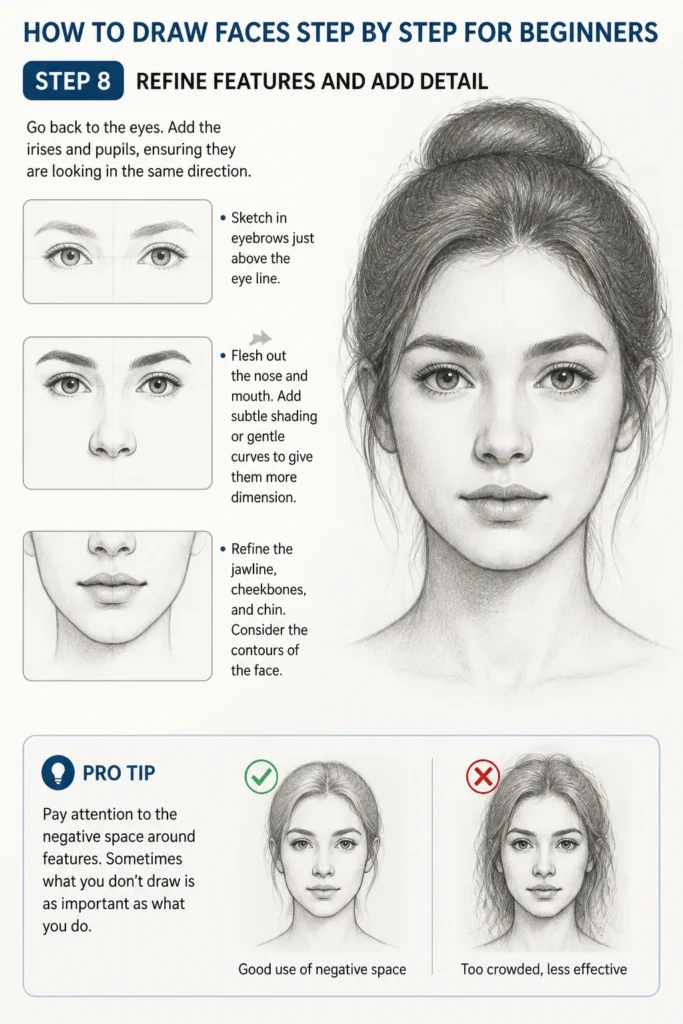
Flesh out the nose and mouth. Add subtle shading or gentle curves to give them more dimension.
Refine the jawline, cheekbones, and chin. Consider the contours of the face.
Pro Tip: Pay attention to the negative space around features. Sometimes what you don’t draw is as important as what you do.
Step 9: Draw the Hair
Sketch the mass and flow of the hair, starting from your hairline guideline. Think of hair as a volume, not individual strands.
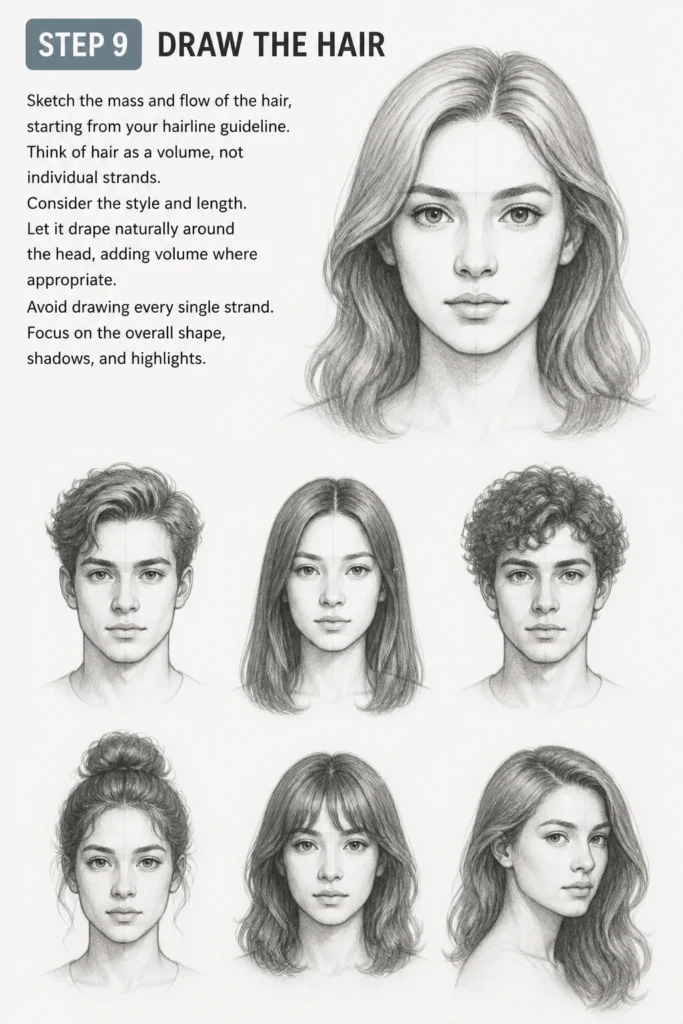
Consider the style and length. Let it drape naturally around the head, adding volume where appropriate.
Avoid drawing every single strand. Focus on the overall shape, shadows, and highlights.
Step 10: Erase Guidelines and Final Touches
Carefully erase all your initial construction lines. This will make your drawing look much cleaner.
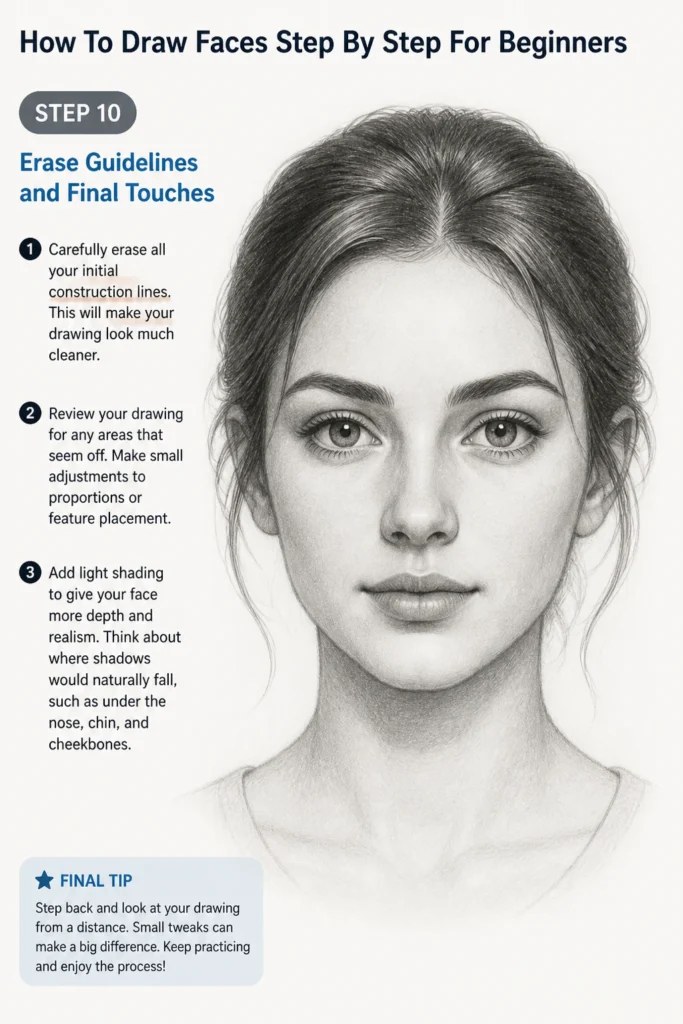
Review your drawing for any areas that seem off. Make small adjustments to proportions or feature placement.
Add light shading to give your face more depth and realism. Think about where shadows would naturally fall, such as under the nose, chin, and cheekbones.
Common Mistakes to Avoid
Drawing Features Too Flat
Many beginners draw eyes, noses, and mouths as if they are flat cutouts on the face. This makes the drawing look two-dimensional and unrealistic. Remember that the face is a three-dimensional form, with curves and contours.
Instead, think of features as existing on a sphere or an egg shape. The nose protrudes, the eyes are set into sockets, and the lips curve around the teeth. Use subtle shading and varying line weight to suggest this depth.
Incorrect Proportions
One of the most common issues is misplacing features, leading to an unbalanced face. Eyes might be too big, the nose too long, or the chin too short. This often happens when artists don’t use initial guidelines.
Always start with your basic construction lines for the eyes, nose, and mouth. Regularly compare the distances between features and the overall head shape. Stepping back from your drawing can help you spot these errors.
Making Faces Too Symmetrical
While guidelines help with symmetry, perfectly symmetrical faces often look unnatural or robotic. Real faces have subtle asymmetries; one eye might be slightly higher, or one side of the mouth a little different.
Embrace slight variations. Once you have the basic structure down, allow for minor imperfections. This adds character and realism to your portraits, making them more engaging.
Drawing Hair as a Helmet
Beginners sometimes draw hair as a solid, flat mass glued to the head. This makes the hair look stiff and unnatural, lacking volume and movement. Hair is a complex element that flows and has weight.
Think of hair as starting above the scalp, not directly on it, to give it volume. Sketch the overall shape and direction of the hair flow first, then add suggestions of individual strands or texture.
Troubleshooting
My Face Looks Lopsided
If your face appears uneven, the primary issue is likely your initial vertical centerline or the placement of your horizontal guidelines. A slight tilt in these foundational lines can throw off the entire drawing.
Go back and redraw your core construction lines very lightly, ensuring the vertical line is truly vertical and the horizontal lines are parallel and correctly spaced. Use a ruler if necessary to check alignment in the early stages.
Features Don’t Look Realistic
This often happens when you focus too much on drawing symbols of features (like a perfect almond for an eye) rather than observing their actual shape and form. Your features might lack depth or look generic.
Study real faces—from photos or life. Notice the subtle curves, the way light hits different planes, and the variety in shapes. Practice drawing individual features multiple times before integrating them into a full face.
The Face Lacks Dimension
A flat-looking face usually means you’re not utilizing shading or considering the three-dimensional form. Without light and shadow, your drawing will appear flat on the page.
Think about the light source. Where is the light coming from? This will determine where shadows fall—under the nose, chin, cheekbones, and around the eyes. Gradually build up your shading from light to dark to create depth.
Key Takeaways
- Always start with basic shapes: A circle for the skull and guidelines for features are essential.
- Master proportions: Consistent spacing for eyes, nose, and mouth is key to a balanced face.
- Build gradually: Don’t try to perfect a feature immediately; sketch lightly and refine over time.
- Observe real faces: Study how light, shadow, and individual features appear in life or photos.
- Embrace practice: Drawing is a skill that improves with consistent effort and experimentation.
- Use light lines: Your initial sketches should be barely visible, making corrections easy.
Frequently Asked Questions
How do I make my faces look less generic?
To make faces less generic, focus on individual characteristics. Pay attention to the subtle differences in eye shape, nose bridge, lip fullness, and jawline. Study diverse reference photos and try to capture unique angles and expressions. Practice drawing specific people rather than just a general “face.”
What pencil hardness is best for beginners?
For beginners, an HB or 2B pencil is ideal. HB is a good all-around pencil for sketching and light lines, while 2B is slightly softer, allowing for darker lines and easier shading. Avoid very hard pencils (like 2H) which can indent the paper, and very soft ones (like 6B) which can be messy for initial sketches.
Should I draw from imagination or reference?
As a beginner, always draw from reference. Whether it’s a photo, a live model, or even your own reflection, references help you understand real-world proportions, light, and shadow. Once you’ve developed a strong understanding of facial anatomy and structure, drawing from imagination will become much easier and more accurate.
How do I make my drawings look more like the person I’m trying to draw?
The key to capturing likeness is careful observation and accurate measurement. Constantly compare the angles, distances, and shapes in your drawing to your reference. Pay close attention to unique features like the distance between the eyes, the shape of the nostrils, or the curve of the lips. Small details make a big difference in capturing a person’s unique appearance.
Our Top Recommended Finds
- Sketchbook with smooth paper: A good quality paper reduces friction and allows for smoother lines and blending.
- Kneaded eraser: This soft, pliable eraser lifts graphite without damaging the paper, perfect for lightening lines or cleaning up.
- Set of drawing pencils (HB, 2B, 4B, 6B): Having a range of hardness allows for more versatility in sketching, shading, and adding detail.
Your Artistic Journey Starts Now
You’ve taken the first exciting steps into the world of drawing faces. This guide provides a solid foundation, but the real magic happens with practice. Don’t be afraid to experiment, make mistakes, and learn from every stroke.
Keep drawing, keep observing, and watch your skills grow with each new face you create. Perhaps your next step is exploring different facial expressions or mastering specific features. Pick up your pencil today and bring another face to life on your page.