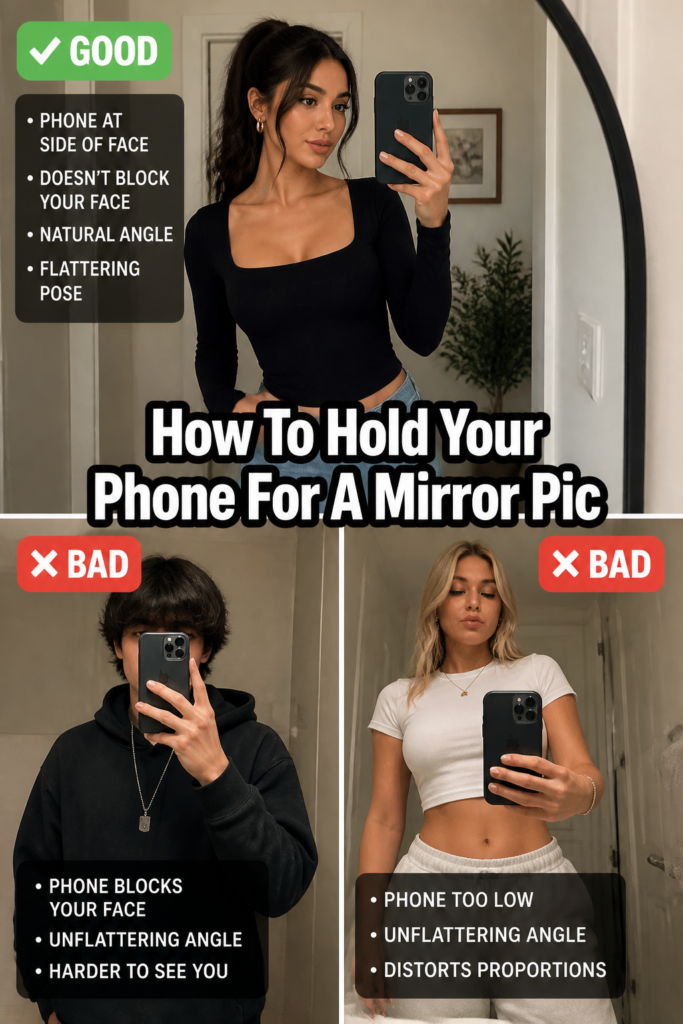
🤳 How To Hold Your Phone For A Mirror Pic
Mirror selfies are a staple of modern photography, a quick way to share your outfit, your mood, or just a moment. Yet, getting that perfect shot often feels like a secret art. I’ve spent countless hours in front of mirrors, phone in hand, perfecting the pose and the hold.
This guide distills all those trials and errors into simple, actionable steps. You’ll learn the techniques I use to capture flattering, clear, and engaging mirror pictures every time.
Quick Overview
This guide will empower you to take stunning mirror pictures with confidence and ease. You’ll master phone positioning, lighting, and common pitfalls.
- Time needed: 15-30 minutes (initial practice)
- Difficulty: Beginner
- What you’ll need: Your smartphone, a clean mirror, good lighting
Step-by-Step Instructions
Step 1: Prepare Your Canvas and Tool
Before you even think about posing, ensure your mirror is spotless. Dust, smudges, and fingerprints will show up prominently in your photo. Use a glass cleaner and a microfiber cloth for a streak-free shine.
Next, wipe your phone’s camera lens. Even tiny smudges can significantly blur your image quality. A quick clean makes a big difference.
Your background also plays a crucial role. Tidy up any clutter that might distract from your main subject – you!
Step 2: Find Your Best Light Source
Lighting is arguably the most important element for any photograph, and mirror pics are no exception. Natural light is almost always your best friend. Position yourself facing a window or a soft, diffused light source.
Avoid harsh overhead lights or direct, blinding sunlight, which can create unflattering shadows. Experiment with different angles relative to your light source. A slight turn can dramatically improve how you look.
Pro Tip: If natural light is scarce, use a ring light or a soft lamp. Position it slightly above and in front of you for even illumination.
Step 3: Position Your Body and Angle
Stand naturally, but with purpose. Your stance can convey confidence, playfulness, or elegance. Experiment with subtle shifts in weight distribution, a slight lean, or a hand on your hip.
Think about what you want to emphasize. If it’s an outfit, ensure the full ensemble is visible and flattering. A slight turn of your body, rather than facing the mirror head-on, can often create a more dynamic and slender silhouette.
Step 4: Determine Your Phone’s Height and Distance
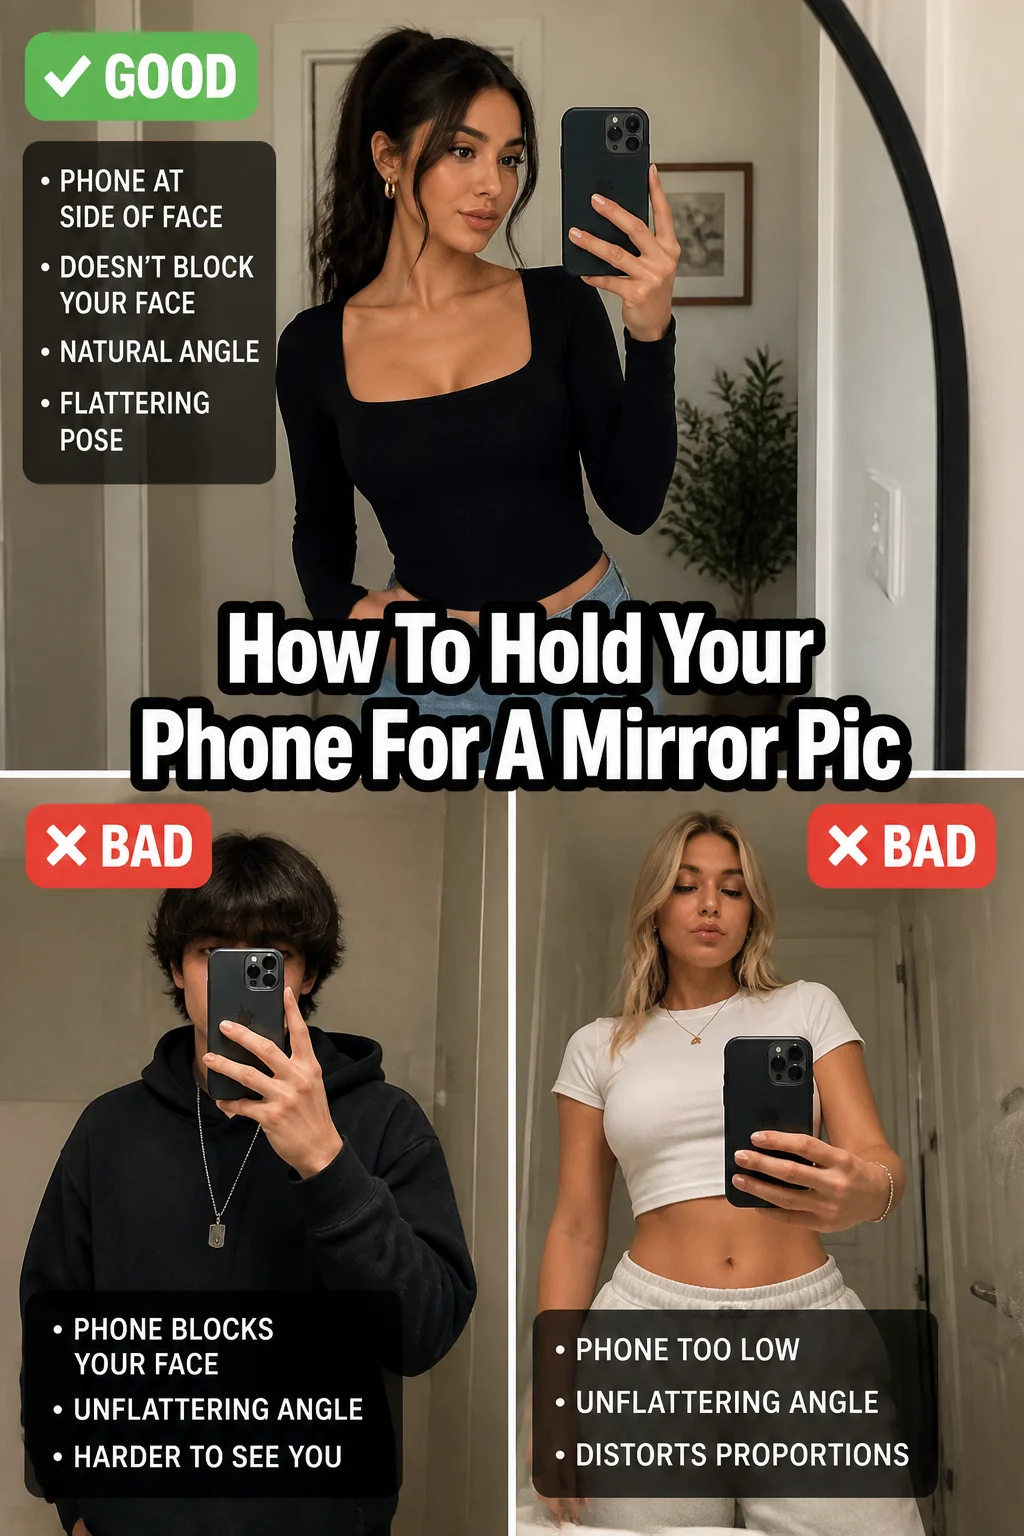
This is where the “hold” truly comes in. Generally, holding your phone slightly above eye level and angled downwards can be very flattering. This angle tends to elongate your body and can make your face appear more defined.
Experiment with distance from the mirror. Too close, and you might cut off parts of your body or get a distorted wide-angle effect. Too far, and you might get lost in the background. Find the sweet spot where you fill the frame nicely.
Step 5: Master the Phone Grip for Stability
Hold your phone firmly but relax your grip. A shaky hand leads to blurry photos. Use both hands if necessary for extra stability, especially if you’re holding it at an awkward angle.
One common technique is to cradle the phone in one hand while using the thumb or index finger of the other hand to tap the shutter button. You can also use the volume buttons as a shutter release for a more stable press.
Step 6: Conceal or Incorporate Your Phone
Decide if you want your phone to be a visible part of the picture or subtly hidden. If hiding it, try to position it so it covers as little of your face or outfit as possible. Holding it slightly to the side or angled away from your body can minimize its impact.
If you’re incorporating it, make it part of your pose. Hold it confidently, perhaps showing off a stylish phone case. The key is intentionality.
Pro Tip: For a hidden look, use the timer function. Set a 3 or 10-second timer, press the shutter, then quickly adjust your hand to a less conspicuous position or even put your phone down (if possible) before the photo is taken.
Step 7: Tap to Focus and Adjust Exposure
Before you snap, tap on your face or the most important part of your outfit on the phone screen. This tells your phone’s camera where to focus, ensuring sharpness.
After tapping, a small slider or icon might appear allowing you to adjust exposure (brightness). Slide it up or down to make sure your image isn’t too dark or too bright. This fine-tuning can dramatically improve the final image.
Step 8: Take Multiple Shots from Various Angles
Don’t settle for just one photo. Take many! Shift your weight, change your expression, move your phone slightly, and try different angles. The more options you have, the higher the chance of finding that perfect shot.
Digital storage is cheap; missed opportunities are not. Review your photos periodically as you shoot to see what’s working and what’s not. This allows for real-time adjustments.
Step 9: Review and Refine Your Selection
Once your photoshoot is complete, go through your gallery. Look for photos that are in focus, well-lit, and capture your desired look. Don’t be afraid to delete the ones that don’t meet your standards.
The best mirror pics often require a little post-processing. A slight crop, brightness adjustment, or color enhancement can elevate a good photo to a great one. Many phone apps offer simple editing tools.
Common Mistakes to Avoid
Obscuring Your Face or Outfit
A frequent error is holding the phone directly in front of your face or blocking a key part of your outfit. This defeats the purpose of a mirror picture, which is to showcase you. Always be mindful of what your phone is covering.
Instead, position the phone slightly to the side, above, or below your main subject. Angle it so that the screen faces away from your reflection if you want to be less visible.
Poor Lighting Choices
Shooting in a dimly lit room or under harsh, direct overhead lights leads to unflattering shadows and graininess. This makes even the best pose look bad. Always prioritize good lighting.
Seek out soft, natural light or use supplementary lighting. Experiment with turning off overhead lights and relying on lamps or windows instead.
Messy or Distracting Backgrounds
A cluttered background, like unmade beds, piles of clothes, or dirty dishes, draws attention away from you. It makes your photo look unprofessional and unappealing. Your environment is part of your visual story.
Always take a moment to tidy up the area visible in the mirror. A clean, minimalist background allows you to be the undisputed focal point of your picture.
Awkward Phone Position
Holding the phone too low can create an unflattering angle, making you appear shorter or wider. Holding it too high can make your head look disproportionately small. An unsteady grip also leads to blurry photos.
Aim for a stable, deliberate hold, typically around chest or eye level, angled slightly down. Practice different heights until you find what flatters your figure most.
Troubleshooting
Blurry Photos
If your mirror pictures consistently come out blurry, several factors could be at play. First, ensure your camera lens is clean; a smudge can significantly impair sharpness.
Next, make sure you’re tapping on your face or the main subject on the screen to set the focus before pressing the shutter. Finally, ensure your hands are steady. Use both hands or lean against something for support if needed.
Phone Visible and Distracting
When your phone takes center stage, it detracts from your pose or outfit. This usually happens when the phone is held too far forward or directly in line with your body.
Try angling your phone slightly away from the mirror or holding it closer to your body. Utilize the timer function to briefly remove your hand from the phone after pressing the shutter, allowing it to be less prominent.
Reflections or Glare on the Mirror
Unwanted reflections or glare can ruin an otherwise perfect shot. This often occurs when a light source is directly opposite the mirror or angled incorrectly.
Adjust your position relative to the light source. Try moving to a different spot in the room or turning off specific lights. Sometimes, a slight shift in your body or phone angle can eliminate the glare without changing the lighting setup.
Key Takeaways
- Always clean your mirror and phone lens before starting.
- Prioritize soft, natural light for the most flattering results.
- Experiment with body angles and phone height to find your best look.
- Maintain a steady grip on your phone to prevent blurry images.
- Tap to focus and adjust exposure for sharp, well-lit shots.
- Take multiple photos and be prepared to edit for final polish.
Frequently Asked Questions
Should I use flash for a mirror pic?
No, generally avoid using flash for mirror pictures. Flash often creates harsh glares on the mirror surface and can wash out your features, leading to an unnatural look. Rely on natural light or external soft lighting instead.
How do I make my arms look natural while holding the phone?
Relax your shoulders and elbows. Avoid locking your arms straight out. You can rest an elbow on your hip or hold the phone slightly closer to your body. Practice in front of the mirror to find a comfortable and natural-looking arm position.
What if my mirror isn’t full-length?
If you only have a smaller mirror, focus on upper body shots. Frame your reflection to highlight your outfit’s top half, accessories, or a close-up of your face. Adjust your distance to fit as much of yourself as possible into the frame.
Can I use my phone’s front camera for a mirror pic?
While technically possible, it’s not recommended. The front camera typically has lower resolution and image quality compared to the rear camera. Using the rear camera, even if you can’t see the screen as you shoot, will yield superior results.
Our Top Recommended Finds
- Microfiber Cleaning Cloth: Essential for keeping your mirror and phone lens spotless, ensuring crystal-clear images every time.
- Portable Ring Light: Provides soft, even illumination to eliminate harsh shadows and brighten your photos, especially in low-light conditions.
- Smartphone Tripod with Remote: Offers ultimate stability for blur-free shots and allows you to experiment with hands-free poses, making it easier to hide your phone.
Mastering Your Mirror Pic Persona
You now have all the tools and techniques to elevate your mirror picture game. It’s about more than just snapping a photo; it’s about confidence, intention, and understanding the subtle art of light and angle. Don’t be afraid to experiment and make these tips your own.
Start practicing today, even if it’s just for a few minutes. You’ll quickly discover what works best for you and your unique style. Soon, every mirror pic you take will be a testament to your newfound skill.