🎨 How To Draw Starry Night Step By Step

& Painting
No rigid rules or pretension. Just practical guides, medium comparisons, and encouraging tips to help you enjoy the drawing & painting process.
Capturing the magic of Van Gogh’s “The Starry Night” might seem daunting.
However, with a structured approach, you can recreate its iconic beauty on your own canvas.
Having explored various techniques for this masterpiece, I’m excited to share a practical guide that breaks down its complexity into manageable strokes.
Quick Overview
This guide will walk you through the process of drawing and painting your own rendition of Vincent van Gogh’s “The Starry Night.” You’ll learn to capture its distinctive swirling sky, the dramatic cypress tree, and the tranquil village below.
- Time needed: 3-5 hours (depending on detail and drying time)
- Difficulty: Intermediate
- What you’ll need: Canvas or thick paper, acrylic or oil paints (blues, yellows, white, black, green, brown), paintbrushes (various sizes, including a small round brush and a flat brush), palette, water container, paper towels.
Step-by-Step Instructions
Step 1: Gather Your Art Supplies
Before you begin, ensure all your materials are within easy reach. Having everything prepared streamlines the creative process and prevents interruptions.
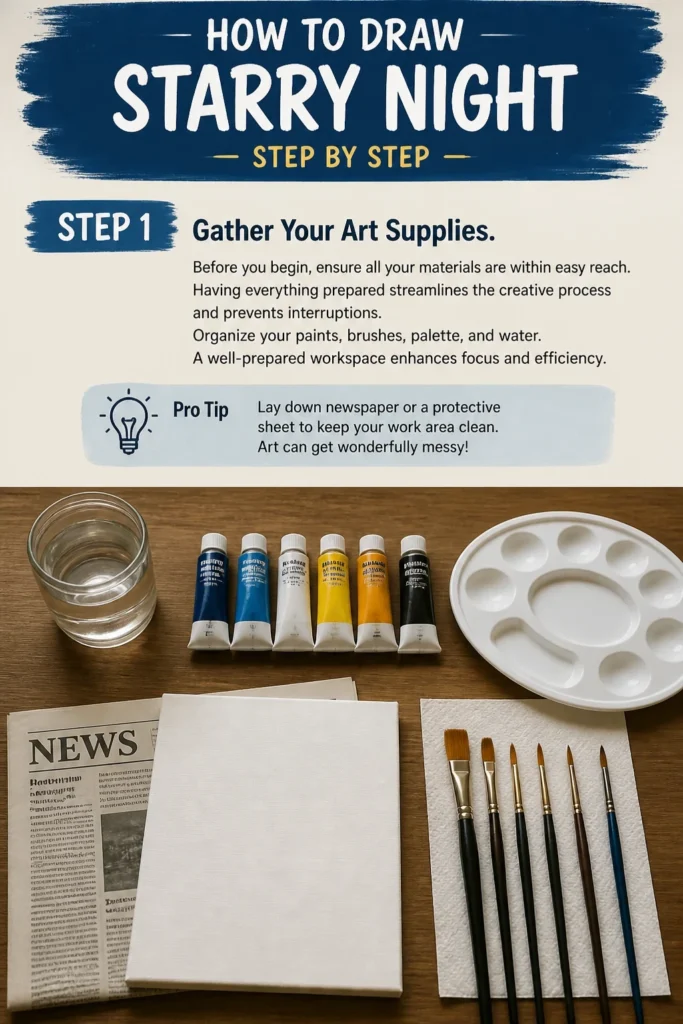
Organize your paints, brushes, palette, and water. A well-prepared workspace enhances focus and efficiency.
Pro Tip: Lay down newspaper or a protective sheet to keep your work area clean. Art can get wonderfully messy!
Step 2: Study the Original Composition
Take a moment to truly observe “The Starry Night.” Notice the interplay of light and shadow, the distinct swirling patterns, and the relative sizes of the elements.
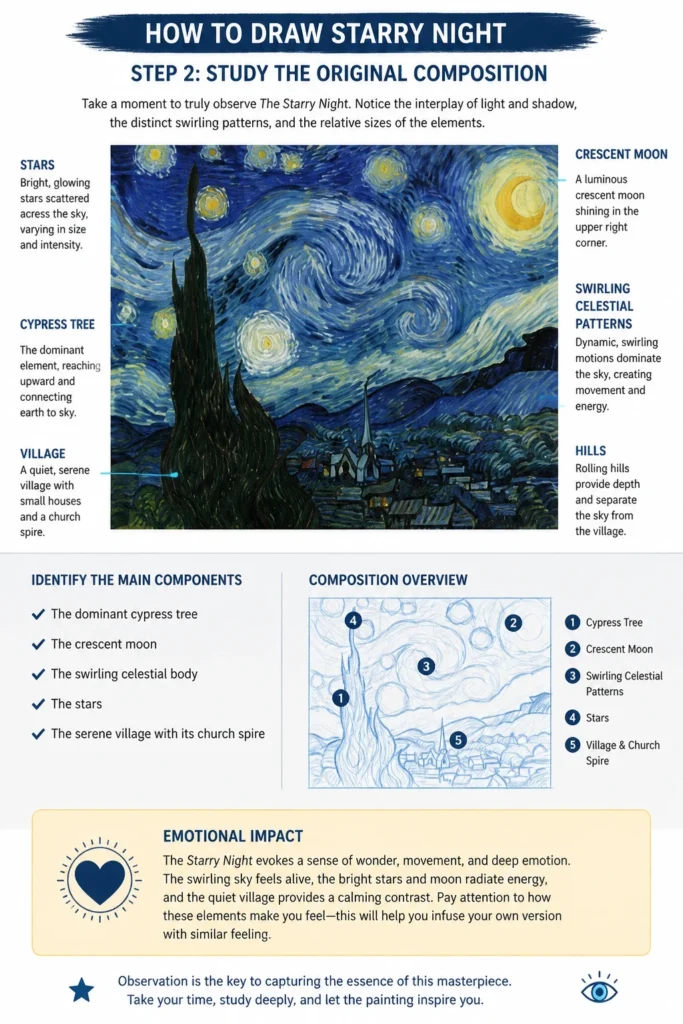
Identify the main components: the dominant cypress tree, the crescent moon, the swirling celestial body, the stars, and the serene village with its church spire.
Pay attention to the emotional impact of the painting. This helps you infuse your own version with similar feeling.
Step 3: Lightly Sketch the Horizon and Village
Begin by establishing the basic layout of your painting. Use a pencil or a very light wash of thin paint.
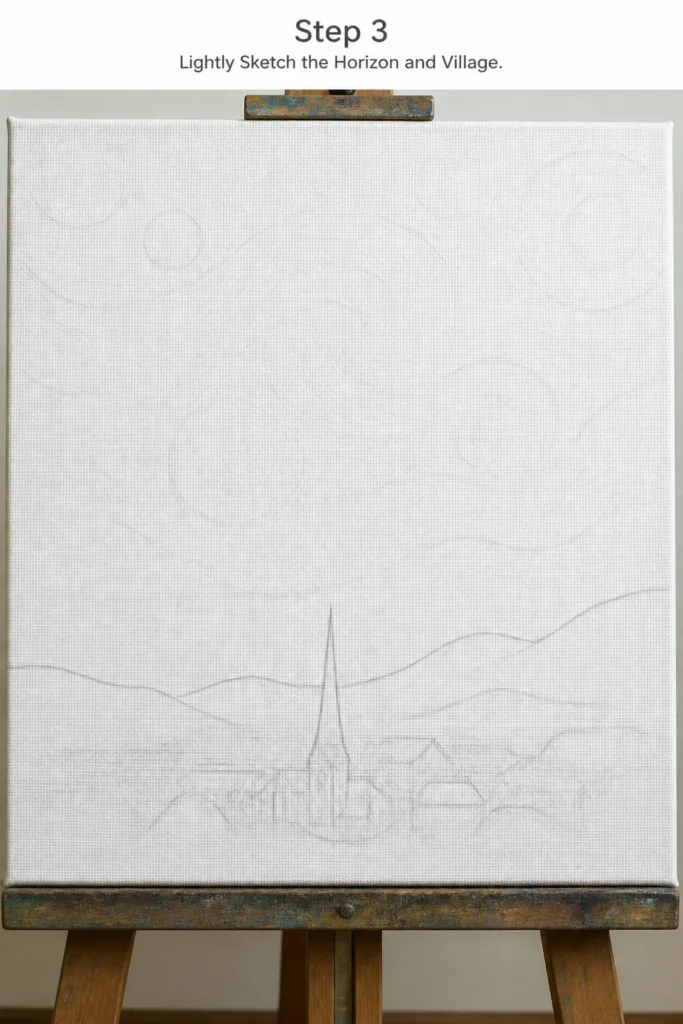
Draw a subtle, slightly wavy horizon line about one-quarter of the way up from the bottom of your canvas. This separates the land from the sky.
Outline the small, clustered shapes of the village houses just above the horizon. Include the tall, slender church spire, centrally placed within the village.
Keep these lines very faint. They are merely guides for your painting, not permanent features.
Step 4: Outline the Dramatic Cypress Tree
The cypress tree is a powerful, flame-like element that anchors the left side of the composition. It should reach almost to the top of your canvas.
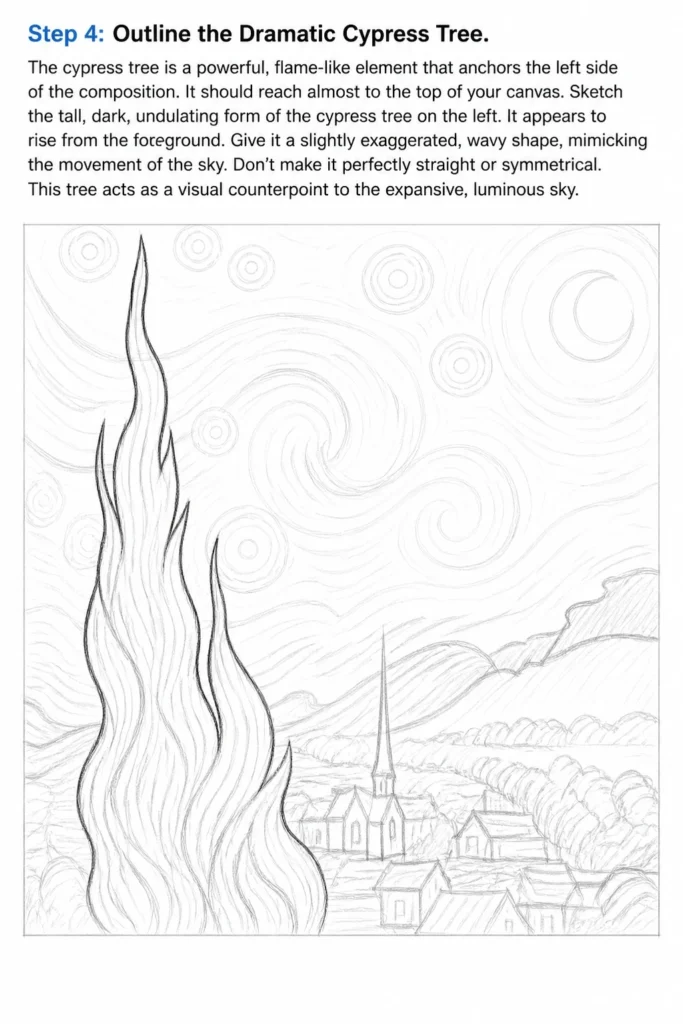
Sketch the tall, dark, undulating form of the cypress tree on the left. It appears to rise from the foreground.
Give it a slightly exaggerated, wavy shape, mimicking the movement of the sky. Don’t make it perfectly straight or symmetrical.
This tree acts as a visual counterpoint to the expansive, luminous sky.
Step 5: Map Out the Swirling Sky
This is where the iconic movement of Van Gogh’s sky truly comes to life. Focus on the large, expressive curves.
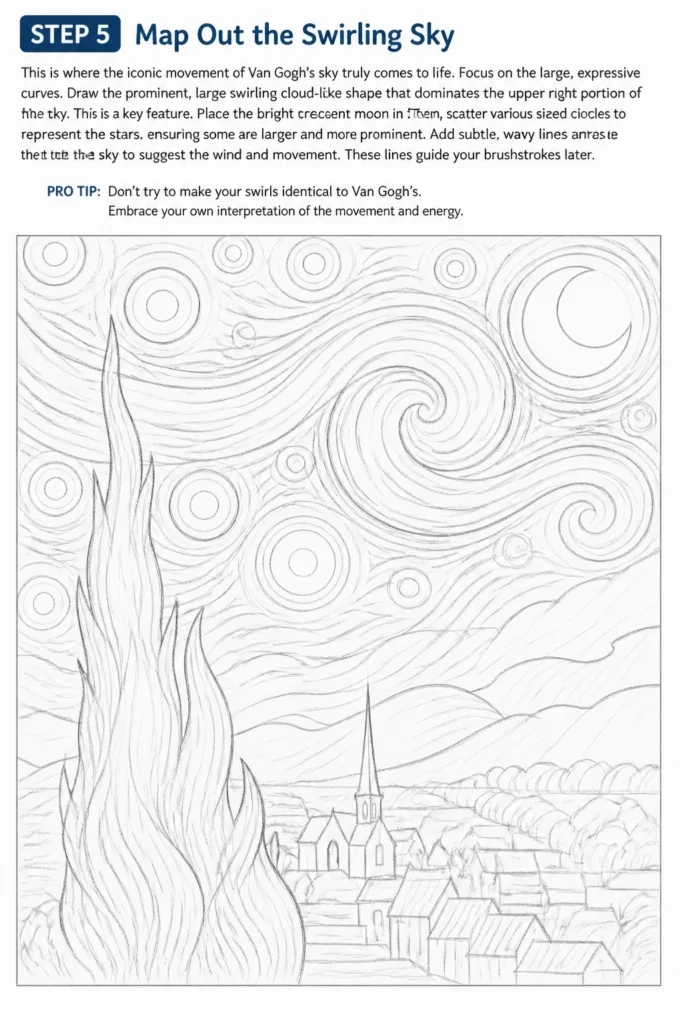
Draw the prominent, large swirling cloud-like shape that dominates the upper right portion of the sky. This is a key feature.
Place the bright crescent moon in the upper right corner, partially obscured by the swirl. Then, scatter various sized circles to represent the stars, ensuring some are larger and more prominent.
Add subtle, wavy lines across the rest of the sky to suggest the wind and movement. These lines guide your brushstrokes later.
Pro Tip: Don’t try to make your swirls identical to Van Gogh’s. Embrace your own interpretation of the movement and energy.
Step 6: Apply Base Colors to the Sky
Now, it’s time to introduce color. Start with thin layers to establish the overall tone of the sky.
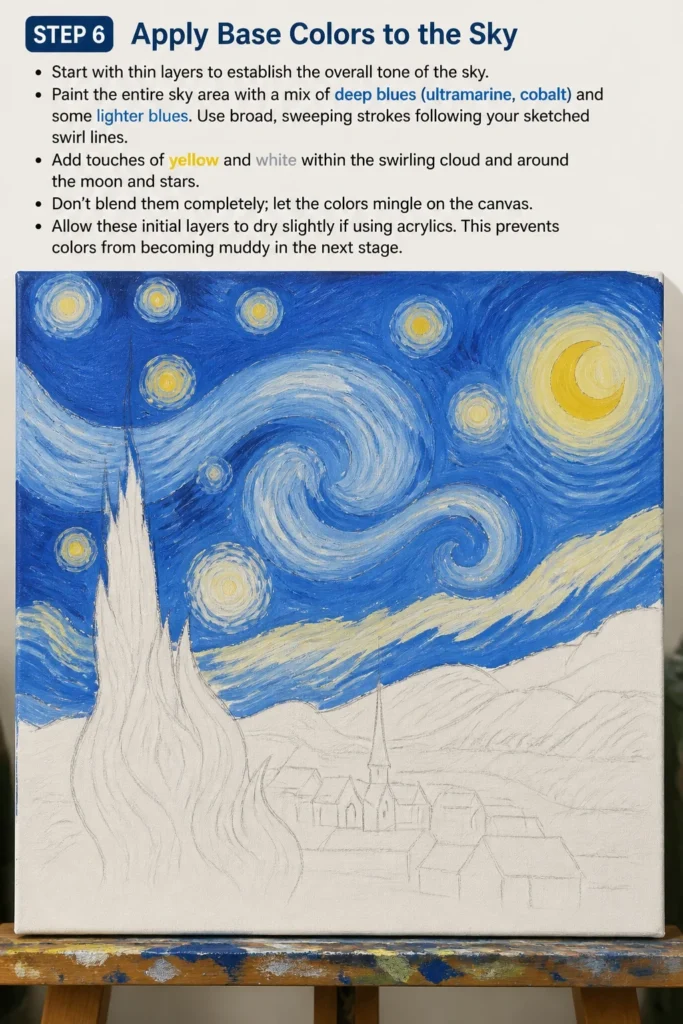
Paint the entire sky area with a mix of deep blues (ultramarine, cobalt) and some lighter blues. Use broad, sweeping strokes following your sketched swirl lines.
Add touches of yellow and white within the swirling cloud and around the moon and stars. Don’t blend them completely; let the colors mingle on the canvas.
Allow these initial layers to dry slightly if using acrylics. This prevents colors from becoming muddy in the next stage.
Step 7: Build Texture with Impasto Brushstrokes
Van Gogh’s style is characterized by thick, visible brushstrokes. This step focuses on creating that texture.
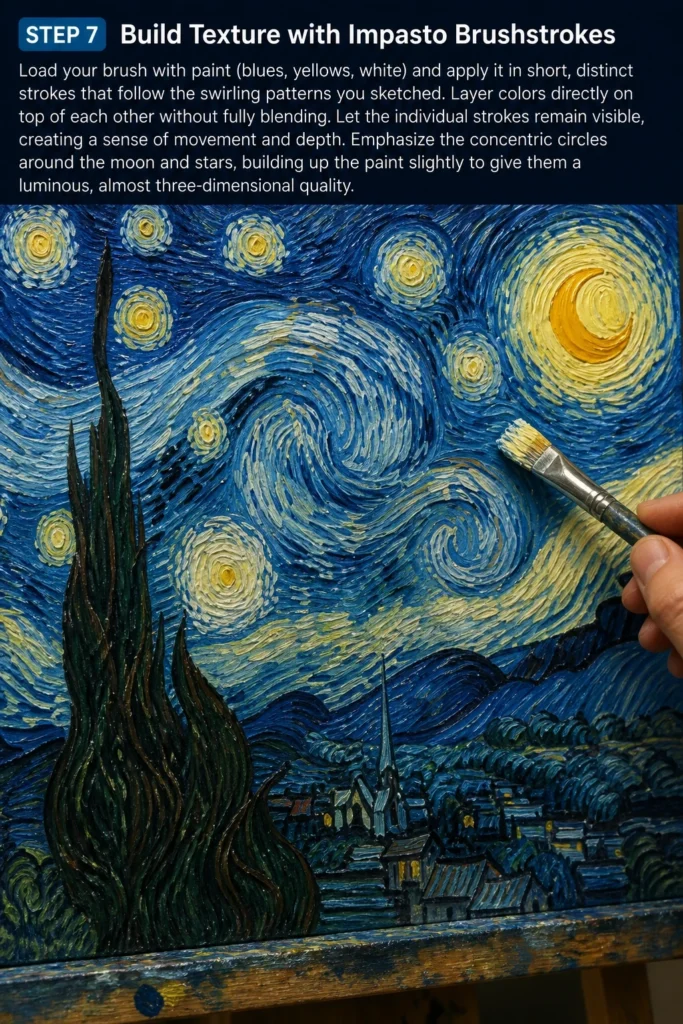
Load your brush with paint (blues, yellows, white) and apply it in short, distinct strokes that follow the swirling patterns you sketched.
Layer colors directly on top of each other without fully blending. Let the individual strokes remain visible, creating a sense of movement and depth.
Emphasize the concentric circles around the moon and stars, building up the paint slightly to give them a luminous, almost three-dimensional quality.
Step 8: Color the Village and Rolling Hills
Shift your focus to the calmer, darker elements of the foreground.
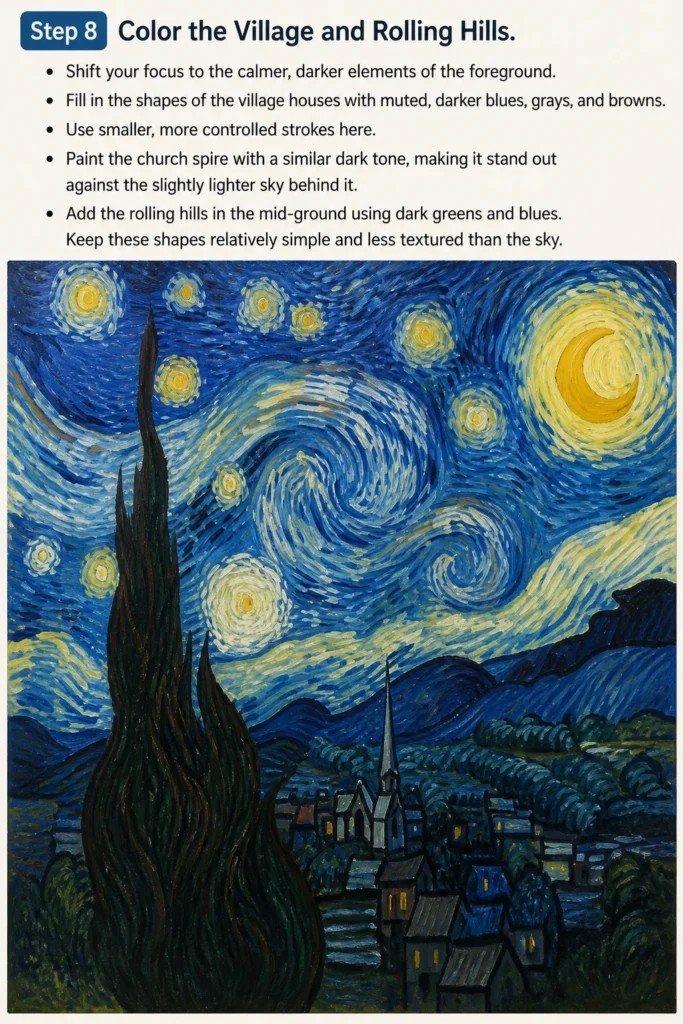
Fill in the shapes of the village houses with muted, darker blues, grays, and browns. Use smaller, more controlled strokes here.
Paint the church spire with a similar dark tone, making it stand out against the slightly lighter sky behind it.
Add the rolling hills in the mid-ground using dark greens and blues. Keep these shapes relatively simple and less textured than the sky.
Step 9: Paint the Cypress Tree and Foreground
The cypress tree should be the darkest and most imposing element in the painting.
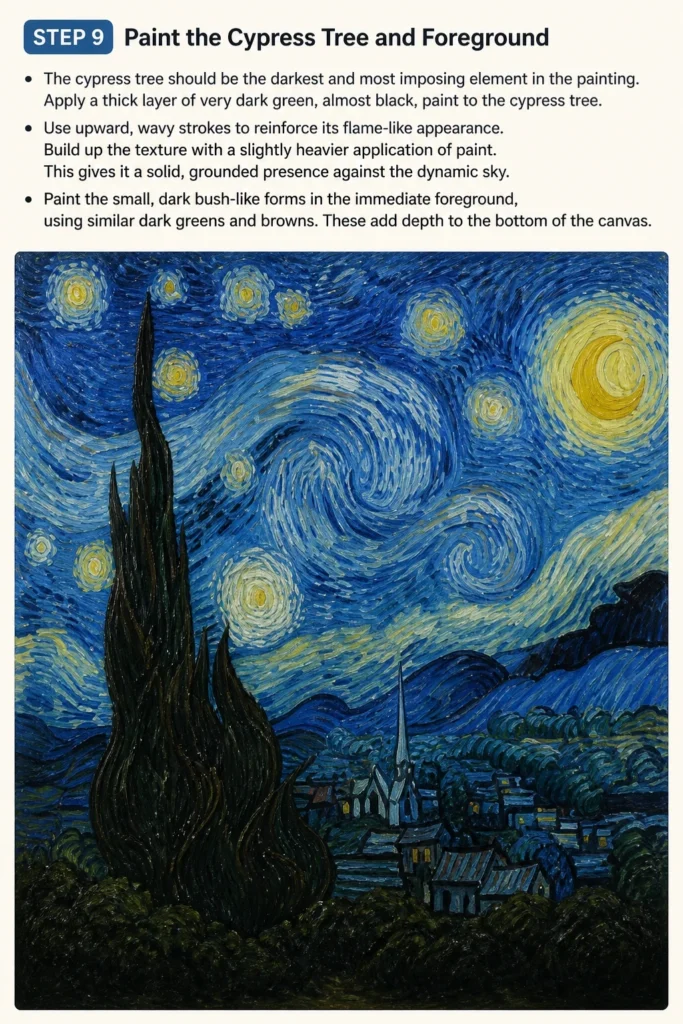
Apply a thick layer of very dark green, almost black, paint to the cypress tree. Use upward, wavy strokes to reinforce its flame-like appearance.
Build up the texture with a slightly heavier application of paint. This gives it a solid, grounded presence against the dynamic sky.
Paint the small, dark bush-like forms in the immediate foreground, using similar dark greens and browns. These add depth to the bottom of the canvas.
Step 10: Add Final Details and Highlights
This stage involves refining elements and adding the finishing touches that bring the painting to life.
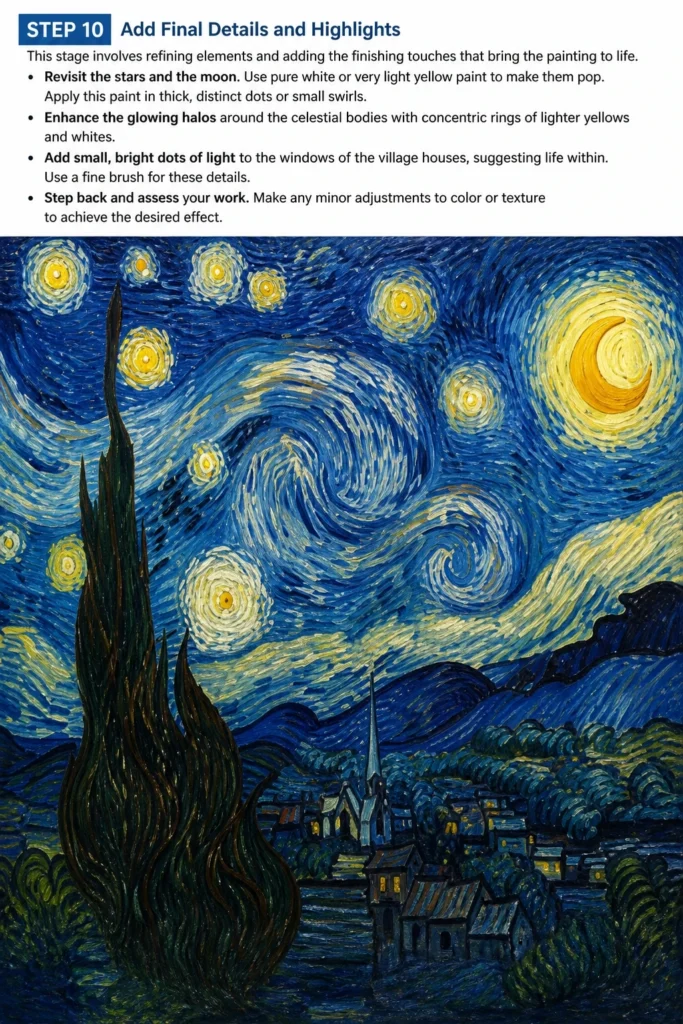
Revisit the stars and the moon. Use pure white or very light yellow paint to make them pop. Apply this paint in thick, distinct dots or small swirls.
Enhance the glowing halos around the celestial bodies with concentric rings of lighter yellows and whites.
Add small, bright dots of light to the windows of the village houses, suggesting life within. Use a fine brush for these details.
Step back and assess your work. Make any minor adjustments to color or texture to achieve the desired effect.
Common Mistakes to Avoid
Over-blending Colors
One common pitfall is blending colors too smoothly, losing the characteristic impasto texture. Van Gogh’s “Starry Night” thrives on visible brushstrokes and the distinct interaction of colors.
Instead of blending, try layering colors side-by-side or on top of each other. Allow the individual strokes to remain visible, creating that vibrant, textured surface.
Making the Cypress Tree Too Symmetrical
The cypress tree is a powerful, organic form, not a neatly trimmed plant. Making it too uniform or perfectly shaped can diminish its dramatic impact.
Embrace its natural, almost wild, undulating shape. Let its branches reach and curve with an expressive, almost fiery quality. It should feel alive and wind-swept.
Neglecting the Foreground Details
While the sky is the star, the foreground elements provide important grounding and contrast. Overlooking them can make the painting feel unbalanced.
Pay attention to the small details of the village and the dark, rolling hills. These elements, though subdued, add depth and a sense of scale to the vastness of the sky.
Rushing the Swirling Sky
The swirling patterns in the sky are crucial to the painting’s energy. Rushing this section can lead to flat or uninspired movement.
Take your time to build up the layers and textures of the swirls. Use varying brushstroke directions and paint thicknesses to create a dynamic, flowing motion that feels authentic.
Troubleshooting
My Colors Look Muddy
Muddy colors often result from over-mixing or applying wet paint over wet paint without letting layers dry. Especially with acrylics, colors can blend unexpectedly.
To fix this, allow the problematic area to dry completely. Then, apply fresh, clean colors on top in distinct layers. Avoid excessive brushing in one spot, which can overwork the paint.
The Sky Lacks Movement
If your sky appears static, it might be due to uniform brushstrokes or insufficient layering. The dynamism comes from varied application.
Go back into the sky with more paint. Use short, curved strokes that follow the path of your swirls. Layer different shades of blue, yellow, and white, letting each stroke be visible to create a sense of flowing energy.
My Cypress Tree Doesn’t Feel Dramatic Enough
A lack of drama in the cypress tree can stem from using too light a color or not enough texture. It needs to be a strong, dark silhouette.
Apply a thicker layer of very dark green or a mix of dark blue and black. Use upward, slightly wavy brushstrokes to build texture and give it a flame-like, imposing presence against the lighter sky.
Key Takeaways
- Embrace Texture: Don’t be afraid to use thick, visible brushstrokes to create movement and depth.
- Layer, Don’t Over-blend: Allow colors to interact on the canvas rather than mixing them completely on your palette.
- Study the Composition: Understand the key elements and their emotional weight before you start painting.
- Balance Elements: The dramatic sky needs the grounded village and cypress tree for contrast and harmony.
- Personalize Your Interpretation: While inspired by Van Gogh, let your own hand and feeling come through in your artwork.
- Practice Patience: Building layers and textures takes time. Enjoy the process rather than rushing to the finish.
Frequently Asked Questions
Can I use watercolors for “Starry Night”?
While technically possible, watercolors will make it challenging to achieve the characteristic thick, textured impasto look of Van Gogh’s original. Acrylics or oils are generally recommended for their opacity and ability to build texture.
How do I make the stars really glow?
To create a glowing effect, use pure white or very light yellow paint for the stars and moon. Apply it thicker than the surrounding paint. You can also add concentric rings of slightly lighter blues and yellows around the stars to suggest a luminous halo.
What if my painting doesn’t look exactly like Van Gogh’s?
That’s perfectly fine, and even encouraged! The goal is to learn from his technique and style, not to create an exact replica. Your unique brushstrokes and interpretation will make your “Starry Night” truly yours.
How do I clean my brushes after using acrylics?
Immediately after use, rinse your brushes thoroughly with water. If paint has dried, you may need a brush cleaner or warm soapy water. Never let acrylic paint dry on your brushes, as it can permanently damage them.
Our Top Recommended Finds
- Artist’s Loft Acrylic Paint Set: A great starter set with a good range of colors for beginners.
- Canvas Panels (Multi-pack): Affordable and versatile surfaces perfect for practice and finished pieces.
- Assorted Paintbrush Set: Includes various sizes and shapes, essential for different painting techniques.
Unleash Your Inner Artist
Drawing “The Starry Night” is more than just copying a painting; it’s an exploration of color, movement, and emotion.
Each stroke you make brings you closer to understanding the genius of Van Gogh and discovering your own artistic voice.
Don’t hesitate. Gather your materials and begin your starry journey today. What other masterpieces will you recreate next?
& Painting
No rigid rules or pretension. Just practical guides, medium comparisons, and encouraging tips to help you enjoy the drawing & painting process.