🌸 How To Draw A Lily Flower Step By Step
Have you ever wanted to capture the elegant beauty of a lily on paper?
I remember my first attempt at drawing a lily; it felt daunting but incredibly rewarding.
This guide will walk you through each stroke, sharing the insights I’ve gained over years of sketching botanicals.
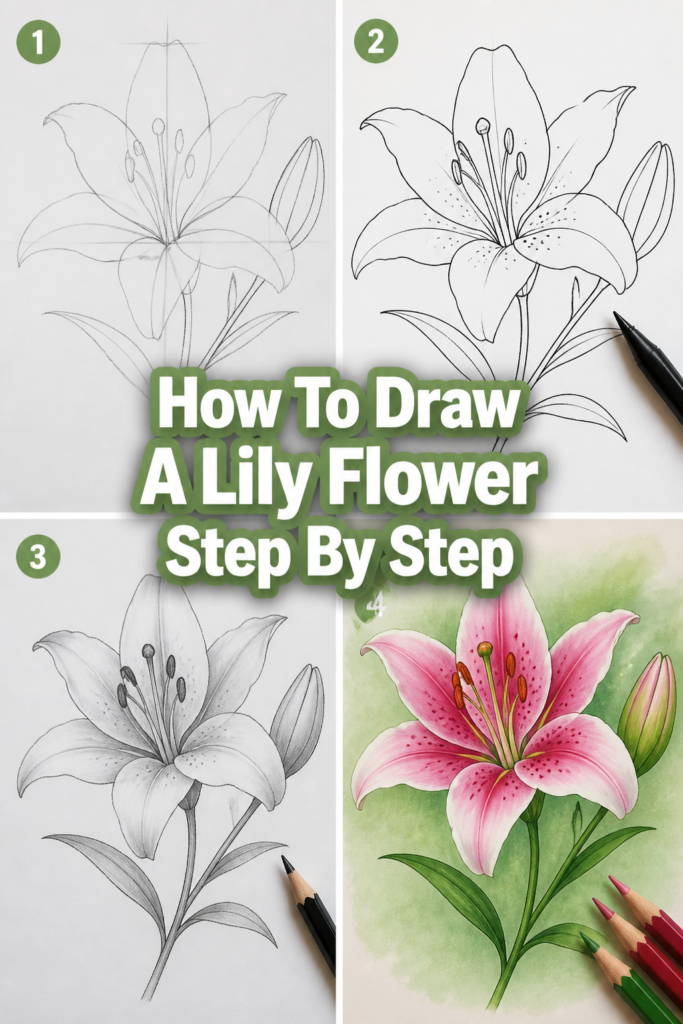
Quick Overview
This guide will help you create a beautiful lily drawing from scratch.
You’ll learn how to build the flower’s structure, refine its delicate petals, and add realistic shading.
- Time needed: 45-75 minutes
- Difficulty: Intermediate
- What you’ll need: Pencil (HB, 2B, 4B), eraser, drawing paper, blending stump (optional)
Step-by-Step Instructions
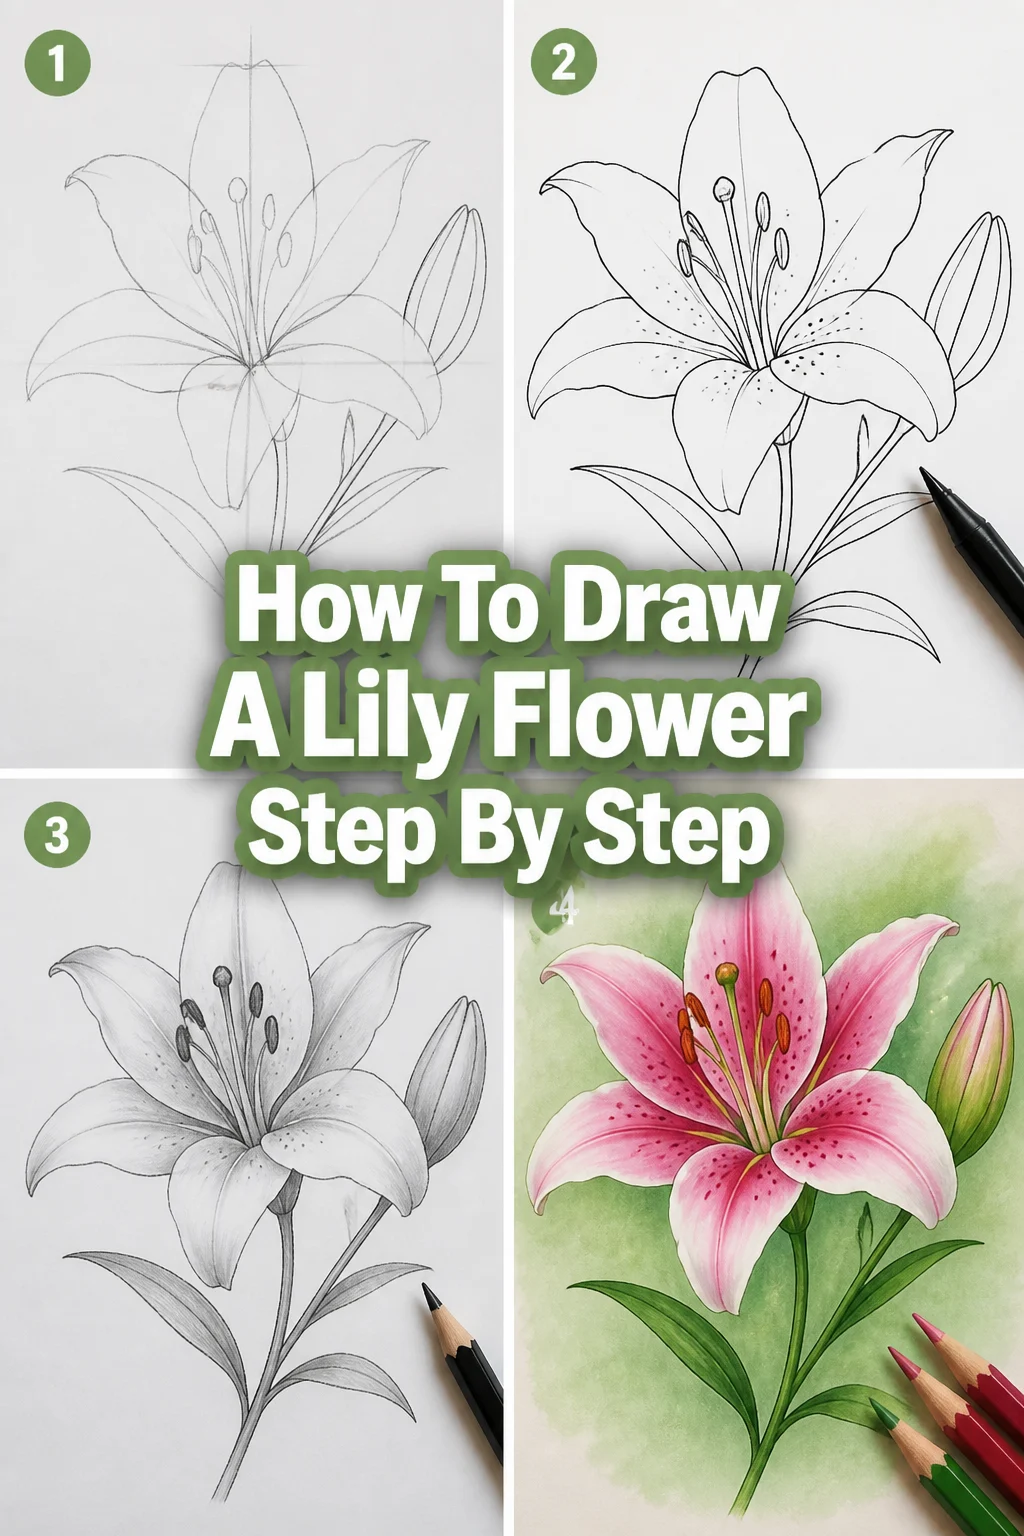
Step 1: Lay Down the Basic Framework
Begin by lightly sketching the core structure of your lily.
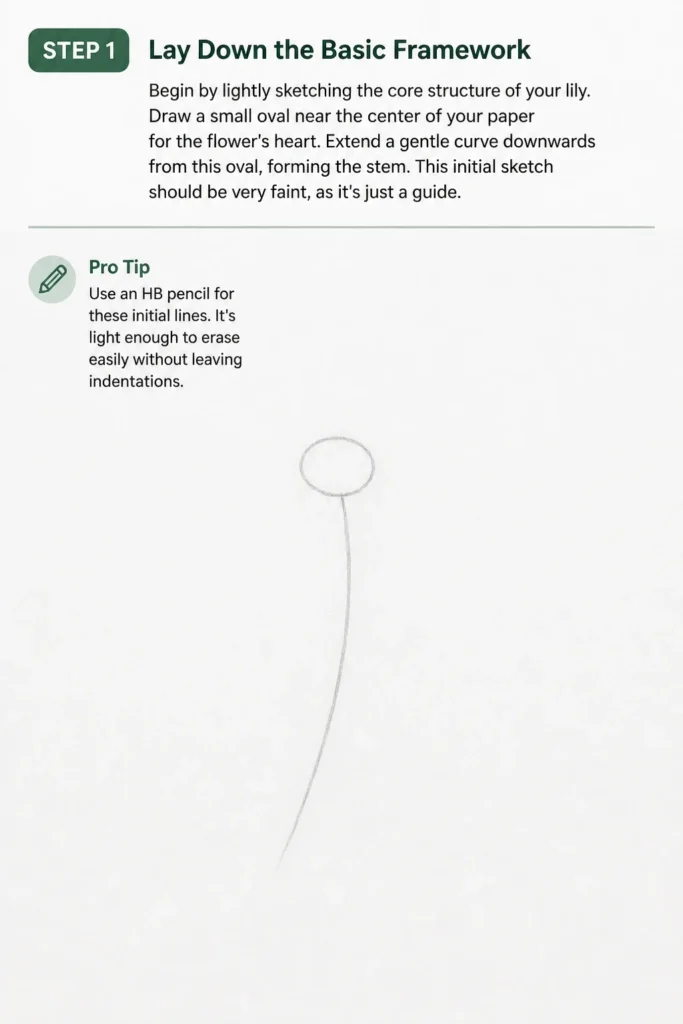
Draw a small oval near the center of your paper for the flower’s heart.
Extend a gentle curve downwards from this oval, forming the stem.
This initial sketch should be very faint, as it’s just a guide.
Pro Tip: Use an HB pencil for these initial lines. It’s light enough to erase easily without leaving indentations.
Step 2: Outline the Main Petal Shapes
Lilies typically have six petals, often arranged in two layers of three.
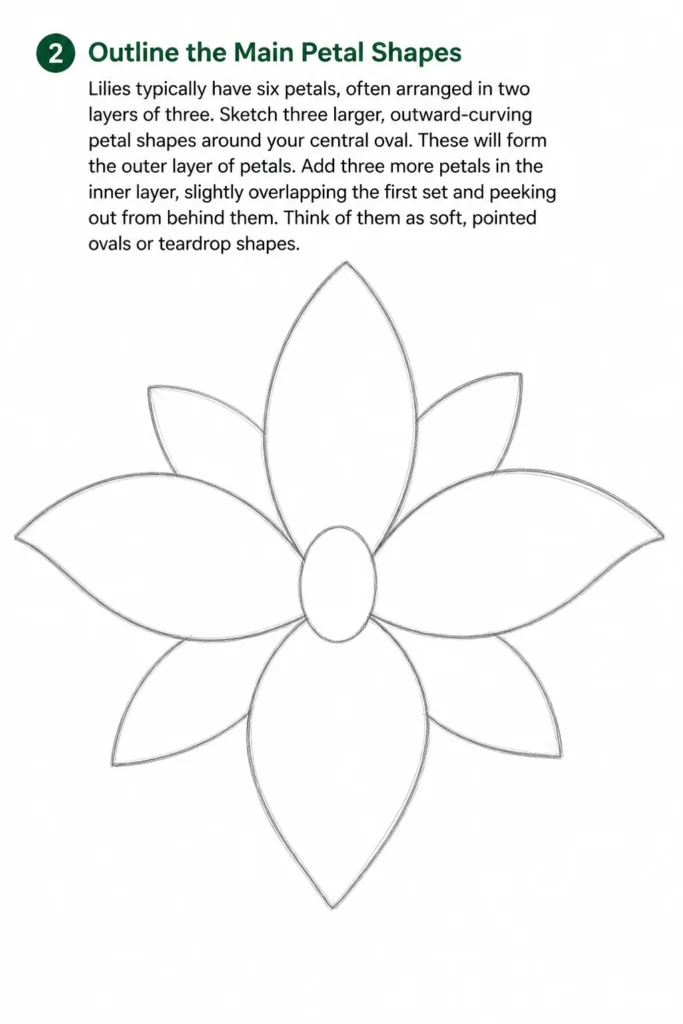
Sketch three larger, outward-curving petal shapes around your central oval.
These will form the outer layer of petals.
Add three more petals in the inner layer, slightly overlapping the first set and peeking out from behind them.
Think of them as soft, pointed ovals or teardrop shapes.
Step 3: Define the Petal Details and Curves
Now, refine the edges of each petal.
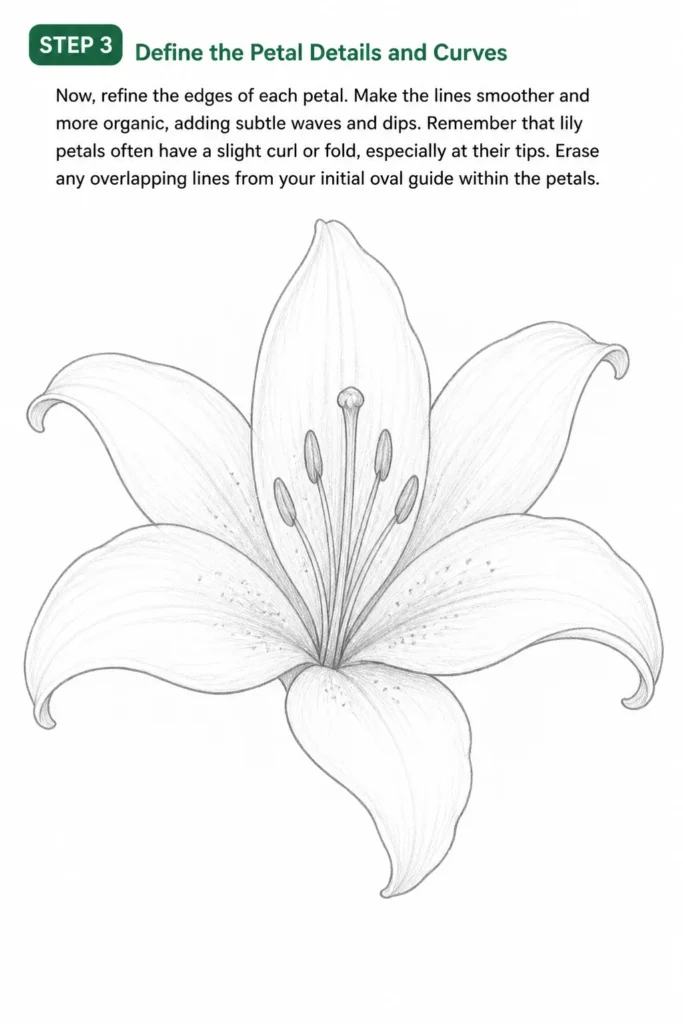
Make the lines smoother and more organic, adding subtle waves and dips.
Remember that lily petals often have a slight curl or fold, especially at their tips.
Erase any overlapping lines from your initial oval guide within the petals.
Step 4: Add the Stamens and Pistil
The center of a lily is distinctive with its prominent reproductive parts.
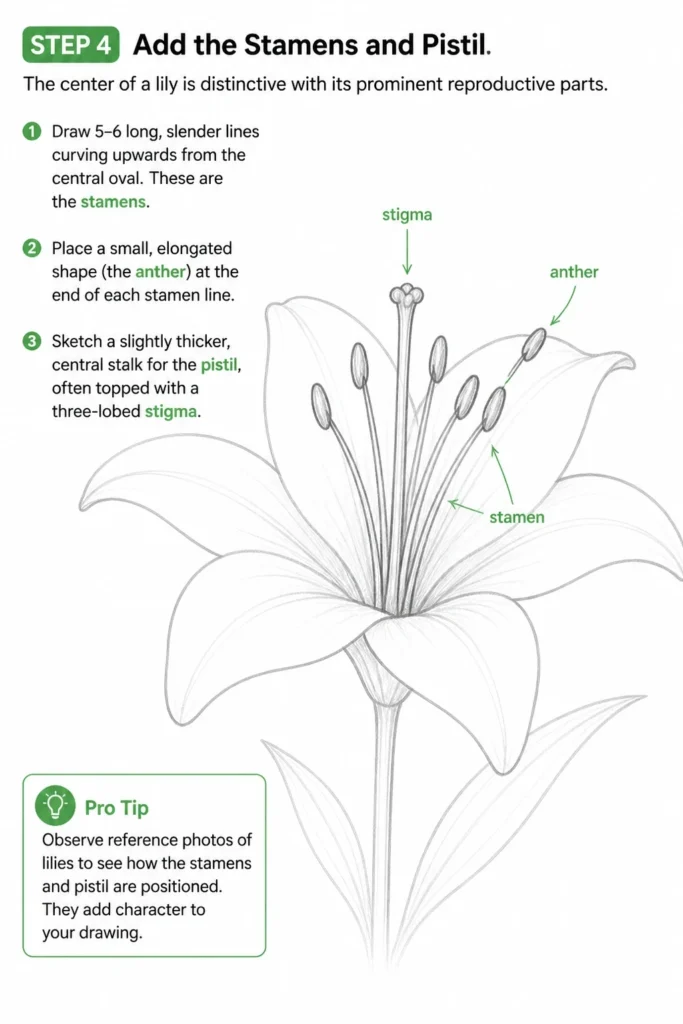
Draw 5-6 long, slender lines curving upwards from the central oval.
These are the stamens.
Place a small, elongated shape (the anther) at the end of each stamen line.
Sketch a slightly thicker, central stalk for the pistil, often topped with a three-lobed stigma.
Pro Tip: Observe reference photos of lilies to see how the stamens and pistil are positioned. They add character to your drawing.
Step 5: Develop the Stem and Leaves
The stem provides stability and connects the flower to its environment.
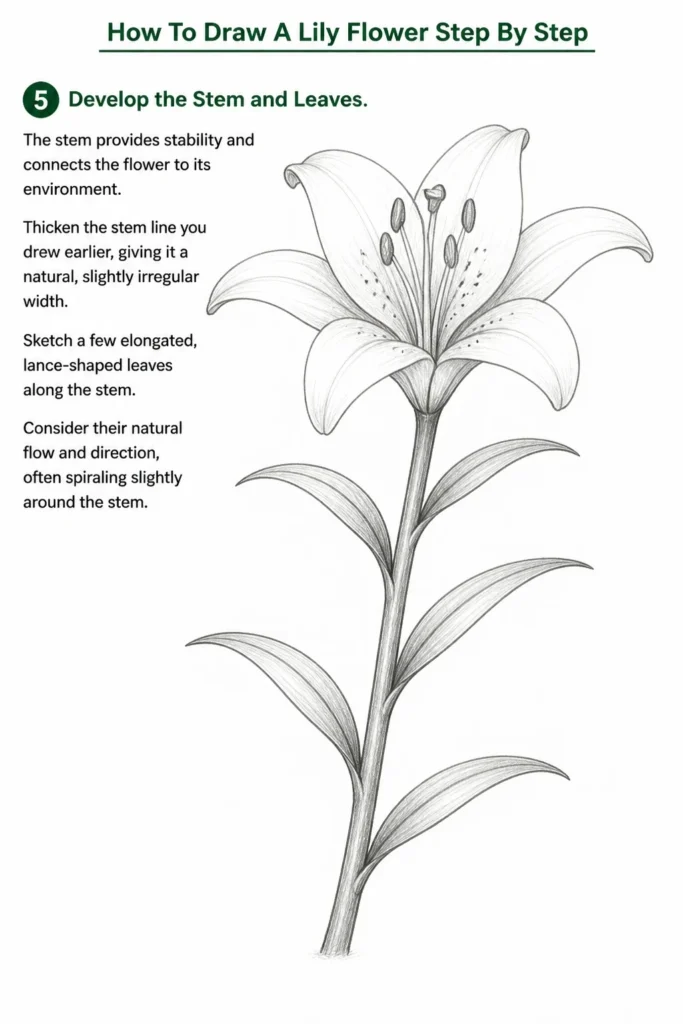
Thicken the stem line you drew earlier, giving it a natural, slightly irregular width.
Sketch a few elongated, lance-shaped leaves along the stem.
Consider their natural flow and direction, often spiraling slightly around the stem.
Step 6: Introduce Basic Shading and Form
Shading brings your lily to life, giving it depth and dimension.
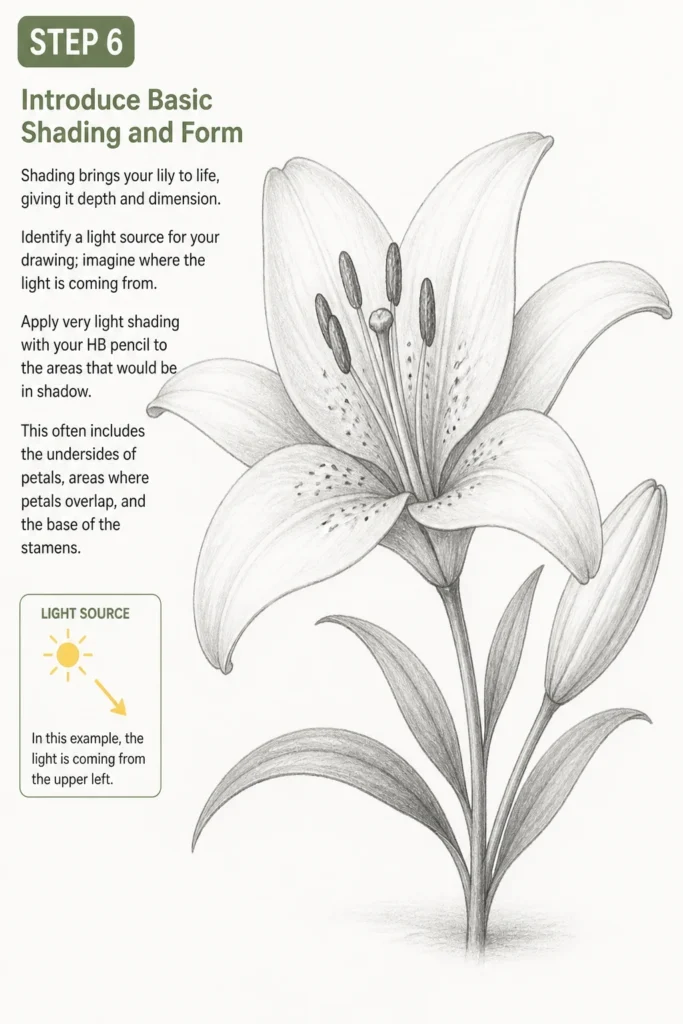
Identify a light source for your drawing; imagine where the light is coming from.
Apply very light shading with your HB pencil to the areas that would be in shadow.
This often includes the undersides of petals, areas where petals overlap, and the base of the stamens.
Step 7: Refine Shading and Add Texture
Gradually build up your shading using a 2B pencil for darker tones.
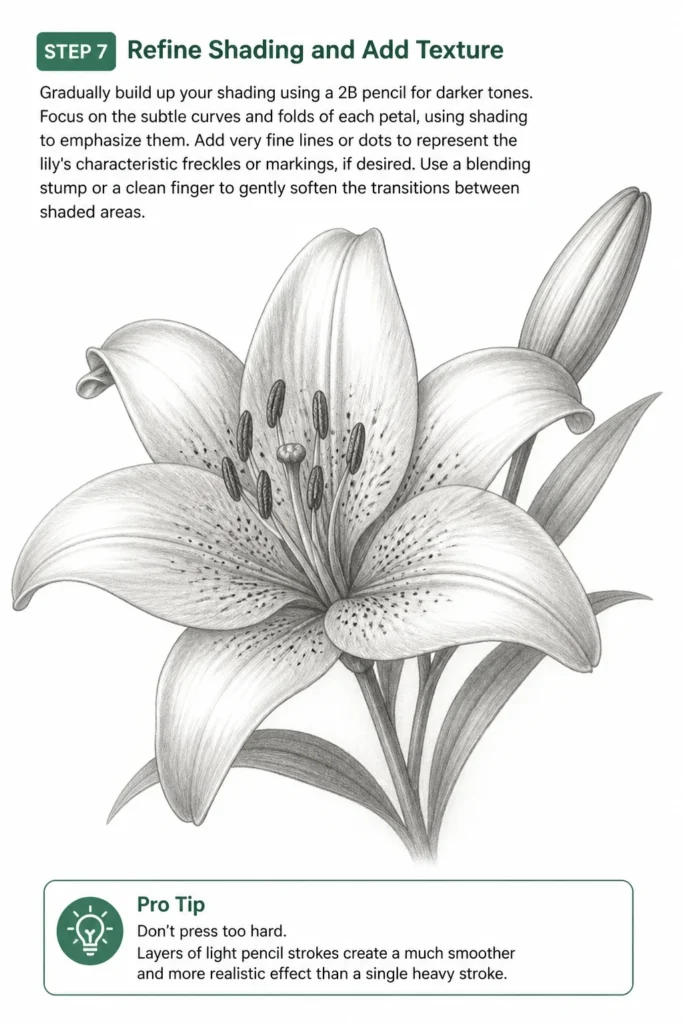
Focus on the subtle curves and folds of each petal, using shading to emphasize them.
Add very fine lines or dots to represent the lily’s characteristic freckles or markings, if desired.
Use a blending stump or a clean finger to gently soften the transitions between shaded areas.
Pro Tip: Don’t press too hard. Layers of light pencil strokes create a much smoother and more realistic effect than a single heavy stroke.
Step 8: Darken Key Areas and Add Contrast
A well-defined drawing benefits from good contrast.
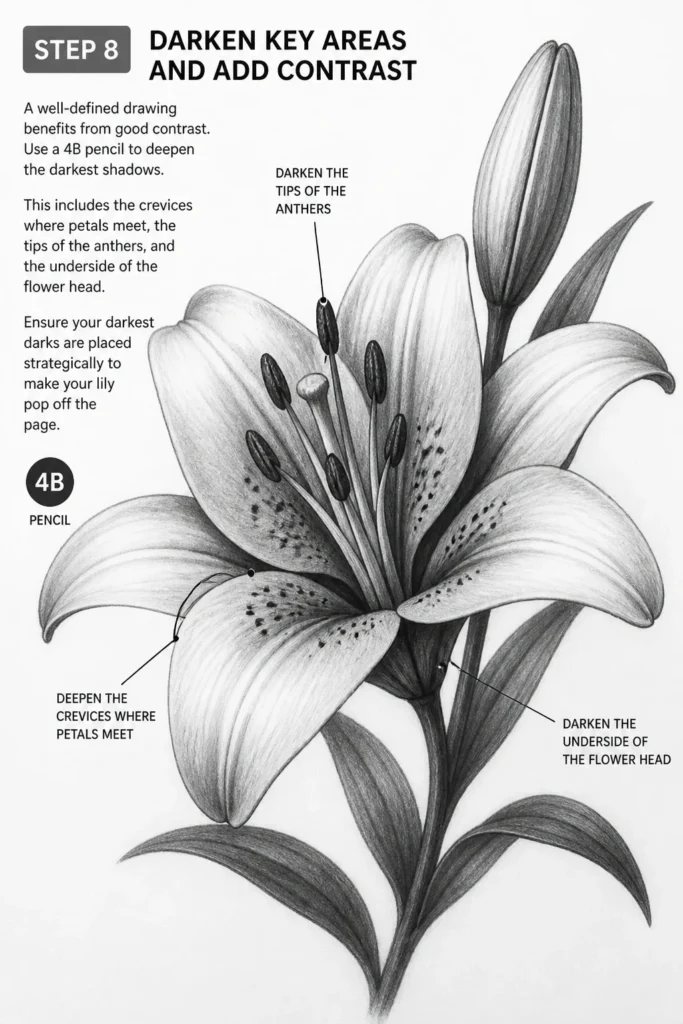
Use a 4B pencil to deepen the darkest shadows.
This includes the crevices where petals meet, the tips of the anthers, and the underside of the flower head.
Ensure your darkest darks are placed strategically to make your lily pop off the page.
Step 9: Final Touches and Erasing
Step back and review your entire drawing.
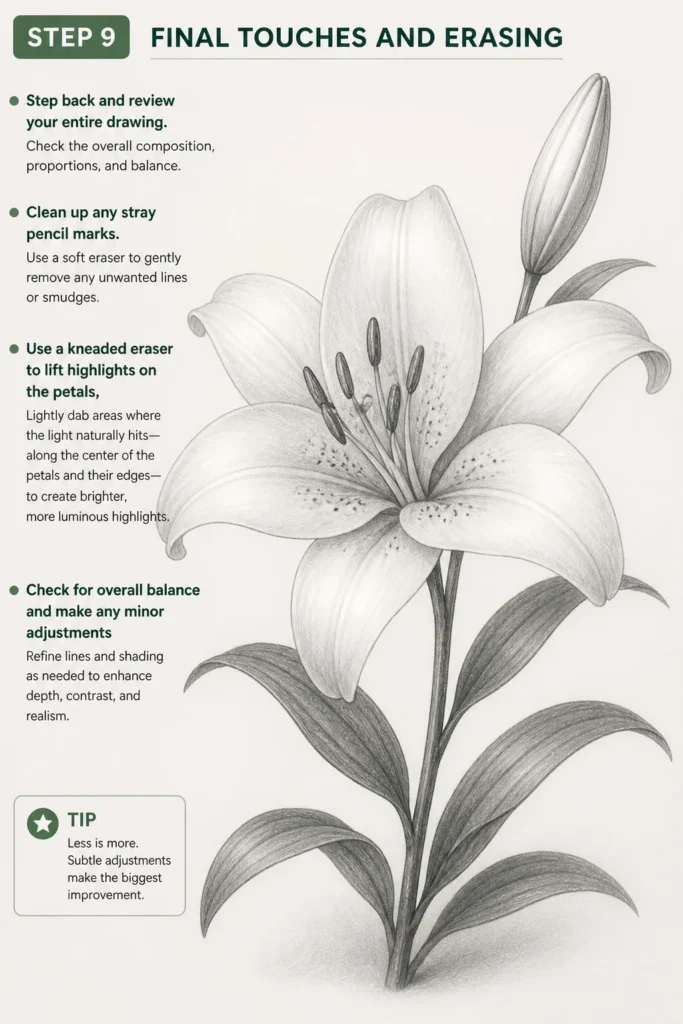
Clean up any stray pencil marks with your eraser.
Use a kneaded eraser to lift highlights on the petals, making them appear brighter and more luminous.
Check for overall balance and make any minor adjustments to lines or shading.
Common Mistakes to Avoid
Flat Petals
A common pitfall is drawing petals that look two-dimensional and lack volume. Lilies have soft, curved petals that often overlap and curl at the edges.
To correct this, think of each petal as a three-dimensional form. Use subtle shading along the edges and where petals overlap to suggest depth and their natural curvature.
Disproportionate Anatomy
Sometimes, the stamens and pistil might appear too large or too small compared to the petals, or the stem might be too thin.
Always start with light guide lines for the overall shape and size of the flower before adding details. Regularly compare the sizes of different elements to maintain a harmonious balance.
Lack of Depth
A drawing can look flat if there isn’t enough variation in tone and contrast. All lines and shading might be the same darkness.
Vary your pencil pressure and use different pencil grades (HB, 2B, 4B) to create a full range of values from light to dark. This contrast is crucial for giving your lily depth and making it feel real.
Over-Blending
While blending can create smooth transitions, over-blending can make your drawing look muddy and lose its crispness and texture.
Blend sparingly and intentionally. Focus on softening harsh edges rather than smudging everything. Allow some pencil strokes to remain visible to add texture and character.
Troubleshooting
My drawing looks stiff and unnatural.
This often happens when you focus too much on drawing perfect, straight lines. Lilies are organic and full of gentle curves.
Try drawing with a lighter hand and allowing your lines to flow. Practice drawing S-curves and C-curves without lifting your pencil. Observe real lilies or photos to understand their natural, slightly asymmetrical beauty.
I can’t get the petals to look symmetrical.
True symmetry in nature is rare. Striving for perfect symmetry can make your drawing look rigid and less lifelike.
Embrace slight imperfections. Focus on the overall balance and flow rather than mirror-image symmetry. Each petal can have its own unique curve and fold, which adds to the lily’s charm.
My shading looks messy or uneven.
Uneven shading usually comes from inconsistent pencil pressure or trying to shade too quickly.
Build your shading in light layers. Use small, circular motions or consistent parallel strokes. Gradually increase pressure or switch to a darker pencil grade for deeper shadows. A blending stump can help smooth out transitions, but remember to use it gently.
Key Takeaways
- Always start with light, basic shapes to establish the lily’s structure.
- Pay close attention to the unique curves and overlaps of the six petals.
- Include the distinct stamens and pistil to give your lily character.
- Use a variety of pencil grades to create a full range of tones and depth.
- Embrace natural imperfections; a lily’s beauty lies in its organic form.
- Practice light layering for smooth, realistic shading rather than heavy strokes.
Frequently Asked Questions
What’s the best type of paper for drawing lilies?
Smooth, medium-weight drawing paper (like Bristol board or cartridge paper) works well. It allows for crisp lines and smooth blending without tearing or excessive tooth that can interfere with fine details.
How do I make my lily drawing look more realistic?
Realism comes from careful observation and attention to light and shadow. Study reference photos closely, paying attention to how light hits the petals, where shadows fall, and the subtle textures or markings unique to lilies. Use varied pencil pressure to achieve a wide range of values.
Should I draw the background too?
Adding a simple, soft background can help your lily stand out. A blurred wash of color or a very lightly shaded area behind the flower can provide context without distracting from your main subject. For beginners, focusing solely on the flower is perfectly fine.
What if my drawing doesn’t look like a lily?
Don’t be discouraged! Drawing is a skill that improves with practice. Review your drawing against your reference. Did you capture the correct number of petals? Are the stamens prominent? Focus on one element at a time and keep practicing. Every attempt is a learning opportunity.
Our Top Recommended Finds
- Staedtler Mars Lumograph Pencils: These offer a fantastic range of graphite grades, from hard (HB) to very soft (8B), perfect for varied shading.
- Kneaded Eraser: Essential for lifting graphite gently, creating highlights, and cleaning up without smudging.
- Blending Stumps/Tortillons: These paper tools are excellent for smoothly blending graphite, giving your shading a professional, soft finish.
Embrace Your Artistic Journey
Drawing a lily is more than just putting lines on paper; it’s an act of observation and patience.
Each stroke brings you closer to understanding the beauty of nature and expressing it through your art.
Why not try drawing another flower, like a rose or a sunflower, applying these same foundational techniques?
Grab your pencil and paper today, and let your creativity bloom!