🌳 How To Draw A Tree Step By Step

& Painting
No rigid rules or pretension. Just practical guides, medium comparisons, and encouraging tips to help you enjoy the drawing & painting process.
Drawing a tree might seem simple, but capturing its unique character can be a delightful challenge. I remember feeling overwhelmed by the complexity of branches and leaves when I first started. This guide will break down that complexity into manageable, enjoyable steps, making it accessible for everyone.
You’ll discover how to create trees that feel alive, full of texture and depth. Trust me, with a few simple techniques, you’ll be drawing impressive trees in no time.
Quick Overview
This guide will walk you through creating a realistic tree drawing, focusing on fundamental shapes, textures, and shading. You’ll learn to observe and translate the organic beauty of nature onto paper. By the end, you’ll have a complete drawing and the confidence to tackle more complex natural forms.
- Time needed: 45-90 minutes (depending on detail)
- Difficulty: Beginner
- What you’ll need: Pencil (HB, 2B, 4B recommended), Eraser, Sketchbook or paper
Step-by-Step Instructions
Step 1: Understand the Basic Form and Structure
Every tree, no matter how grand, starts with a simple underlying shape. Begin by observing the general silhouette of the tree you want to draw. Is it tall and slender, wide and sprawling, or round and bushy?
Lightly sketch a basic geometric shape that encapsulates this overall form. This could be an oval, a rectangle, or even a triangle for a pine tree. Think of it as the tree’s personal cloud or container.
This initial shape acts as your guiding boundary. It helps you maintain proportions and ensures your tree doesn’t grow too unwieldy or lopsided as you add details.
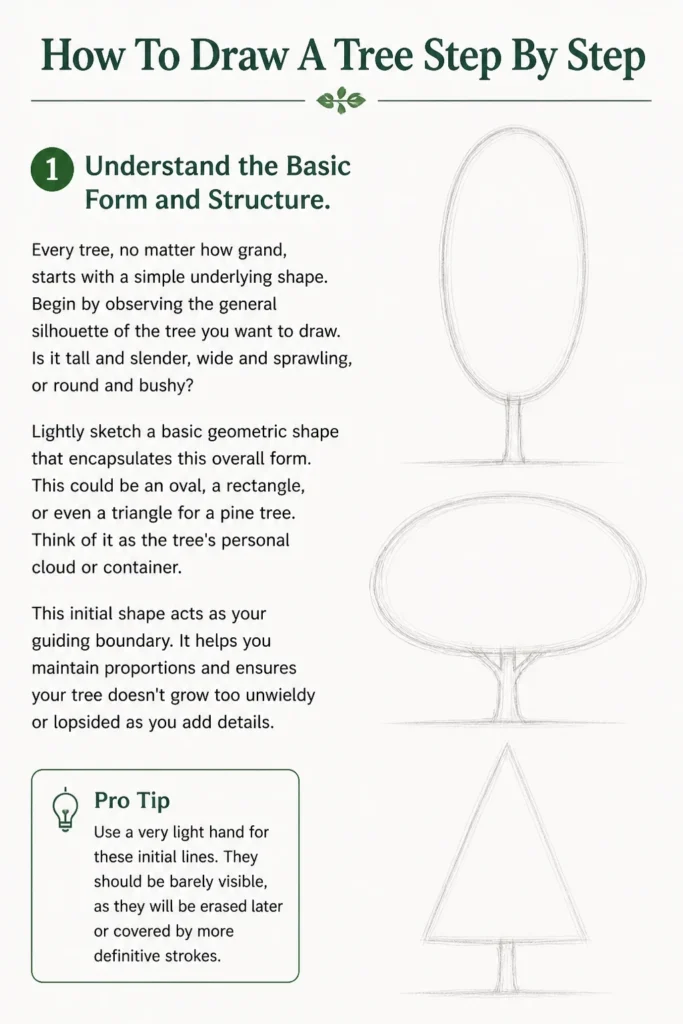
Pro Tip: Use a very light hand for these initial lines. They should be barely visible, as they will be erased later or covered by more definitive strokes.
Step 2: Establish the Trunk and Main Branches
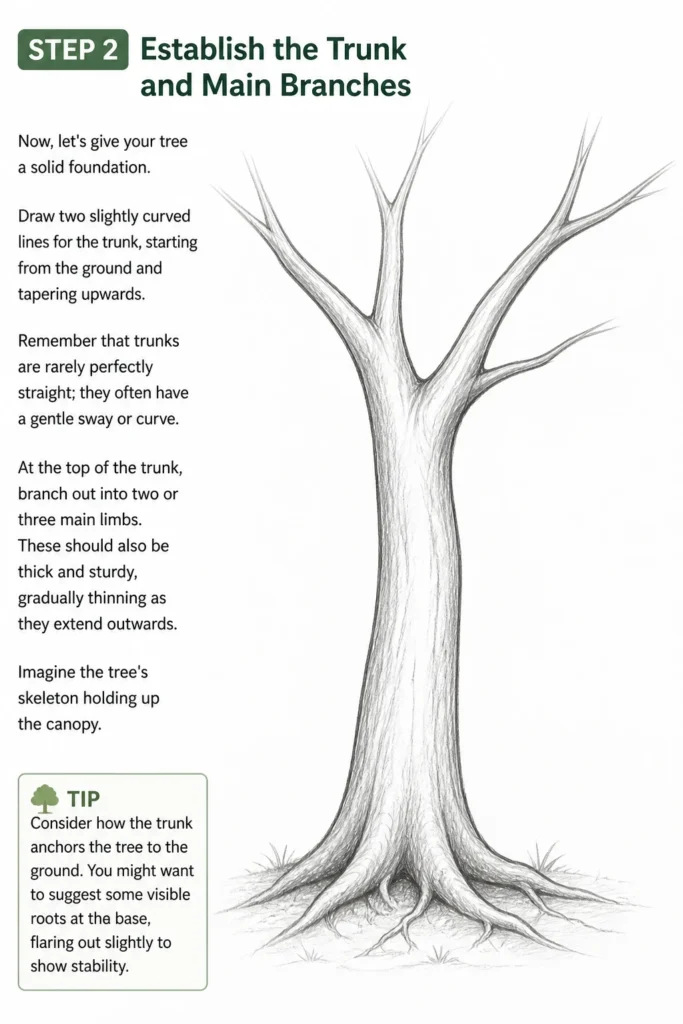
Now, let’s give your tree a solid foundation. Draw two slightly curved lines for the trunk, starting from the ground and tapering upwards. Remember that trunks are rarely perfectly straight; they often have a gentle sway or curve.
At the top of the trunk, branch out into two or three main limbs. These should also be thick and sturdy, gradually thinning as they extend outwards. Imagine the tree’s skeleton holding up the canopy.
Consider how the trunk anchors the tree to the ground. You might want to suggest some visible roots at the base, flaring out slightly to show stability.
Step 3: Map Out the Canopy’s Volume
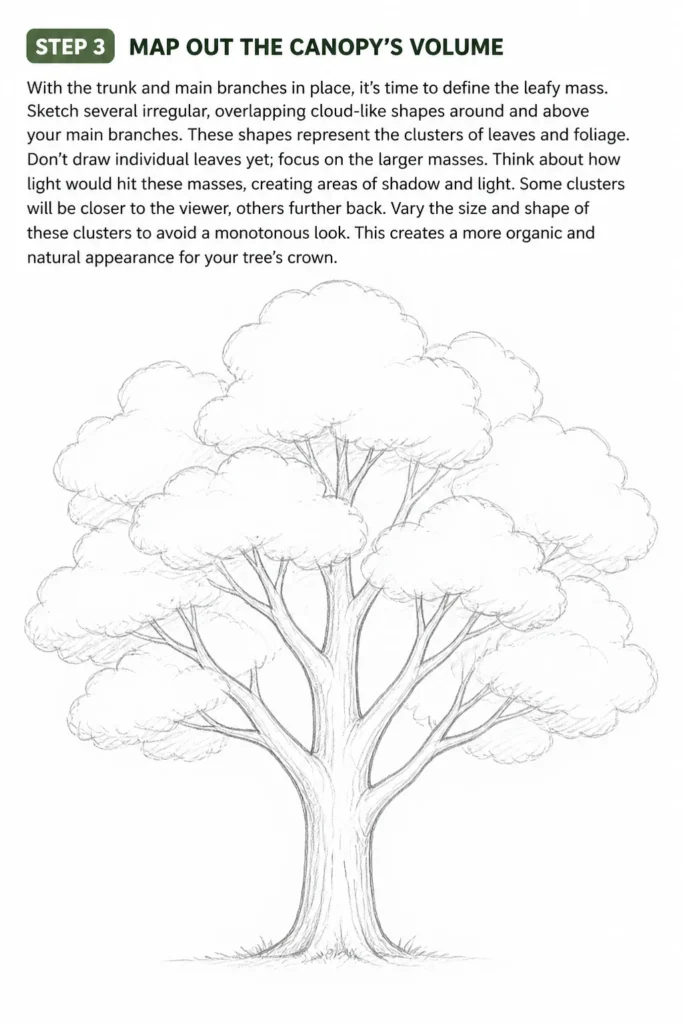
With the trunk and main branches in place, it’s time to define the leafy mass. Sketch several irregular, overlapping cloud-like shapes around and above your main branches. These shapes represent the clusters of leaves and foliage.
Don’t draw individual leaves yet; focus on the larger masses. Think about how light would hit these masses, creating areas of shadow and light. Some clusters will be closer to the viewer, others further back.
Vary the size and shape of these clusters to avoid a monotonous look. This creates a more organic and natural appearance for your tree’s crown.
Step 4: Refine Branch Structure and Smaller Twigs
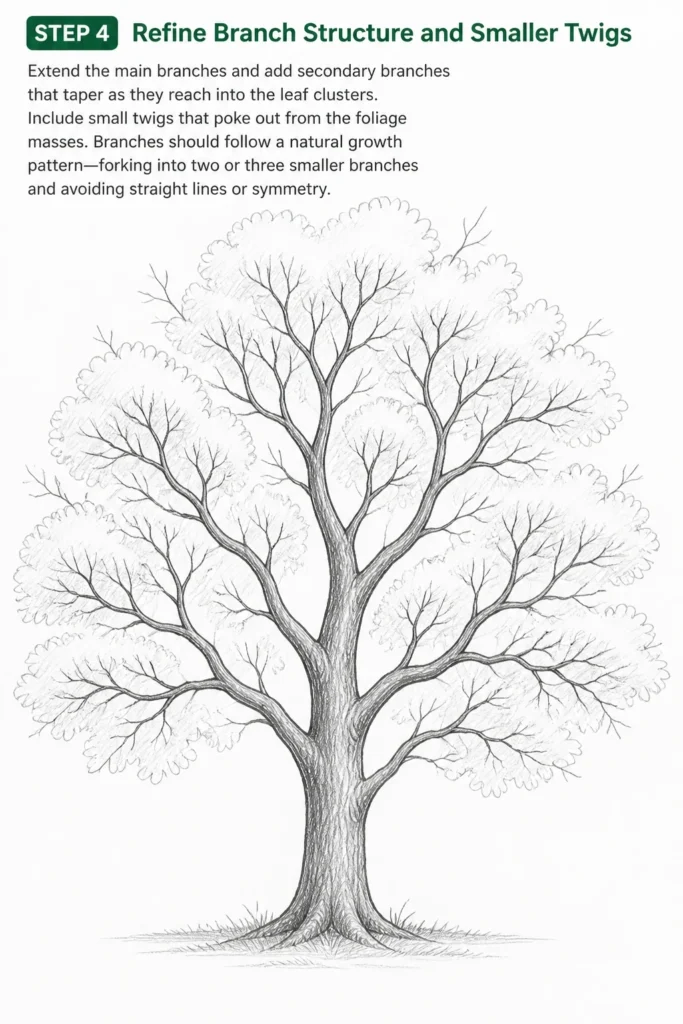
Go back to your main branches and extend them further. From these, draw smaller, thinner branches that reach into the leaf clusters you’ve outlined. These secondary branches should get progressively thinner as they move away from the trunk.
Don’t forget the tiny twigs that often poke out from the main leaf masses. These add important detail and realism. Make sure your branches follow a natural growth pattern, avoiding perfectly straight lines or symmetrical forks.
Observe how branches split and taper in real trees. They usually fork into two or three smaller branches, not just one. This natural division is key to a believable structure.
Step 5: Begin Adding Foliage Texture
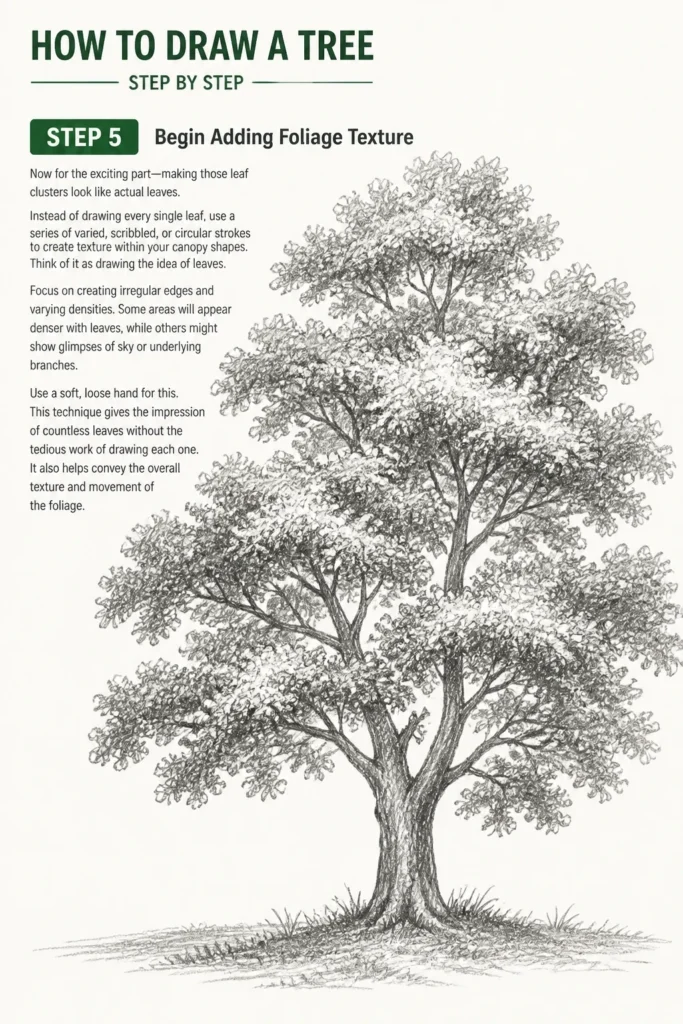
Now for the exciting part: making those leaf clusters look like actual leaves. Instead of drawing every single leaf, use a series of varied, scribbled, or circular strokes to create texture within your canopy shapes. Think of it as drawing the idea of leaves.
Focus on creating irregular edges and varying densities. Some areas will appear denser with leaves, while others might show glimpses of sky or underlying branches. Use a soft, loose hand for this.
This technique gives the impression of countless leaves without the tedious work of drawing each one. It also helps convey the overall texture and movement of the foliage.
Step 6: Introduce Light and Shadow (Form Shading)
Light and shadow are essential for giving your tree depth and dimension. Decide on a light source; is it coming from the left, right, or above? This will determine where your shadows fall.
Shade the areas of the canopy that are furthest from the light source. These will typically be the underside of leaf clusters or areas tucked away within the tree’s volume. Use a slightly darker pencil (like a 2B or 4B) for these shadows.
Also, add some shadow to the side of the trunk opposite your light source. This simple step transforms a flat drawing into a three-dimensional form.
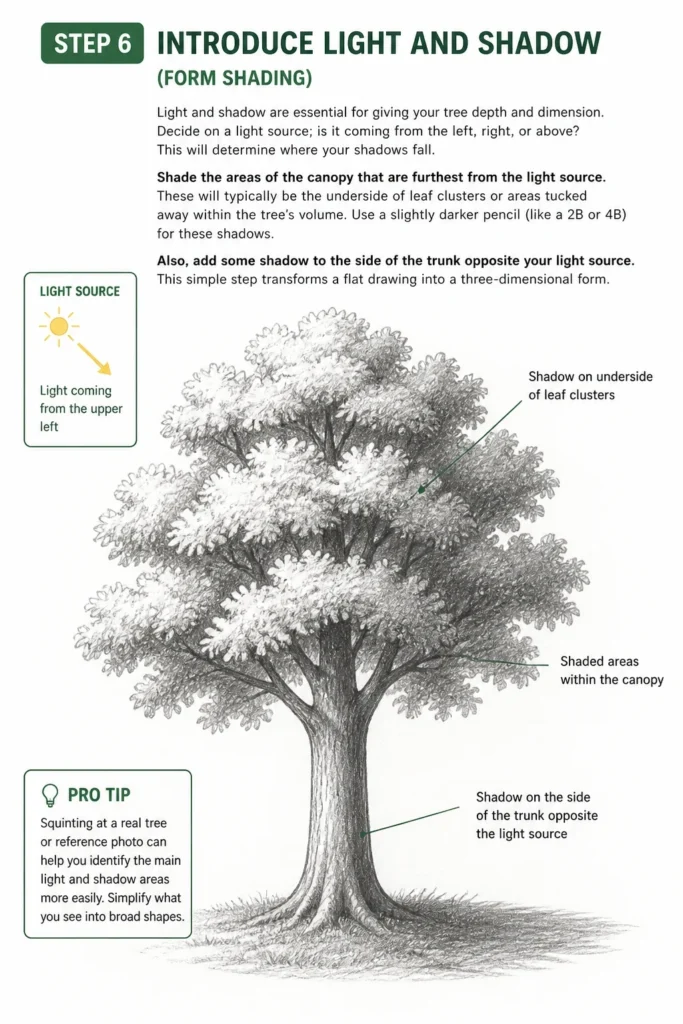
Pro Tip: Squinting at a real tree or reference photo can help you identify the main light and shadow areas more easily. Simplify what you see into broad shapes.
Step 7: Add Details and Refine Textures
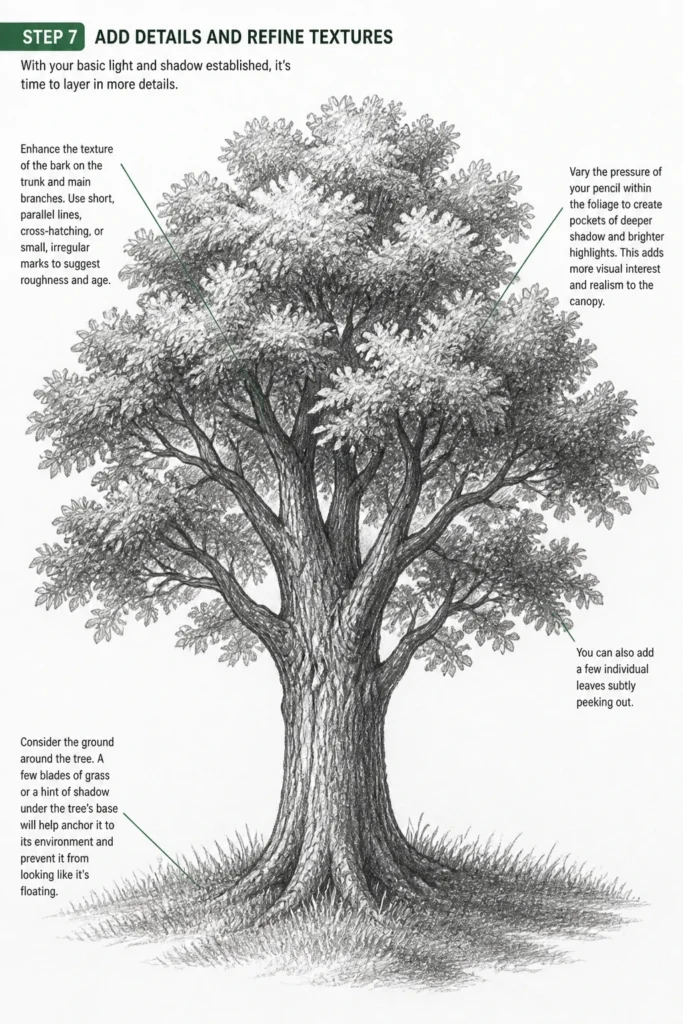
With your basic light and shadow established, it’s time to layer in more details. Enhance the texture of the bark on the trunk and main branches. Use short, parallel lines, cross-hatching, or small, irregular marks to suggest roughness and age.
Vary the pressure of your pencil within the foliage to create pockets of deeper shadow and brighter highlights. This adds more visual interest and realism to the canopy. You can also add a few individual leaves subtly peeking out.
Consider the ground around the tree. A few blades of grass or a hint of shadow under the tree’s base will help anchor it to its environment and prevent it from looking like it’s floating.
Step 8: Final Touches and Review
Step back and examine your drawing. Are the proportions correct? Does the light source make sense throughout the tree? Erase any visible initial sketch lines that are no longer needed.
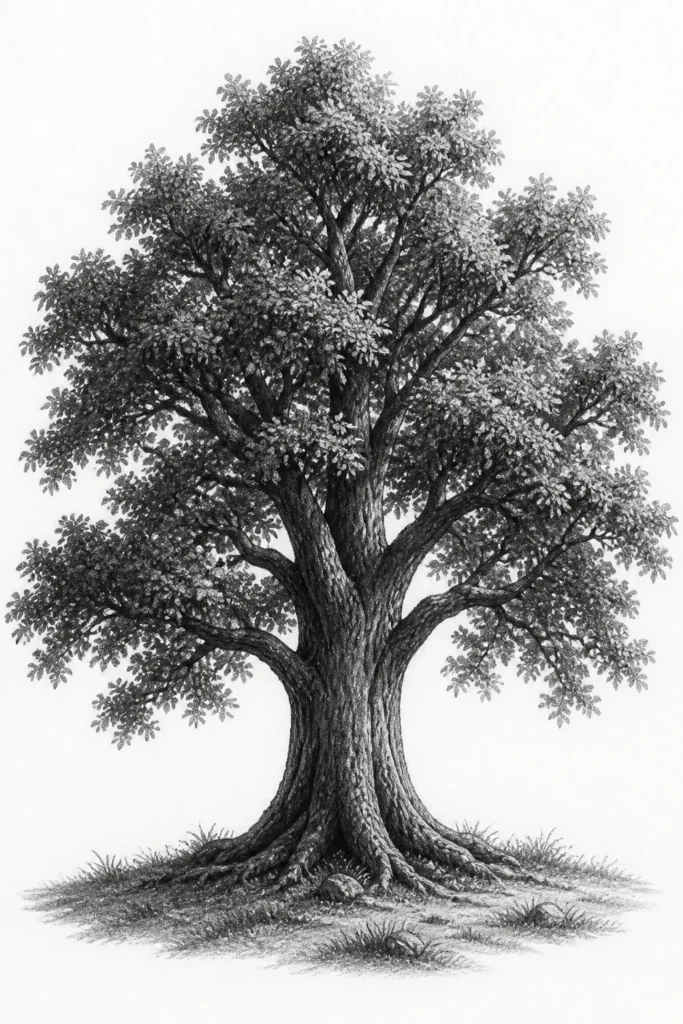
Darken key areas to increase contrast, especially where shadows are deepest or where the tree meets the ground. A good range of darks and lights makes a drawing pop. Make any final adjustments to balance and overall composition.
This final review allows you to catch any inconsistencies and bring your drawing to a polished finish. Don’t be afraid to make small corrections to improve the overall impact.
Common Mistakes to Avoid
Drawing a “Lollipop” Tree
Many beginners draw trees with a perfectly round, symmetrical canopy sitting on a straight trunk. This creates an unnatural, cartoonish look. Real trees have irregular, organic shapes, with branches and foliage extending unevenly.
To correct this, always vary the outline of your canopy. Let some branches extend further than others, and create irregular, cloud-like clumps of leaves. Embrace asymmetry and the natural randomness of growth.
Neglecting the Trunk and Branch Structure
Sometimes artists focus too much on the leaves and forget the tree’s underlying skeleton. A weak or poorly drawn trunk and branches can make the entire tree look flimsy or unbelievable, even if the foliage is well-rendered.
Always establish a sturdy, tapering trunk and strong, believable main branches first. Ensure they fork naturally and progressively thin out. Think of them as the support system for the entire tree.
Lack of Light and Shadow
A common error is drawing a tree entirely with outlines and flat tones. Without light and shadow, your tree will look flat and two-dimensional, lacking depth and realism. This makes it appear less alive.
Always establish a clear light source and then apply shading to create volume. Darken the areas furthest from the light and leave areas facing the light brighter. This immediately brings your tree to life and gives it form.
Over-detailing Individual Leaves
Trying to draw every single leaf in a canopy is not only tedious but often results in a cluttered, overwhelming drawing. It can make the tree look stiff and artificial, losing the overall impression of a leafy mass.
Instead of individual leaves, focus on suggesting clusters and textures. Use varied, irregular strokes to imply foliage. Concentrate on the overall form, light, and shadow, letting your eye interpret the details.
Troubleshooting
My Tree Looks Flat and Lifeless
If your tree appears flat, it’s likely missing crucial elements of dimension. The primary cause is often a lack of proper light and shadow. Without these, the tree has no form.
Solution: Re-evaluate your light source. Identify the parts of the canopy and trunk that would be in shadow and those in light. Apply darker tones to the shadowed areas and lighter tones to the illuminated parts. Use a range of pencil pressures to create contrast and depth.
The Foliage Looks Like a Solid Mass, Not Leaves
When the leaf clusters appear too uniform or dense, they can lose the characteristic texture of foliage. This happens when there isn’t enough variation in your strokes or density.
Solution: Vary your strokes. Instead of uniform scribbles, use a mix of short, broken lines, small circular motions, and irregular marks. Create some areas where the foliage is denser and darker, and others where it’s lighter and more sparse, allowing glimpses of sky or branches through.
My Branches Look Unnatural or Stiff
Branches that are too straight, symmetrical, or evenly spaced can make a tree look artificial. Real branches grow organically, with twists, turns, and varying thicknesses.
Solution: Go back and add more organic curves and slight irregularities to your branches. Ensure they taper naturally from thick to thin. Practice drawing branching patterns from real trees or reference photos to understand their natural growth habits. Think about how they would reach for light.
Key Takeaways
- Start with Basic Shapes: Always begin by outlining the tree’s general silhouette to establish overall proportions.
- Build a Strong Skeleton: Focus on a sturdy, tapering trunk and naturally branching limbs before adding leaves.
- Suggest, Don’t Detail: Use varied strokes and clusters to imply foliage rather than drawing every single leaf.
- Embrace Light and Shadow: Apply shading based on a consistent light source to give your tree three-dimensional form and depth.
- Vary Textures: Use different marks for bark and leaves to add realism and visual interest.
- Observe Nature: Pay attention to how real trees grow, branch, and interact with light for more authentic drawings.
Frequently Asked Questions
What type of pencil is best for drawing trees?
A good range of graphite pencils is ideal. An HB pencil is great for initial sketches and lighter tones. A 2B or 4B pencil works well for mid-tones and darker shadows, allowing you to build depth effectively.
How do I make my tree look less like a “stick with a ball on top”?
The key is to avoid perfect symmetry and embrace irregularity. Ensure your trunk tapers, and your branches fork naturally. For the canopy, use irregular, overlapping cloud-like shapes instead of a single round one, and vary the texture within these shapes.
Should I draw the background first or the tree?
Generally, it’s best to draw the main subject (the tree) first to establish its form and position. Then, you can add background elements, making sure they complement the tree without overpowering it. Sometimes, a light sketch of the horizon line helps to ground the tree.
How do I make my tree look old versus young?
Older trees typically have thicker, gnarled, and more textured trunks with deeper bark lines. Their branches might be more sprawling and twisted, and their canopy often appears more sparse or irregular. Younger trees tend to have smoother bark, straighter trunks, and a denser, more compact canopy.
Our Top Recommended Finds
- Quality Sketchbook: A good sketchbook with paper that can handle multiple layers of graphite is essential for practice.
- Graphite Pencil Set: A set ranging from 2H to 6B will give you all the versatility you need for varied tones and textures.
- Kneaded Eraser: This type of eraser is perfect for lifting graphite gently without smudging and for creating highlights.
Your Artistic Journey Begins Now
You’ve just taken the first step towards drawing beautiful, lifelike trees. Remember, every stroke is a learning opportunity, and practice truly makes a difference. Don’t be afraid to experiment with different tree types and environments.
Now, grab your pencil and paper and start sketching. Try drawing the tree outside your window, or use a reference photo that inspires you. Keep exploring, keep creating, and watch your artistic skills grow with every drawing.
& Painting
No rigid rules or pretension. Just practical guides, medium comparisons, and encouraging tips to help you enjoy the drawing & painting process.