🐱 How To Draw A Cat Step By Step Easy
I remember my first attempts at drawing cats often looked more like lumpy potatoes with ears.
It was frustrating, but I soon discovered that breaking down the process into simple shapes made all the difference.
This guide shares those easy, actionable steps I learned, helping you create an adorable feline friend, no matter your current skill level.
Quick Overview
This guide will equip you with the fundamental skills to sketch a charming cat, transforming simple shapes into a recognizable pet.
You’ll learn how to build your drawing layer by layer, making the process enjoyable and achievable for anyone.
- Time needed: 30-60 minutes
- Difficulty: Beginner
- What you’ll need: Pencil (HB recommended), eraser, paper, optional fine-liner, optional colored pencils
Step-by-Step Instructions
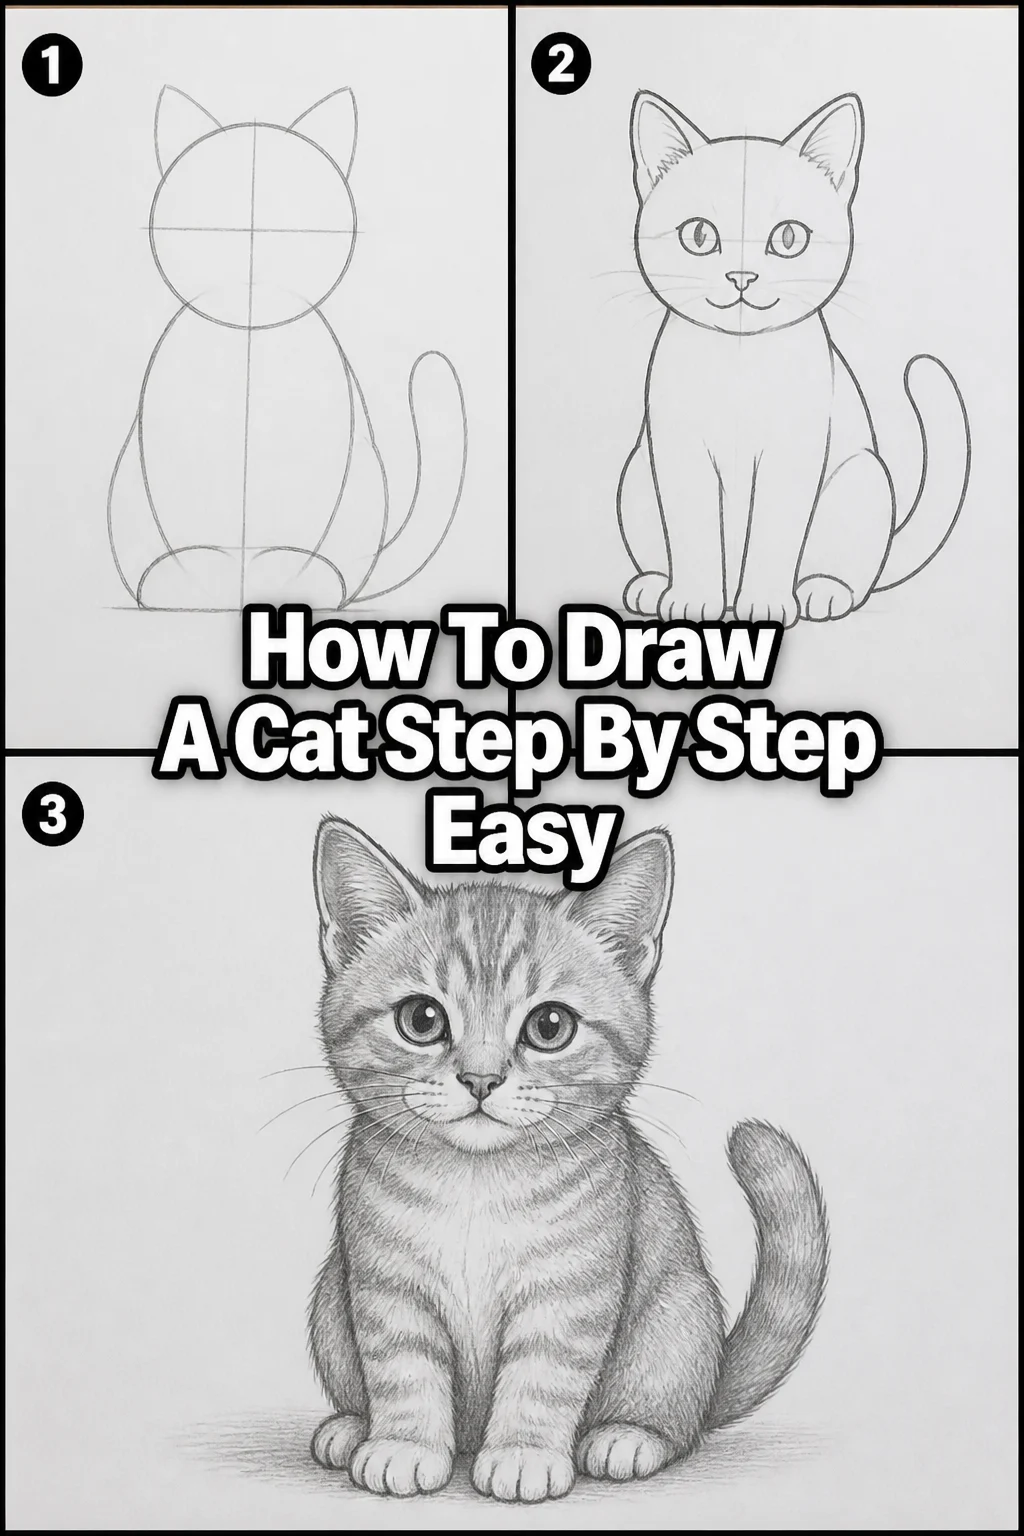
Step 1: Start with Basic Shapes for the Head and Body
Begin by lightly sketching two primary shapes on your paper.
Draw a medium-sized circle for the cat’s head, placing it towards the top-center of your page.
Below this, slightly overlapping, sketch a larger oval for the body. Think of it as a slightly flattened egg shape.
Pro Tip: Use very light pencil strokes for these initial shapes. These are just guides, and you’ll erase them later. Pressing too hard will leave indentations.
Step 2: Connect the Head and Body with a Neck
Now, it’s time to give your cat a neck. Draw two gentle, curving lines that connect the bottom of the head circle to the top of the body oval.
These lines should flow smoothly, creating a natural transition between the two main masses.
Avoid making the neck too thin or too thick; aim for a balanced appearance.
Step 3: Add the Ears and Muzzle Guide
Let’s define the head further. Sketch two triangles on top of the head circle for the ears.
Place them slightly to the sides, not directly on top, with the points facing upwards.
For the muzzle, draw a smaller, slightly flattened circle or oval towards the bottom-center of the head circle.
This will serve as a guide for placing the nose and mouth later.
Step 4: Sketch the Legs and Paws
Now, let’s give your cat something to stand on. Draw simple cylinder or rectangular shapes for the legs extending from the body oval.
Cats typically have four legs, so plan for two front and two back legs, even if only partially visible.
At the end of each leg, add small, rounded ovals or bean shapes for the paws.
Pro Tip: Observe how a cat’s legs bend. The front legs are relatively straight, while the back legs have a distinct ‘kink’ at the hock joint, like an inverted knee. Keep them slightly bent for a more natural look.
Step 5: Draw the Tail
A cat’s tail is full of expression. Sketch a long, curving line extending from the back of the body oval.
Make the tail thicker at the base and gradually taper it towards the tip.
You can give it a gentle curve, a playful curl, or even an upright question mark shape.
Experiment with different tail positions to convey different moods.
Step 6: Refine the Face Features
This step brings your cat to life. Draw two almond-shaped eyes above the muzzle guide, slightly angled upwards at the outer corners.
Inside each eye, add a small circle for the pupil, or a vertical slit for a more feline look.
For the nose, sketch a small, inverted triangle or a rounded ‘W’ shape at the top of your muzzle guide.
From the bottom of the nose, draw two curving lines downwards and outwards, forming an inverted ‘Y’ for the mouth.
Pro Tip: The space between the eyes is roughly equal to the width of one eye. This helps maintain good proportions. Add tiny highlights in the eyes to give them sparkle.
Step 7: Outline and Erase Guide Lines
Once you’re happy with your sketch, it’s time to commit to your final lines. Carefully trace over your desired pencil lines with a slightly firmer hand or a fine-liner pen.
Focus on creating smooth, confident strokes for the cat’s silhouette.
After your final lines are in place (and dry, if using a pen), gently erase all the initial light guide lines and any unwanted sketch marks.
This cleaning process makes your drawing look much crisper and professional.
Step 8: Add Details and Shading (Optional)
Now, for the finishing touches. Draw whiskers extending from the muzzle area, using light, flowing lines.
You can also add some subtle fur texture by sketching short, feathery lines along the edges of the cat’s body, especially around the neck and paws.
For depth, apply some light shading under the chin, on the underside of the body, and behind the legs.
This simple shading makes your cat appear more three-dimensional.
Pro Tip: Don’t overdo the fur texture. A few well-placed lines are more effective than covering the entire cat in scribbles. Focus on areas where fur would naturally clump or change direction.
Common Mistakes to Avoid
Drawing Too Darkly From the Start
Many beginners press down too hard with their pencil during the initial sketching phases.
This makes it incredibly difficult to erase mistakes or refine shapes without leaving stubborn marks on the paper.
Always start with the lightest possible touch, building up your lines gradually as you become more confident in your forms.
Disproportionate Features
A common pitfall is making one feature, like the head or eyes, too large or too small compared to the rest of the body.
This can make your cat look unbalanced or even cartoonish, unless that’s your specific intention.
Regularly step back and compare the sizes of different parts. Use your initial basic shapes as a guide to maintain overall harmony.
Stiff, Unnatural Poses
Cats are fluid and graceful creatures, but beginners often draw them with very rigid, straight lines.
This results in a cat that looks stiff and lifeless, lacking the characteristic feline elegance.
Always incorporate gentle curves into your lines, especially for the back, tail, and legs, to capture that natural movement.
Forgetting to Erase Guide Lines
Leaving your initial construction lines visible is a clear sign of an unfinished drawing.
These lines, while helpful during the process, can distract from the final form and make your artwork appear messy.
Make sure to gently and thoroughly erase all preliminary sketches once your final outline is complete.
Troubleshooting
My Cat Looks Flat/Lifeless
If your drawing lacks dimension, it’s likely missing subtle cues that create depth.
Try adding a small amount of shading under the chin, on the underside of the body, and where limbs meet the torso.
Varying the thickness of your outline—making lines slightly darker or thicker in areas that would be in shadow or closer to the viewer—can also add life.
I Can’t Get the Eyes Right
Eyes are crucial for expression, and they can be tricky. If they look off, focus on their placement and shape.
Ensure they are symmetrical and correctly spaced relative to the nose and muzzle guide.
Remember the almond shape, and don’t forget to add a tiny highlight within each pupil; this small detail instantly brings sparkle and life to the gaze.
The Proportions Are Still Off
If your cat’s parts still don’t seem to fit together, revisit your initial basic shapes.
Are the head circle and body oval the correct relative sizes? Are they positioned well on the page?
Sometimes, simply rotating your paper or stepping back to view your drawing from a distance can help you spot imbalances you missed up close.
Key Takeaways
- Always begin your drawing with very light, simple geometric shapes as your foundation.
- Use gentle, flowing curves rather than straight, rigid lines to capture a cat’s natural grace.
- Pay close attention to the relative size and placement of features to maintain good proportions.
- Don’t be afraid to use your eraser; it’s an essential tool for refining your artwork.
- Adding subtle details like whiskers, fur texture, and light shading brings your drawing to life.
- Practice is the most important ingredient in improving your drawing skills and confidence.
Frequently Asked Questions
What if my first attempt isn’t perfect?
That’s completely normal and expected! Drawing is a skill that improves with practice and patience.
Every artist starts somewhere, and each attempt, perfect or not, is a valuable learning experience.
Focus on enjoying the process and celebrating your progress, no matter how small.
How can I make my cat drawings more unique?
To add personality, try experimenting with different cat breeds, each with distinct facial features or body types.
Play with various poses—a sleeping cat, a stretching cat, or a playful cat—and explore different facial expressions.
Adding unique fur patterns or accessories like a collar can also make your cat one-of-a-kind.
What kind of pencil should I use?
For initial sketching and guide lines, an HB pencil is ideal because it’s light and easy to erase.
For outlining and adding darker details, a 2B or 4B pencil offers richer, darker lines.
A basic pencil set with varying lead hardness is a great investment for any aspiring artist.
Is it okay to trace?
Tracing can be a helpful tool for understanding shapes, proportions, and muscle memory when you’re starting out.
It can build confidence and help you internalize forms.
However, always balance tracing with freehand drawing to truly develop your own artistic eye and skill.
Our Top Recommended Finds
- Sketchbook with Quality Paper: A good sketchbook with paper that can handle erasing without tearing or pilling makes the drawing process much more enjoyable and less frustrating.
- Pencil Set (HB, 2B, 4B): Having a range of pencil hardness allows you to sketch lightly, create strong outlines, and add soft shading, providing versatility for all your drawing needs.
- Kneaded Eraser: Unlike traditional erasers, a kneaded eraser lifts graphite gently from the paper without smudging or damaging the surface, perfect for correcting light guide lines.
Your Feline Masterpiece Awaits!
You’ve now walked through all the essential steps to draw an adorable cat.
Remember that drawing is a journey, not a destination, and every line you draw refines your skill.
Don’t stop here! Try drawing your cat in different poses, with varied expressions, or even experiment with different cat breeds.
Grab your pencil today and let your creativity flow, bringing more charming feline friends to life on your page.